Pages

Friday 29 August 2014

Welcome Bonnie as guest and who are the new challenge winners?

It is always such a pleasure to introduce a new guest here at A Vintage Journey and today we have the lovely Bonnie McLain joining us. Bonnie was the winner of the Dies and Distress challenge and she is sharing some amazing ATCs with us.

Hi
My Name is Bonnie McLain… and at times I am referred to as Love, Light and Peace…Bonnie.. (that is the way I have signed my name for a long long time now).
I have been in the art field for over 50 years… and have done a lot of different professional art such as; Fashion design, fabric design in New York City Garment district…. art therapy in psychiatric hospitals; designed and manufactured a line of country gifts that my husband and I produced from Aromatic Red Cedar and created a cottage industry for over 40 people. I have designed and also manufactured a line of hand wrapped jewelry. So I have been in the art business and field for a lovingly long time. I love it now more than ever, as it is all fun and games. I presently teach and have a nice studio in my home. What could be more perfect. Doing challenges is a fun and learning experience for me in so many ways… and also meeting people from around the world. I have been on Design Teams, and also had web sites and blogs for over 12 years now… all very exciting… I personally feel that once we stop learning and meeting others, our life will stop pretty soon… so I keep active in that area as much as possible… I do many different kinds of art even now, from knitting, spinning, felting, painting, metal wrapping, book making, Zentangling, sewing, quilting, making our clothes, basket making, journaling, all kinds of health situations, and cooking, along with canning and preserving our foods for the year.
On a more personal note, I have been married to my sweet and adoring soulmate for 45 years now.. and we have a daughter (who is a potter) and a son who is a chain saw carver… and between them we have two grandsons also. My Husband has always been an artist also… but it was never really been developed until he was in his 40’s… now he uses his art in many ways… from building to also sculpting pieces of wood and logs. We presently have an organic farm in the western mountains of North Carolina…. and live a very ‘clean’ life (chemically free) as much as possible.
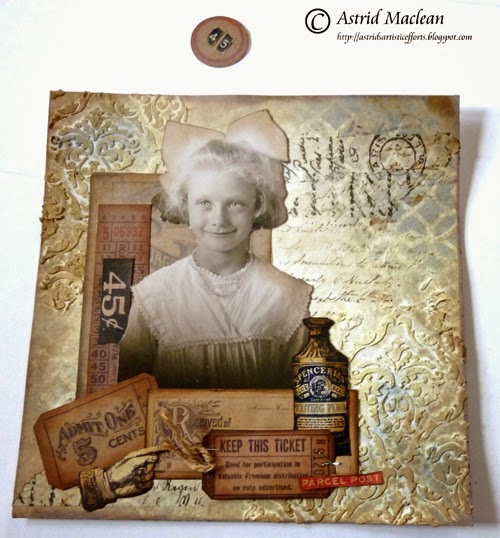
Okay… now you know a little bit about me… I am very prolific in my art making and love to create also in the kitchen… if you have ever been to my blog (lovelightandpeacebonnie.blogspot.com) you will know what I am saying is the truth. So please go after you see these ATC’s and you will see all kinds of ATC’s that I have just created for this challenge… but also that have been created over the years to trade with others… as I use to trade with over 75 gals on a monthly basis… so I have seen many and traded way too many ATC’s… ATC’s are like tags to me… (a little smaller, but the same) in that you can add an ATC or a tag to a card and send it to someone special… so CREATE AWAY and enjoy making these…

ATC1ATC2ATC3ATC4
Wow Bonnie, thank you so much for making all these wonderful ATCs, there is just so much to see and so many wonderful details to take in, they really are the most amazing collection.

………………………………………………………………………………

Well, who is going to be the winner of our last challenge? Chris was our host and along with the other Creative Guides she has chosen a fabulous winner and three new Pinworthy mentions.

Without further ado ……………….
the winner of our Time Flies challenge is
……………
Janna's beautiful piece of art is a creative and original piece of home decor depicting her granddaughter. The passage of time has been demonstrated by the two photo's, from baby to 4 years old. Original, well executed,  personal and creative, who wouldn't love a piece of art like this in their home?
Thanks Janna for sharing your fabulous project with us and for taking the time to make it specific to the challenge and congratulations on gaining a Winner’s badge. You will soon receive notification of your prize which is a £10 voucher to spend in-store at Country View Crafts. We hope you will join us for an upcoming challenge as a Guest Designer and create something to share and telling us a bit about yourself and your crafting talents.

So here are the Pinworthies too -
In numerical order they are -

Ingrid has shown clearly how Tim has inspired her and she has used the butterfly wings sprinkled with cogs from various timepieces to convey the theme which I thought was a fab take on it. Another wonderful piece of art.
 
So much has inspired Sara to create her canvas and she has conveyed the theme in many ways. The use of the (Dr Seuss) poem is was a brilliant addition to emphasize the theme even more.
 
We have all been in that place without our mojo so I was even more impressed at what came out of Ruth's two old wooden stamp mounts. We've all heard of up-cycling but this is pretty impressive! Grunge, distressing, faux rust and a very creative imagination  makes me think that Mr Mojo is back in bucket loads!


Thank you for stopping by to see our blog today of the journey and if you enter our challenges it is such a pleasure to come and visit your blogs and look at your art work in more detail. Don’t forget you have one more week to join in Alison’s ATC’s challenge and we look forward to seeing you hop aboard and share some little bits of Tim with us.

Have a great weekend, see you on Monday with another Guest Creative Guide project.

hugs Brenda and the Team xxx

.

Monday 25 August 2014

Destination Inspiration Layered Collage

Hello everyone and thank you for visiting here. This is Astrid sharing a project with you that will hopefully give you some inspiration to work with multiple layers and collage. The finished project is a large (8 x 8) pocket card and tag.
What I am hoping to show you is how to build up a layered collage step by step, but to be honest, I am feeling quite nervous about it, because the truth is, I normally do my artwork like my cooking, - I never follow a recipe and just go with the flow. But as several of my blog friends have specifically asked me, to do a step by step on how I create my layered pieces, I'll try my best and hope I can take you along on the journey.
The base layer is a folded piece of Kraft card with a small spine to give room for the pocket. I am lucky enough to have some A3 Kraftcard which was just the right size, but you could easily create a spine with a separate piece of card. However, for this post I will concentrate on how I built up the main part.

I started with a piece of square Manila card stock and inked all around the edges with a mix of Vintage Photo and Walnut Stain Distress Inks.
As the centre is going to be covered with the next layer, there is no need to do the inner part, but to add a bit more interest to this layer I did some water stamping with a little background stamp, below is a close up:
The next layer started with a piece of smooth white card stock, cut slightly smaller than the first bit. I added texture with Wendy Vecchi Embossing Paste through my favourite  layering stencil of the moment, the new Gothic Stencil by Tim Holtz of course.
When building up a design it is important to keep the eventual balance of the piece in mind, so in fact I turned the paper the other way round when I built up the next layers, as it usually works better to have darker and heavier elements towards the bottom of your finished piece.

When the texture paste had dried, I added some colour with three different colours of Distress Paint: Antique Linen, Weather Wood and Frayed Burlap. I used a brush, my fingers and most importantly a baby wipe and a water spritzer to blend the colours until I was happy with the effect.
To echo the textures of the paste I used the baby wipe, pouncing it in the wet paint to add some further textures.
Doing something like that, helps to tie the different parts of the piece together, - I just love the subtle effect of this process.

Time to slowly start to build up further layers:
First I added some more stenciling, this time using just Distress Inks in the same colours, Weathered Wood and Frayed Burlap, using the Lattice work Stencil this time, another favourite. I also added some tissue tape and background stamping, again, trying to keep a balance in the overall effect.
So far so good on the background, - now to the collage:

Most importantly, a vocal image, this could be a stamp, a photo or whatever you choose. For the front of my piece I decided to use the sweet girl from the Found Relatives and then I collected various bits and pieces, some tickets, stamped and fussy cut images, some bits of various paper stashes etc. I inked and coloured them to fit in with my overall colour theme:
Here you can see them but at this point I am not sure yet whether I will use them all or not, or will add additional pieces still.

Before committing to anything definite, it is always a good idea to play around a bit and see how things might work out, below is a picture where I am just playing like that, as you will see, there will be various changes still along the way...
Nothing is glued down yet, so all is possible still, just play around with your pieces until you feel the design looks good and balanced. Some things to keep in mind are:
-  vertical and horizontal lines
- arranging elements so the eye can move easily around the page
- balance between darker and lighter elements etc.

Right, time to start gluing down, I always like to have my vocal image with some layers behind and some on top, so this is what I landed up with first of all:
I have put the ticket at an angle to break up the stark vertical and horizontal lines. The dark 45c piece definitely needs to be balanced out as does the heavy Received ticket:
Getting a bit better already, but there are still a few funny gaps, the whole piece is also a bit bottom heavy, so what next?
I have this round piece left, useful to break up the blockiness, but where to put it? Top right? Bottom right? where? So many possibilities....
Which one is better, - the left or the right? Neither quite does it for me, or am I starting to over think?

I know, - no collage Tim Holtz style is quite complete without some Ideaology, so in the end I land up with this:
A stencilled Number, this time in Black to balance out the heavier elements in the bottom left corner, a type-charm and rusted pen-nib to help the eye move around the page and finally (though I am not totally sure about this) the bit of measuring tape ribbon, to balance out the vertical lines on the left. It looks a bit forlorn there, but I have just thought of a solution for that, but you will see that in a moment.

Are you still with me? Onto the inside of the card, I'll go a bit quicker this time round as this post is pretty endless already.


A basic sideways pocket created with bits from the French Industrial paper stash. As you can see, I stitched both the front and the back to the base card with some messy stitching.

A central panel done in the same way as the front, but this time without the texture paste.
Some stencilling, done just with inks and then the collage, going through the same process, playing around with elements until some balance is achieved, - this time the vocal image is a freebie from the net, it can be found here. This wonderful lady posts freebies every Friday.
On this photo the design is still a bit bottom heavy, but that will be balanced with the clip and heart that will be showing on both the front and the back, all rusted up with rusting powder for the vintage look:


Now all that is left to do is the tag:
However, as this post is so long already, I will do a separate post on that on my blog in a few days time.

So here you can see the tag in the pocket:
And here you can see the full inside:
If you are still with me, congratulations on being so patient. I hope you have enjoyed this project and that I have given you some inspiration to have a go at multiple layers and collage yourself. One final bit I have not mentioned is that it makes all the difference if you add some shadow to your vocal image. You can use a Distress marker, a coloured pencil or some charcoal, the possibilities are endless.

All the principles of this tutorial can be followed on both large and small projects, so why not join in our ATC challenge and give it a go?.
Almost all of the products used in this project are available from Countryview Crafts our wonderful sponsors. I hope you have enjoyed my destination inspiration.
Thank you so much for visiting today and have a great creative week ahead!
xxx

Friday 22 August 2014

Challenge 13 - A Little Touch of Tim - ATCs only!

Hello all. It's Alison (butterfly) here, and I'm delighted to be hosting the challenge this fortnight. Thank you for all your amazing entries to Challenge #12... and now it's time for Challenge #13!!

I'm looking for "A Little Touch of Tim" from you. The challenge is to use Tim's products and/or inspiration to create ATCs (Artists Trading Cards), so they must be 3.5 x 2.5 inches in size.

You could create a single ATC or a pair or a set, but I'm being a purist here, and so your creation must be ATCs only - NOT chunky ATCs or ATBs - to qualify for the prize or to be one of our Pinworthies.

Our challenge runs for 2 weeks, and then a winner will be chosen by the team. The winner will receive a £10 shopping voucher from our host, Country View Crafts on-line shop. We will also be choosing 3 blog badge winners, our 'Pinworthies', who will be pinned to our special winners' Pinterest board.

If you are unfamiliar with our rules (they're very simple), PLEASE read them - you can find them HERE in our 'Travelling Instructions'. If your entry does not demonstrate one of the styles we're looking for and a clear, strong influence of Tim Holtz, then you won't qualify for the prize. If you are unsure what we're after, you can find our interpretation HERE.

To help you on your journey our talented team of Creative Guides have crafted a project each. I think my amazing team-mates have outdone themselves yet again creating some miniature masterpieces to inspire you so, without further ado, here they are...
______________________________________


I started from the little scrolls of book pages, and things just sort of grew from there! There are lots of little touches of Tim: Idea-ology, Alterations, Distress, and all on the 3.5 x 2.5 of an Artists Trading Card. Come and check out the tiny details over at Words and Pictures.


Created using mainly TH products, I was amazed when I saw the list of everything I had used for such a small item - that's creativity, lol! I don't make many ATCs but I had great fun making this one using several 'Tim techniques'. This challenge definitely stretched my thought processes! (Full details can be found HERE.)


Our lovely host, Alison, has asked us to keep it small so I have done just that.

I took this ATC literally as this is my business card. It started out as an ATC, embossed with Tim's Poker Face embossing folder, two small rhinestone hearts and my information on the back. I want to make a lasting impression, pun intended. so I could think of no better way than to hand out these original cards.


I decided to make a whimsical ATC set using the famous trio from the Steampunk Stamp Set. I always think of them as "the friends" so I thought it would be fun to combine them with the friends quote from Ways With Words. Wrinkle free distress, stamping and crackle embossing create the background for the trio and I have used lots of Tim embellishments. It is amazing what you can fit into a small space!


I've returned to what I think is my most favourite way to create art and that is collage. Here I have used lots of snippets from Tim's papers to create the ephemera for these three ATCs and each one has a story to it.


A pair of ATC's created with a mixture of Tim papers, stamps, stencils and dies. Working small is a great way to use scraps we don't want to waste - my butterflies and flowers being cut from the leftovers from other projects. 


I love creating with all my distress goodies in this size..it always amazes me how much you can pack in on such a small space! I decided to make my troublesome trio using my favourite inks and stains , with a bit of idea-ology thrown in!


Creating little miniature pieces really is such fun! Having recently had my eyes tested necessitating a large outlay of cash on new glasses, I just had to use the Phrenology head with the optometry glasses and a monocle. You can see more over on my blog.


The theme Alison chose made me feel really nostalgic, as making and swapping ATCs was what first got me into blogging and paper crafting with a passion. I had not made ATCs for years, but had so much fun that I decided to make 3. I also made a little triptych to mount them on. All details can of course be found on my blog.


I love making ATCs, they are so lovely to produce and I need to do more!
Great challenge to keep it simple with Tim's influence and as we know he has so many perfect dies and stamps to use with them.
I love texture and have used a variety of effects on my ATCs & Bag.
To see more details please visit my blog.


I have been DESPERATE to use the new TH Gothic Layering Stencil so when Alison challenged us to create Tim style vintage ATC's there was only one way this was going! I had images of rusted gates in my head (yep, it's a weird place in there ;) so these became experiments to create different versions of rust and verdigris. See them on my blog and find out how they were created.

____________________________


See - I told you they were amazing!  I hope that's got your creative juices flowing to create something in the ATC format this fortnight.  You have until 18.00 BST on Thursday 4th September to play.  

Remember it's ATCs only, 2.5 x 3.5 in size (no chunky ATCs or ATBs please), and all demonstrating "A Little Touch of Tim".  I can't wait to see what you come up with, but most of all I hope you have lots of fun!

Watch out for another fantastic Destination Inspiration on Monday... and happy crafting all.

Alison xx
(and all of us here at A Vintage Journey)


Monday 18 August 2014

Welcome Zuzu as Guest Creative Guide today

Welcome everyone on this fabulous Monday morning.
Today we have the amazing Zuzu with us today sharing a magnificent project for our ‘Time Flies’ challenge. Zee is well known for her fabulous altered art and a look round her blog will give you a wonderful and inspiring insight into her world of mixed media and transformed objects.

271189_10150316721272619_609677618_9535369_2971785_n

My name is Louise but in the craft world I am known as Zuzu  (or Z / Zee).  I started crafting about 8 years ago by taking up simple card making. (I shudder to think at some of the cards I churned out and thought were fabulous).  I soon realised that card making wasn't for me and I discovered things like, tags, ATCs, fatbooks etc. and did that for a while. Still I didn’t get comfy with crafting until I really discovered Altered Art (with the help of Tim Holtz and his products and techniques). 
3D objects seem to give me more satisfaction or adding a lot of texture to flatter objects. I love altered art in a vintage shabby chic style and fail terribly at clean techniques.

a vintage journey passing of time zuzu 02
Ever since I can remember, I have been a bit of a collector of old junk. needless to say, when an artist came on the seen who was also into old junk and who then started producing wonderful craft supplies to compliment this love of old and distressed, I became an immediate fan. Like Tim, I wander into junk shops and bric-a-brac shops and bring odd bits of it home and on one of those trips I found a mantle clock case with no clock inside. I managed to get it for £3 and it has been sitting on a shelf for a fair few months.
a vintage journey passing of time zuzu 04
When I was invited along as a guest then heard the theme was "Time Flies", I made my mind up very easily, to get the clock case down and give it a "Holtz" vintage distressed makeover. Also, I just received my new framelets die and stamp set from country view crafts so I HAD to include lots of those little butterflies. The clock case for the "Time" part and my butterfly framelits for the "Flies" part. once the clock was painted with paints and crackle medium I cut out and stuck on lots of butterflies cut out from the "Laboratorie" papers. I stuck a section cut from the "wallflower" papers on to the back of the inside and then stuffed the clock innards with moss, sticks and lots of Tim Holtz ephemera and ideaology pieces. to finish it off, I decorated the bottom of the clock with tissue tape.
a vintage journey passing of time zuzu 05

Wow Zee this is a fabulous transformation. I love the way you have changed the appearance of the clock case and all the wonderful elements you have added to the inside, it’s brilliantly conceived and executed and I just love your interpretation of the theme. Thank you so much for sharing your project and your wonderful imaginative and inspirational style.

..............................................

Well there are only 4 days left to enter Chris’s challenge if you haven’t already and to be in with a chance of winning that £10 voucher from Country View Crafts. As always we love looking through your fantastic entries – so pop over to the challenge post and take a look at everyone’s work for a dose of creativity, ingenuity and originality.

Have a wonderful week and we will see you back here on Friday with the next new challenge hosted by our fabulous Alison (Words and Pictures).

Take care.

hugs Brenda and the Creative Guides xx


Friday 15 August 2014

It's tags and winners today!

Good morning everyone and a big welcome to winners' Friday. We have no winner's guest post today so we are having a Creative Guide's 'Tag you like' day instead. Some of our team have put together a tag (on whatever theme they like) especially to show you! But, before we see them, we have the very important task of announcing the winner and Pinworthies from our last challenge, Jenny's 'Just stain it'.

The CGs have pondered and pontificated, oooh'd and aaarh'd and Jenny even cogitated and ruminated!! LOL  After the team's input, Jenny's final decisions are........


Winner of the Country View Crafts' Voucher

http://almocraft.blogspot.co.uk/2014/08/gothic-butterfly-avj-just-stain-it.html

Jenny said:
"One of the hardest things as a DT member is voting for challenge winners when you know some of those entering. There's always that worry that people might think you are favouring someone for that reason when actually it can be the complete opposite! However, I have no qualms in choosing Mo's picture as the winner of the 'Just Stain It' challenge because it makes full use of a range of techniques for using Distress Stains and looks absolutely incredible."

Our three pinworthies

http://mylittlecraftthings.blogspot.ca/2014/08/vintage-travel-bag-my-summer-journey.html


http://cupcakescreations.blogspot.co.uk/2014/08/journey.html


http://www.craftyjax.blogspot.co.uk/2014/08/distress-stains.html


Congratulations to Mo, Pamelia, Mona and Jackie, all very worthy winners. A big thank you too to all who joined in and entered their beautiful projects, great work everyone!

And now to our tags...


Most definitely influenced by Tim using his techniques, dies and paperie but with the addition of some decayed work too in the flourish. There are more details here if you want them.


Well what can I say, I love blueprints, I love Distress and all of Tim's lovely goodies and here is the result.. a manly thank you created with lots of my favourite things! All of the details can be found here.


A distress stained tag with bleaching through the doily stencil was the start point for this Tim inspired tag. Add some hearts,stars, frameworks and butterflies - all my favourite things. Lots more detail and piccies over at A2A - Addicted to Art.


I started with Tim's bubbles embossing folder and went from there. The seaweed was made using the wave embossing folder and both the seahorse and starfish have been given a dose of crackle paint, I seem to be using it so much at the moment, it gives such great effects.


A triple layered, over the top tag experimenting with bleach stamping. Sometimes I just wished I could do Clean and Simple.... Details can be found on my blog


The busy busy bee seemed an appropriate image for me at the moment... there's so much going on! I didn't get around to making my July Tim tag, but the bee I'd started to play with for it needed a home. You can see the details of where he's living now over at Words and Pictures.


Keeping in with the current challenge theme of Time Flies, I started with the words 'time traveler' and developed my tag from there. I have used fabric from Tim's latest release of Eclectic Elements for my base tag, added some stitching and then built it up from there. Further details can be found on my blog.


I love dragonflies and have just acquired the fabulous Layered Dragonfly die & embossing folder so my tag is inspired by their beautiful colours. To see more details on the techniques used please visit my blog


For my tag I decided to use up some of my gorgeous Tim Paper scraps ( French Industrial ) and some Kraft Glassine from a previous project. I layered two tags ( size 8 & 5 ), however, you cant see that in my photograph, which is a shame. Having recently purchased the new French Flight Alterations Stamps and Dies I just had to play with them too. Happy Friday xx


Tim style and my Tim's August Tag of 2014, but with butterflies. Stamping, texture stenciling and staining is all going on here. For more details, please visit my blog! Enjoy the day!


So there we go Ladies and Gentlemen, your winners and we're at the beginning of week 2 of our challenge!  We'd love to see some more of what you're all up to so get out your time pieces, anything you'd like to do to express the passing of time as long as you can demonstrate a strong influence from Tim.

We will be back on Monday with another special guest and a gorgeous project for you to look at.

Thanks everyone, have a fabulous weekend!

Chris xxx
For Brenda and the AVJ Creative Guides