Pages

Monday 27 February 2017

Destination Inspiration - Terminal 4

Hello all!  It's Alison here, delighted to be arriving at Terminal 4 with the contents of my travel bag.  In case you've forgotten, here's what they are this month:

Substrate - Burlap
Colour - Fired Brick or dark red
Product - kraft card
Technique - stencilling

That dark red gave me pause for thought, but in the end I caved in to the obvious solution in February... hearts.  But given that my stop is way beyond 14th February, and that I have very little truck with all the Valentine business in any case, my hearts are all cracked up.


I started with one of the Idea-ology burlap panels and stencilled on some texture paste through a Memory Box stencil.


The hearts are made with the Movers and Shapers dies and I coated them first with some DecoArt Crackle Paste.


Once that had dried and done its crackling, I added layers of colour with DecoArt Media Line acrylic paints and some spritzes of Distress Stain Spray.


I used DecoArt Antiquing Cream to highlight the cracks and, once I was happy with the look, I put a coat of Triple Thick Gloss Glaze over the top of it all for a nice shiny finish.


I layered up a book page covered tag with some other offcuts of card which were lying around the craft table.  I thought of adding stamping or rub-ons, but in the end I decided I preferred the simple look.


The kraft card I've used was actually intended to be a stencil.  I thought it looked so cool that I would use the actual stencil on the project.


The word beads came from The Range very cheaply.  I love that the letters are printed so that you get the same word from all angles.


A couple of small wooden buttons adorn the collaged card pieces.


And in the corners of my panel I've used some Calico Craft Parts screw heads to hold it all together (not really!).  They're altered with some Fresco White Fire paint as well as more of the DecoArt Media Line paints to get a rusty look.


I hope you've enjoyed stopping to stretch your legs and your creative imagination at each of this month's Destination Inspiration terminals.

Just to remind you, we met up with S@ndy at Terminal 1...


And with Nikki at Terminal 2...


And now I'm bringing up the rear at Terminal 4...


Thanks so much for continuing on the journey with us.  I hope you'll hop on board for with Jennie's Words That Are Special challenge - you've got just a couple of days left to catch the ride.  Happy crafting all!

Alison x

Friday 24 February 2017

We have a fantastic special guest today ........

Yes today sees us sharing a project with you from the ever amazing Trish Latimer and we are so lucky to have her show how she uses her own range of stamps, giving us great ideas and techniques to use. I for one want to have a go at this as it's not my general style and is way out of my comfort zone but she makes it look so easy.


Trish is a full time mixed media artist, currently Editor of the best magazine in the world (!!) for stampers and mixed media addicts: Craft Stamper Magazine.
She describes her style as messy, painty, colourful and more than a little weird at times....
Trish also has her own range of WhimsyGirl Rubber Art Stamps.
          www.craftstamper.com

So it's over to Trish to show us what she made for us .......

***


Hi there!
I'm thrilled to be a guest on the blog today, and with a theme very close to my heart!
I use words such a lot in my day job, and this spills over into my art work too. I just can't create a project without giving it a title or label of some sort, even if it is a very obvious 'home' sticker on a house for example!
One of my favourite words to use is 'star'.... it is in my email addresses, my business name and I may even have a few star tattoos dotted about my person :) Anything with a star motif is very welcome in my home!
So, for today's project I have incorporated one of my new stamp releases (with a star!) along with some star stamping, and even some 3D stars.....


I have created a step by step tutorial for you to see how I created it... so grab a cuppa (there are just a *few* pictures!) and I'll take you through it....

The background is a typical Trish painty-stamped mess. I drew a rough guide on a sheet of card, just to give me an idea of how big the background needed to be, then got busy with the paint. Simply smear on some gesso (or white paint), and start adding your first colour..


I've used just 4 colours for this, the first three are my main background tones. I've used yellow, baby blue and lime. Smear on lots of layers, adding in more white as well. Don't forget to keep drying so you don't end up with mud!


Once the first three colours have been used, go back in and do a spot of stencilling! I use sequin waste as my go-to stencils, although of course there are thousands of commercial stencil designs too. To keep everything cohesive, I just use the three background colours plus white to stencil with at this point....


The fourth colour is my 'pop' colour. This is the bright 'in your face' shade that stops the piece being subtle! I've used fucshia pink, and smeared it just as I did with the other shades..


To bring the bright tone into the background, and stop it looking like it's just sitting on the top, I add more stencilling over it...


Now to add the stamping! I use many different background stamps, all unmounted. I only stamp small parts of the design, building up a layered, collaged effect...


I love to add splatters, and this can be done in a couple of ways. Flicking with wet paint is one technique, but for this I used embossing powder. UTEE splatters can be controlled better, and are smaller than plaint splats. As all the products I used are permanent, I simply sprayed the surface lightly with water, then carefully sprinkled the powder where I want the splatters to be. The water 'sticks' the powder to the surface so it doesn't get blown away when you heat. When you heat the powder to melt it,  all the water just evaporates away! Be warned though, don't try that if you've used water based inks or sprays, unless you don't mind your backgrounds bleeding!


I've used white UTEE powder, it's easier to see the effect in close up!


That is the background done, so we can move onto the figure. I've used WhimsyGirl Seven from my range of stamps.


I wanted a dotty dress, so doodled some on!


I coloured her face with Inktense pencils and a waterbrush..


Her hair and dress are coloured using Ecoline drawing inks. I put these into a waterbrush for ease of use! Blue for her dress....


and pink for her hair....


I coloured the star yellow and added glitter..


Now we have the background and figure, we can start to assemble the frame. I've used a cheap, deep box frame, and removed the glass and back piece..


I drilled holes in the bottom edge (I drilled 6 but decided to only use 5 in the end. The other hole was simply covered up with gesso!)


I cut stars from scrap card, then glued them to black wires...


These were then glued into the holes in the frame...


All that remains is to cut the background to size and glue it to the back, add the figure to the frame and glue on the finishing touch... the words, of course!


I hope you like it!


Full video tutorials on creating smeared paint backgrounds, and also how I colour faces can be found on my blog: www.inkpaintbeads.blogspot.co.uk

Take care, Trish xx


***********************************


Wow Trish I just adore your journalling style and how you have used it to create this beautiful shadow box. Your stamps are gorgeous and I am sure there will be many of our readers who already have them and will so pleased to see how you incorporate them into your work.
Thank you so much for taking time out of your very busy schedule to make and share this with us today.

****  

Our current challenge 'Words that are Special' is still open for you to join in, we have lots of fabulous entries already, but there's always room for more. Do pop over to take a look at the amazing inspiration from the Creative Guides and see if you have a piece or can make something to join in the fun.

Have a great weekend everyone

hugs Brenda, Trish and the Team xxx

Monday 20 February 2017

February Destination Inspiration - Arriving at Terminal #3

Welcome everyone to Terminal #3!  Julia here with a Destination Inspiration Post.  
Every Monday one of the AVJ Creative Guides is here with a travel bag of supplies she must use to create something.  Here's what our travel bags contain for February.
1.  Product - Kraft Card
2.  Technique - Stenciling
3.  Color - Fired Brick/dark red
4.  Substrate - Burlap

 I found a package of 5"x7"burlap bags in my stash - and knew it would be the perfect base for my creation!
 Here's how I put this together.  First I put a piece of cardboard inside the bag to keep the spray stain from going through to the back.
I laid the Scribbles stencil over the bag and sprayed it with Fired Brick Distress Spray.
 (I did the same on the other side of the bag - but did not decorate the back further.)
I removed the stencil and here is the result.  I like the little edge of spray on the right that happened!  I didn't want the stencil centered - and this bit of outside spray gives interest without being too busy!
There was a lot of stain on the top of the stencil so I took a piece of Kraft cardstock and laid the inky side of the stencil down onto it and pressed over the stencil with a paper towel.  I removed the stencil and it left this great negative print!  I dried it with my heat tool.
I started gathering things I wanted to put on my bag.
I die cut the piece of stained kraft card I made in the photo above using the Artful Dwellings die and used one of the pieces to make a sort of tag for the bag. I die cut the Thinlits 'getaway' out of black card and adhered it to the tag and sponged the edges of the tag with Ground Espresso.  I used a Loop Pin to pin the key and tag to the bag.  I also adhered the tag and key with adhesive - I put the cardboard piece back into the bag so as not to have the glue go through to the back.
I attached the Word Band to the bag with a loop of Black Paper String on each end, tying a knot and trimming the ends - again being careful not to catch the back of the bag in the stitch.
I added Chit Chat and Small Talk Stickers, a wrinkled seam tape bow and stitched the key to the bag as it is heavy and flopped around without the stitch!
I rubbed Ranger Fired Brick Acrylic Distress Paint over the Word Band - heated it to dry - then sanded off the top - then I sponged Ranger Distress Ground Espresso ink over it.  It says "capture life's moments" and is tied onto the front of the bag with Black Paper String as described above.
 I hope I have inspired you with my Destination Inspiration project using the supplies in my travel bag today.  I think this burlap bag will make a nice place to put photos or mementos from a trip!
There will be one more Destination Inspiration for February next Monday.  If you missed the first two - you'll find Terminal #1 here and Terminal #2 here.

And a reminder - there's still time to join in in the February A Vintage Journey Challenge -  Jennie is our host and her challenge is 'Words that are Special'!.
Paper:  Kraft, True Black - PTI
Ink:  Ranger Distress Ground Espresso
Accessories:  5"x7" burlap bag,  Ranger Distress Spray Stain - Fired Brick, Ranger Distress Paint - Fired Brick, Scribbles Stencil - Tim Holtz/Stampers Anonymous, Idea-ology: Black Paper String, Small Talk, Chit Chat, Word Keys, Word Bands, Loop Pins, Dies - Artful Dwellings - Tim Holtz/Alterations, Thinlits Handwritten Vacation, Black wrinkled seam tape.

Friday 17 February 2017

Pinworthy Inspiration

Hi everyone - welcome to Pinworthy Friday - where we welcome our previously chosen Pinworthies to be our guest and share their fabulous creativity with us. Lula, Irina and Sara Emily were pinworthies from our November challenge - Cracking Up - but today they are creating on our current theme - Words that are so Special.

Hello, crafty visitors! It is a pleasure to have been invited back to A Vintage Journey as a Pinworthy Guest Designer. This challenge blog has been a favorite of mine before I even started blogging, so it is an honor to be able to create something especially for them.

My name is Sara Emily, and I live on the middle eastern coast of the United States. You can see our beautiful ocean in the background behind me. I am married and have 18 year old boy/girl twins. I am a retired Licensed Physical Therapist Assistant. I've enjoyed a variety of arts/crafts throughout the years starting with paper, dried macaroni and glue as a very young child. I have been trying a variety of styles lately from CAS to abstract, but my passion is with vintage grunge. 
I have an eye for seeing an object's ability to take on a second life. So for today I have an altered block of wood with a few of my favorite Tim Holtz quotes, which I hope will keep me motivated and focused in my crafty endeavours.
This started as just a block, and I've added the knob at the top and the feet on the bottom. Using DecoArt chalky paints and crackle medium as well as Prima Alchemy paints, I made a simple background for my choice of stamped and heat embossed words.
I rusted up some embellishments using paints, sand paste, glass bead gel, and art stones. If you would like to see what this looked like before and some close ups of the after, and you have time, please stop by my blog. I will also have a tutorial for you, explaining how I made the background, flowers and rust. Many thanks to the talented Creative Guides for having me join them today!

*****************************

Hello everyone,I am thrilled to be here at A Vintage Journey as a Pinworthy Guest.
Thanks bunches ladies for this opportunity!

A little about me:
My name is Lucyna Marynowska, aka Lula. I come from the north of Poland. Nearly sixty, retired widow, mum of two grown up boys and a happy grandma. I started my crafting journey 5 years ago as a card maker and immediately became an addicted paper-lover.
After my husband's death it was crafting that helped me to conquer the pain and struggle with the feeling of loneliness.
I enjoy creating anything from cards to altered art. I love to experiment with various types of
mediums: playing with gesso, texture paste, spraying and inking.
I love challenges to spark my creativity and making crafty friends all over the world makes me very happy.
You can find my creative project on my blog: http://ululi.blogspot.com/


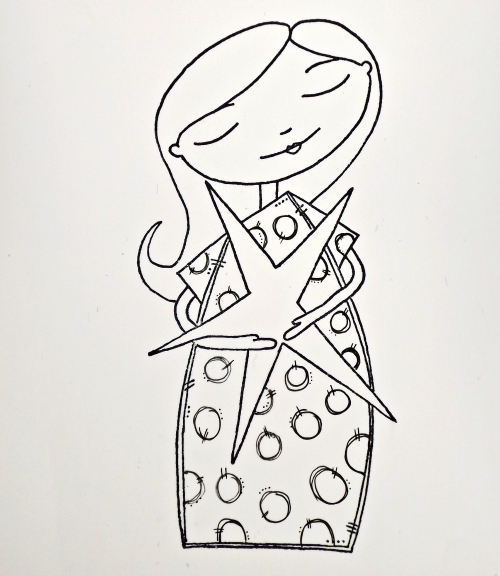
This is a piece I prepared for Words That Are So Special Challenge.
I started with transferring the face image with gesso onto a cardboard (18x18 cm).
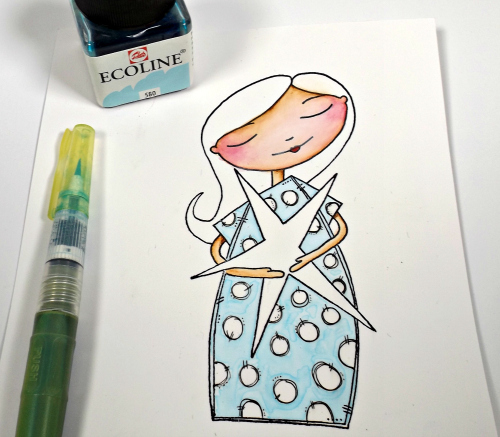
Next step was adding some texture and stenciling some texture paste. Then came the best part- inking, misting, painting! I also added some stamping, outlining with my Inktense pencil and some sequins to finish off.
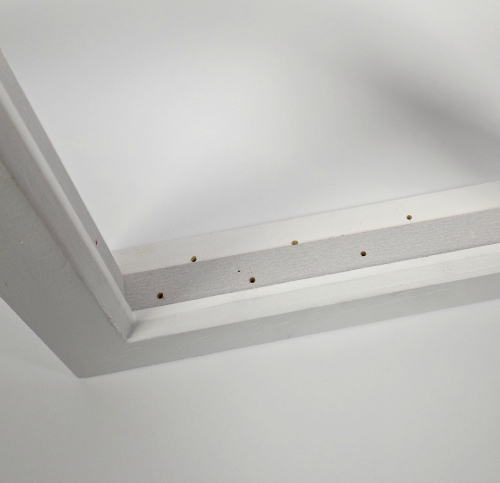
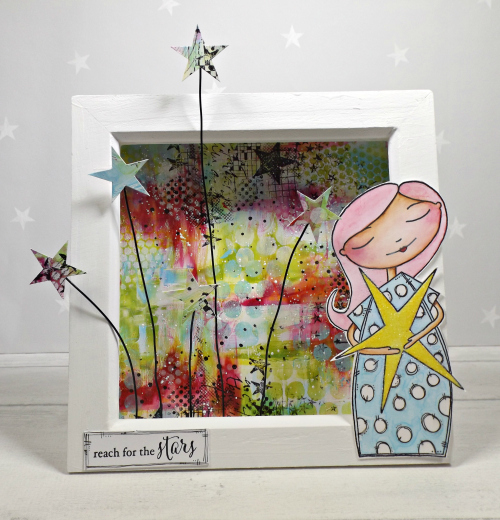
I put the picture into wooden frame and added the words:
I am here
I am simply me
I am strong
I am dreaming big
I have been going through really hard times recently and had to face all sorts of problems ( I guess as we all do). These words remind me of greeting each day with a smile, of looking forward - not back and enjoying life in every minute. 
That is why they are so important to me.

*******************

Hello everybody!
Thank you very much for the invitation to join the challenge - Words That Are So Special by Jennie.
My name is Irina Rakovets. Many people know me under the name IrinaR (my blog is - Скрап-ХоббиМания).) I live with my family in a picturesque corner of the Gulf of Finland, near St. Petersburg. It is already more than four years since scrap came into my life and it is not going to leave. One can not say that I am adherent to any one style.
I love Vintage, Shabby, Steampunk and attracts me, the more that I love paint, so often my work can not do without the mix-media. You could say that I was "scrap omnivorous": I like to make albums and notebooks, canvases, pages and greeting cards, and even my last love - tags.
I love to experiment, to go beyond comfort - take the challenge and make ...
I would be very happy if my work will inspire you.

I took the canvas to the embroidery frame with an old photo of my children.
I used appropriate to the project and this photo words: memories\ be happy\ moment\ time is always a reason to smile.
A few words as I did this canvas.
I took a wooden hoop, pulled them tight cotton cloth, cut off the excess fabric.
Then I primed blank white acrylic primer.
With the help of masks and Color Wash Adirondack painted.
Slightly stamps. Another stencil and transparent modeling gel.
And the finishing touch Distress Ink / The background ready.
It remains to glue the photo and add a decoration.
a few photos with details nearer

**********************

Mixed media at it's best - with Sara Emily's fabulous altered art and rusty grunge, Lula's textured image and inspirational words and Irina's enchanting embroidery frame with gorgeous detail. Thank you all for creating these for us. 

There is still plenty of time to join in our February challenge - Words that are so Special.

Wishing you all a crafty and happy weekend.
Nikki 
xxx