Pages

Friday 31 May 2019

Tag Friday and INTRODUCING .........

Welcome Everyone to a new Tag Friday post which can only be seen when there are five Fridays in the month. Today do we not only have a wonderful array of tags to share with you we are also announcing the new Creative Guides joining our wonderful 'A Vintage Journey' team. We have four amazingly talented artists who I'm sure many of you will know from your crafty travels in blogland. So without further ado let's see who they are.

Ann
I live in Taipei, Taiwan. It is only a small spot on the world map, but I love and thank this land. In this country, I can create freely, and my inspiration is endless. In my childhood, my father was my first art teacher. Once, he taught me to stamp with my fingers, and then he used a pen to draw a few strokes. Surprisingly, they became a bunch of chickens. This was my first experience of art. I felt amazed and since then I've been fascinated with art. In 2012, I accompanied my daughter to participate in paper art courses, and it was then that I started to make cards. At first, even making very simple cards would take me hours, but the look of pure joy that people showed me after receiving a handmade card was worth every second! I also fall in love with Mixed Media. For the past few years, I have been working with mixed media. Different media have their own individual effects, but when they are mixed together, there will be different results. I enjoy the surprises in the creation process. I especially like vintage, shabby, steampunk style. So when invited to join the Vintage Journey team, I was honored to have the opportunity to work alongside the other Creative Guides. I am absolutely thrilled to be part of this wonderful Team and I'm looking forward to sharing my creations with all of you along the way!

Barbara
Hello everyone! First of all, I want to tell you that I'm really thrilled to be part of this wonderful and super talented team! As a second thing, I introduce myself! I'm Barbara (aka Barbarayaya), I'm Italian and I joined this wonderful craft world since 2005. I officially started with traditional scrapbooking (layout and mini-album) but I'm actually a crafter from birth! At about five years old, I cut out everything from my mother's magazines to make collages and divided my colored pencils (I owned into exaggerated quantities) into small packages held by an elastic band according to their color: all yellows, all reds, etc. etc. After my initial approach with traditional scrapbooking, I came across the magical Tim Holtz's world and I can say that this was the turning point of my creative journey. I have never abandoned this style in which I find my best way to express my personality and my art. I have approached Mixed media a couple of years ago, I love it very much because it allows me to mix styles and products. Last thing and I think it will make you smile: I don't have a scrap room but only a tiny corner inside my kitchen that has also become my "studio"! And who cares if every so often some microscopic grain of embossing powder or glitter flies towards my kitchen stove: in this way, I am so happy!!! I'm sure that this new adventure will be wonderful!

Jo
Let's Art Journal
I started Art Journaling in 2015 as a way of expressing my life through words and pictures, and I'm captivated by the variety of techniques and materials that can be used to create so many different styles of art. As my career focused on adult learning I've always been a creative person, and have found art journaling very therapeutic and rewarding, it helps me breathe; a bit of a cliché - but so true. Each page is inspired by what I see, do, feel and hear so it's personal to me and allows me to express myself. It's a fun way to record life events and memories too. Over the years my passion for art has expanded to creating cards and tags, especially for my family and friends, as well as decorations and items for around the house. I love nothing better than to experiment with different techniques and products, get creative, put my ideas into practice and have lots of fun doing so. This has become a passion of mine and I'm delighted to be able to share it with you here at A Vintage Journey!

Toni
Hi everybody! I'm Toni and I'm delighted to be here, as a Creative Guide, at A Vintage Journey. My personal journey into the realms of mixed media and paper crafts, began like many people, as a child. My mum encouraged my brothers and I to draw and paint and there was always a ready supply of paper and pencils in our house. I studied art at Moseley School of Art, and went on to train as a teacher. I've enjoyed a long career, teaching children with Special Educational Needs. I am now retired and love having more time to devote to my arty crafty adventures. I started my blog, Artistic Craft Dabbler, in 2010 and it is a never ending  joy, to discover that all over the world, there are so many like minded people! My style is eclectic, embracing anything from the occasional clean and simple to full on industrial grunge. I love experimenting with new products but also like to incorporate recycled materials and found objects, hence, I am a compulsive hoarder of anything that 'might come in handy'. I'm very excited to be joining this terrifically talented team and hope that you too, will enjoy the journey as much as I do.

We welcome these lovely ladies to the team and I know everyone is looking forward to seeing what they make.

***********************

Onto the inspiration for the day and the wonderful tags created by members of the team with no theme or other constraints, just sheer unadulterated playtime tags.


Jo


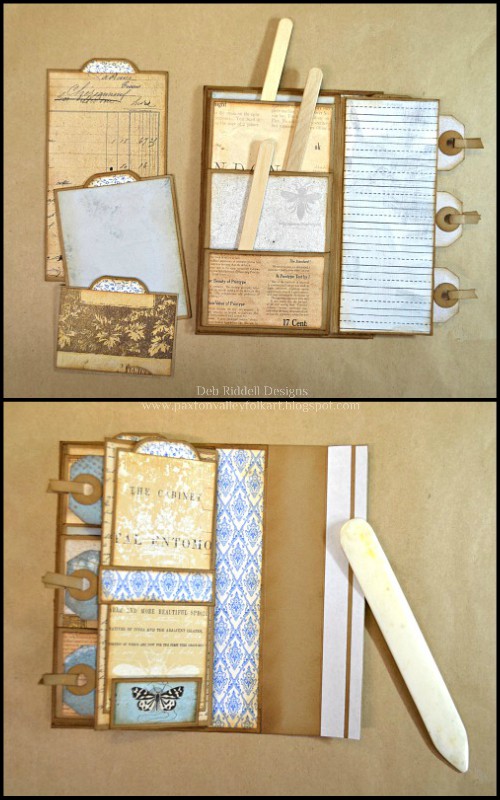
Hello everyone, I'm so thrilled and honoured to be part of this wonderful Challenge Blog and Creative Guide team! As I love Art Journaling, I thought I'd create a "Tag Journal" of double-sided tags. Here's the first one which captures my new adventure here at A Vintage Journey; both sides are vintage style, one side is the front cover of the tag journal reminding me to embrace the journey and the other is a tribute to the support and kindness shown by my fellow Creative Guides. Please find full details of my process and materials here at my blog.


I'm so honored to be part of this wonderful Creative Guide team! This is my first Tag Friday, I had some wrinkle-free fun with distress paints and I was really happy with the outcome of this vintage tag. Do pop over to my blog, there are more details.


I've been working with a lot of bright colours lately and was in serious need of a grungy vintage fix so decided to make my Full Of Possibilities tag with lots of lovely vintage ephemera, crackle paste and Distress Oxide Sprays.  Pop on by blog for my how to and I'd also like to take this opportunity to send a huge warm welcome to our wonderful new Creative Guides!


Before introducing my tag to you I would like to express a huge warm welcome to our four new creative guides. I am sure everyone will agree that they are going to be a fantastic addition to our team! As to my tag, when I started with it, I had no idea where I was going, but after numerous layers of paints, inks sprays and papers, this is what was the result, - vintage shabby chic. If you want to see more detail, just head over to my blog.


I am thrilled to be joining in with Tag Friday, as one of the new Creative Guides, here at A Vintage Journey. It really is a dream come true for me! My tag has a spring theme and I've used lots of Tim Holtz products including, my newest favourite, those gorgeous Transparent Wings. You can see how this came together over on my Artistic Craft Dabbler blog


It's time for those summer vacation trips and I have made my tag to depict the excitement of a new adventure.  You may be surprised to see what the tag itself is made from.  Please visit my blog for all the details by clicking here.


Hello all!  What an exciting day... not only the joys of Tag Friday itself, but also such a joy to welcome our four new Creative Guides to the journey.  With all that excitement, my tag needed a bit of peace and quiet to recover... do come over to Words and Pictures to experience the serenity and silence!


There were so many small pieces of tea dyed lace, net and ribbon sitting on my desk I decided to sew them randomly to a calico tag. Something a little different! Do hop on over to Live The Dream if you would like to see more details. And may I add my welcome to the fabulous new Creative Guides joining us on our creative journey.


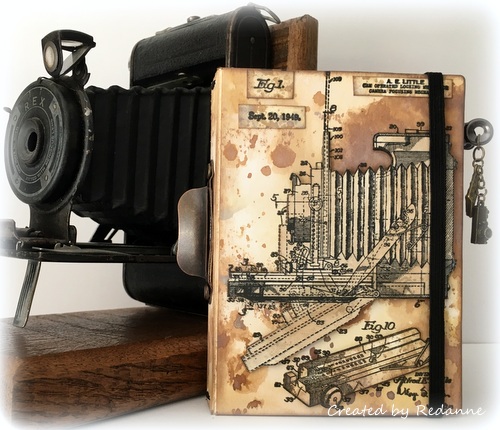
I'd like to extend a warm welcome to our newest team members! I've just finished a big crafty project that's taken weeks of spare time to complete, so tonight it was fun to have some instant gratification with my Distress Oxide Sprays and new to me Tim Holtz The Professor stamps using an old Tim technique. I welcome you to drop by my blog for the details.


Hello everyone! I'm really happy and honored to be here on A Vintage Journey with this group of talented artists! I chose my favorite color palette, rust and turquoise for my first tag here with you! You can find a short tutorial on how I created the background on my Yayascrap blog.


Hi everyone x I am so happy to be joining in with Tag Friday this month and even happier to be welcoming Ann, Jo, Toni and Barbara to the  AVJ team. I am lucky enough to have been on another team with Toni and to have met up with her at a workshop in London a few years ago, which was so nice x For my tag process details you can hop over to my blog HERE


 I have been lucky to get my hands on some of the new Andy Skinner products some of which I have used here on my large size 10 vintage tag. For a few more details and photos it would be lovely to see you at Bumblebees and Butterflies.


*************************************

It's a pleasure to have all four of the new team members contributing a tag today, thank you ladies. They are just so keen to get started and join in, I know they are just gonna fit in perfectly. Please welcome them with a comment below and maybe pop over to their blogs to leave some love.

I'm sure you are enjoying the complete randomness of the styles and personal themes that everyone in the team has put together for today. Enjoy your wander through and thank you for being here to see what we create.

Have a great weekend.

hugs Brenda and the Team. xxx

We always love to see your fun tags that you have been creating and would love you to join the party by linking any tag you have made during the month of May.

You are invited to the Inlinkz link party!
Click here to enter

Friday 24 May 2019

Creative Card Making with Alison

Hello all, it's Alison here with this month's Creative Card Making post.  Regulars over at Words and Pictures will know I almost never make cards.  For some reason I find them very difficult to get going with.  But a Creative Card Making post requires a card, so here it is...


For this, I borrowed my inspiration from a tag I made in which I borrowed inspiration from one of my fellow Creative Guides, the lovely Jennie of Live the Dream.  And at three removes of inspiration, I found that it wasn't so hard to make a card after all!


I started with a pre-cut kraft card and envelope, 6x6 inches, and gave it a rough coat of gesso as a base.


Over that, I added some Idea-ology Tissue Tape and Design Tape strips and then smeared some DecoArt Crackle Paint in places.  (I know I took photos as I was going, but my camera seems to be playing up, and decided not to keep them.)


Over the dried crackle, I added dribbles of Distress Stain in Weathered Wood and Stormy Sky...


... and I smeared some Peeled Paint DI and Shabby Shutters DOxide onto my craft mat, spritzed with water, and added that to the mix too.


I chose those colours to go with the tag I cut the Tim Holtz flower out of.


This one is from the Wildflower Stems #2 set.


I'd done some wrinkle-free distressing with those colours onto the tag, and had just enough to be able to cut the strips of paper lace too.


This is one of the two designs from the Lace Thinlits set released a couple of years ago.


Most of my butterfly Design Tape had become invisible under the crackle, so I added some more of that...


... as well as some actual lace from Tim's Idea-ology Lace Trimmings.


There's a bit of script stamping done in Stormy Sky Oxide.


And I used the leftover blobs from cutting the lace to add some extra detailing.


A few ivory sequins dotted around catch the light rather nicely.


And the Idea-ology Quote Chip gives me the necessary words to finish things off.


In the end, I really like this mixed-media card.  And it's flat enough to go through the post without extra charges!


I hope that's given you some card-making inspiration.  Thanks so much for pausing in your journey with me today.  There's still plenty of time to join in with our current Book It! challenge so do come and join us.  Have fun on your crafting travels.

Alison x

Friday 17 May 2019

Book It! Vintage Nature Inspired Folio Album Tutorial

Hello everyone and thanks for stopping by, it's Deb here today to share a tutorial with you on how I created by vintage nature inspired folio album for our current Book It! challenge.


This folio album was inspired by a YouTube tutorial by papercrafter45.  She has a wonderful 6 part video tutorial on how she made her 8-Pocket Mini Folio so be sure to check it out.  I've changed the dimensions and the design of some of the tuck spots and pockets on mine (think I ended up with 22 pockets and tucks!) but many of the design aspects follow her videos pretty closely.  The measurements that I am going to give you in my tutorial are for the outside dimensions of the pages and pockets only and do not include the 1/2" edge flaps (see papercrafter45's videos to see what I'm talking about!) so take that into consideration if you decide to make one of your own.  This tutorial is pretty long so grab a cup or glass of our favourite beverage and let's get started!

NB: most of the papers and images used on this project are courtesy of Ephemeras Vintage Garden, Vectoria Designs and Far Far Hill.

As is my usual style, I started this project very backwards by making an insert to put inside the folio album before I ever made the album!  I saw another video tutorial by papercrafer45 for an envelope pocket made from a No. 10 envelope and decided to make a little 3 pocket envelope folio.  I adhered two of the envelope pockets back to back (see papercrafter45's video for the envelope pocket how to, she explains it much better than I ever could!) and made a cardstock 'spine' to attach them to the 3rd envelope pocket


Six tags were made to insert into the two main pockets on each of the three envelopes (Tim Holtz's Bird Feather stamp set and Wildflower die cuts).

The crossed fold on each pocket seemed like a good place to tuck some tickets so I stamped up Tim Holtz's Ticket Booth stamps and printed out some more tickets from Vectoria Designs to add to each of the three pockets.


Now that I had my first insert I knew what size of folio album I had to make!  I made a back cover measuring 4 1/2" x 6 1/4" (remember, that doesn't include the 1/2" measurements for the reinforced edges) and added a tuck pocket with an 1/8" gusset to the inside that opened to the left and top.

The No. 10 envelope folio was attached to the tuck pocket, leaving another pocket behind the envelope folio by only gluing it on three sides and leaving the top open.


A flap was adhered to the left edge of the tuck pocket with a 1/2" gusset to accommodate the depth of the No. 10 envelope folio underneath it.

A belly band and a tag stop (the little bee image from Ephemeras Vintage Garden) were added to the inside of the flap along with a tab for easy opening.


A journaling card was made to insert under the belly band.

On the front of the flap, two pockets were added.


And two folded tags were created to slip inside them to create a faux waterfall effect.

A little mini art journal was made to slide inside the back cover tuck pocket.  I filled it with a few pages of mixed media papers and simply tied them in with a piece of elastic cording so they could easily be removed and new ones added as the journal pages were completed.


Back cover done, now on to the front cover!  Same dimensions of course as the back cover (4 1/2" x 6 1/4") and this time I made a pocket measuring 6" x 3 1/4" with an 1/8" gusset for another little mini art journal.

Another flap was added to the front cover pocket, this flap was created as a pocket flap with three spots for little No. 1 manila tags and a belly band.


The No. 1 manila tags were stamped with a discontinued Crafty Secrets stamp set, a tag was made to slide underneath the belly band and another tag stop added to the bottom (the butterfly image from Ephemera Vintage Garden).

Another mini art journal was created in the same manner as the first one to slide inside the front cover pocket.


Three pockets were added underneath the pocket flap.

And three tags were made to slide into the pockets.


Time to put it all together!  I stacked the front and back covers together and measured the depth of the folio album.  This became the width that I needed for the album spine plus I added about a 1/4" more in case I decided to stuff more into it (although at this point it's pretty well stuffed!).  I added an inch on each side to this measurement, scored the cardstock at 1" on each long side and attached the spine to the outside of the front cover with double sided tape.

The spine was then attached to the outside of the back cover and voila, a folio album!


The covers and spine were covered with decorative papers, a few embellishments were added here and there (Tim Holtz's Mini Detailed Butterfly, Small Tattered Florals and Cameo Frame) and a belly band created to keep it closed (it just slides off and on).  And that was it, my folio album was complete.

I made a little flip through video to show you the completed project, hope you will enjoy seeing it.


Thanks as always for stopping by today and thank you for bearing with me to the end, that was one long post!  Hope that I've inspired you to enter our Book It! challenge, there is something so satisfying about making these little albums and I love the challenge of figuring out how to construct them.  Have a wonderful weekend everyone and happy creating,

Deb xo

Friday 10 May 2019

Pinworthies - Neutral Challenge

Hi everyone and welcome to our Pinworthy post where we announce the Creative Guide favourites from our last challenge. The challenge was 'Neutral Zone' where we asked you to create with no colour and use a neutral palette.

We probably say this every time but selecting three is very difficult! I asked all the Creative Guides to select their favourites and over half of the entries received at least one vote!

Here are the three that I have selected from the most popular choices of the Creative Guides - in no particular order.


Congratulations ladies - I will be emailing your pinworthy badges shortly.

Our current challenge invites you to 'Book It' - did you see the inspirational designs from some of the Creative Guides - I missed this one but loved what everyone created! If you missed them do pay a visit and we would love to see your entries in the challenge.
Happy Crafting

Nikki
xxx

Friday 3 May 2019

Book It! May Challenge

Hello everyone, Deb here today to announce our new challenge for the month of May:

Book It!

There is nothing better than curling up with a good book to take us away to another place! This month we'd like you think about books - perhaps you will make a book, or a journal, create a journal page showing a scene from one of your favourite books (do please tell us what book!) or a card showing someone reading or made using text stamps, stencils or word stickers. Just remember to create in one of our preferred styles of vintage, shabby, mixed media, art journaling, industrial, timeworn or steampunk.

We love books and book making here at A Vintage Journey and we cannot wait to see what you create!  You have until June 6th to link up your book inspired creations for a chance to be chosen by the Creative Guides as one of our three Pinworthies.  Our Pinworthies receive a badge to place on their blog or website and will also be pinned to our Pinworthy board on Pinterest.  Need a little inspiration to get you started?  The Creative Guides have made some wonderful projects to share with you as always so enjoy the book inspired creations below and then Book It!

****************************************************************

Deb

Handmade Folio Album by Deb Riddell Designs

I have been consumed lately with making art journals and mini albums so the timing of our Book It! challenge was perfect!  This little nature inspired folio album is based upon a design by papercrafter45 and is filled with pockets and tags and tuck spots and even a couple of little mini art journals.  Pop by my blog for a peek at the inside and a flip through video and come back here to AVJ in two weeks time when I'll have a tutorial to share with you on how it was constructed.


I used Eileen Hull's brand new Sizzix Notebook Die to create a book where my 6 year old grand niece, Mila, can record the books she has read as a new reader this year!  I am so pleased that she loves to read, just like her great aunt!  Please stop by my blog to see the details and more photos of how I put this together!


Our fabulous new challenge coincides with me flying off for a week's holiday in Cyprus, so I just had to make a journal to record what I am sure will be a fabulous holiday with my two old school friends. I have used Eileen Hull's Journal Die and some gorgeous papers with a Mediterranean feel for the covers and inside are ready to journal pages with small collages and quotes. Please do join me over on my blog for more details.


I have a real love for old cameras and for making journals, so I combined the two for Deb's challenge and created this grungy journal.   If you would like to see more please visit my BLOG.


S@ndy


For Deb's great challenge I have decided to revisit one of my favorite makes which is my Art Journal Cover. I created this cover over 5 years ago and I still love it. I hope you will join me to see more details on my blog here.


After some mixed media meltdowns, I ended up going down a very simple route for this challenge... using some Oxide playtime tags which had been around for months to cover a couple of notebooks.  Come over to Words and Pictures to find out what went wrong!


Amanda

Having recently been treated to Eileen Hull's new notebook die Debs challenge provided the perfect opportunity for me to 'break it in' and create my own personal notebook that I can use to record my daily 'thoughts' of which I can assure you there are many - probably far too many!! I really wanted to 'make it my own' so have used colours, mediums, stamps dies and stencils that I love. To find out more please feel free to stop by my blog.


Brenda


I attended an Antonis Tzanidakis workshop last weekend and felt in a very grungy mood when I embarked on creating this Eileen Hull journal/passport book. I have used patterned papers, acrylic paints and crackle glaze with oil paint to get this deep look to the finished covers. If you would like to see more details I'd love to see you at Bumblebees and Butterflies where all will be revealed.

****************************************************************

Well, as always, the Creative Guides do not disappoint, what a wonderful and varied array of fabulous book themed projects!  Hope that you've been inspired to join in the fun, just add your project to our InLinkz link up before 6:00 p.m. BST (that's British Summer Time) on June 6th, we can't wait to see what you create!

Deb and the Creative Guides

You are invited to the Inlinkz link party!
Click here to enter