Hi everyone, S@ndy here, I'm happy to be with you today to share a few tips about Tim’s paint marbling techniques for backgrounds. We have had requests here at A Vintage Journey from our readers for this Destination Inspiration—so this one is for you!! I hope you find it helpful.
First thing I want to say is that this technique does take some (very little) practice so don’t give up, practice does make perfect, or as close as you can get.
I like to use three or four colors and there really isn’t any special way to put them down on your craft sheet. It can be straight lines of paint or squiggly lines. Here are a couple ways I prefer and have had good results.
I suggest that you have a stack of tags ready to use while doing this technique. There is always paint left on the mat when you're done with the first tag and although we all seem to have enough supplies to last a life time we never like to waste.
I suggest that you have a stack of tags ready to use while doing this technique. There is always paint left on the mat when you're done with the first tag and although we all seem to have enough supplies to last a life time we never like to waste.

For the this demonstration I am going to use the same three colors so you can see the difference in the technique. This is one of my favorite color combinations since I'm very fond of orange. I have used Peeled Paint, Rusty Hinge and Mustard Seed.
I always have water handy & I like the Mini Misters from Ranger because the spray is even and not too heavy. You can place the colors next to each other or leave some space as I have done.
Here you can see that I have spritzed the paint with water and it's good to go. The photo below shows how the paint reacts to more water and both are good, it is a simple mater of personal preference.
I like to place the tag straight down on the paint and move my fingers around the tag, much as you would do with a stamp to get equal pressure on the ink. The difference is that if the tag moves it's ok - that's even better.
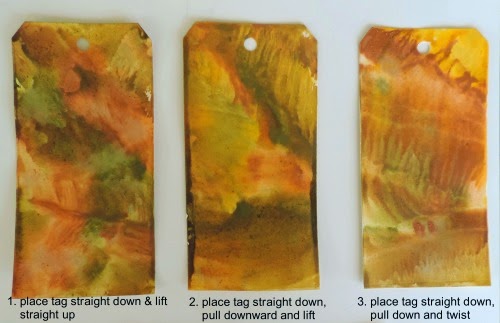
Here are three examples of how the paint will look different depending on how you treat it.
#1 on the far left - place the tag straight down on the paint walking your fingers around the tag and then lift straight up. You can see how the colors are smooshed (technical term).
#2 in the center - place the tag straight down on the paint, walk your fingers around, then pull downward (just a little) and lift straight up. You can see how the colors move together.
#3 on the far right -place the tag straight down on the paint, walk your fingers around and pull downward a little more than in example 2 and lift straight up. More of a marble effect.
#4 shown above - (my personal favorite) I took sample #3 from above while it was still wet - spritzed it with lots of water. The spritzing makes the paint move around and some even runs off the tag. The colors are still separate but much more subtle. The thing I love about these paints is that they never become muddy. The colors blend but hold true to their original color.
If you like more movement in your paint, you can always swipe it through the paint or even twist it before you pick it up. If you don't get complete coverage with the first application, simply put the tag back in the paint.
#5 This tag was placed on the paint and then twisted before lifting
#6 This tag was placed next to the paint and then pulled through it.
You are never going to get the same results twice - so "embrace imperfection" and go for it. By the time you add Distress Ink and maybe some water splats, you'll be happy with your tag.
You can let the tags air dry of course but I have found that if your paper is very wet it tends to curve upward in the center. This makes the paint puddle on the edges and you get a dark line of paint on both sides. You can see that in example 2 above. The best way to minimize this is to use the heat gun and dry it right away.
Another thing to remember is that once the paint has dried, it is there to stay, it will not react again no matter how much water you put on it. You can add paint on top of the surface as shown below.
I'm going to switch colors on you now - I made this tag but was not happy with so much red and pink. I wanted to add some blue so when the tag was completely dry I added some Broken China.
#1 on the far left - place the tag straight down on the paint walking your fingers around the tag and then lift straight up. You can see how the colors are smooshed (technical term).
#2 in the center - place the tag straight down on the paint, walk your fingers around, then pull downward (just a little) and lift straight up. You can see how the colors move together.
#3 on the far right -place the tag straight down on the paint, walk your fingers around and pull downward a little more than in example 2 and lift straight up. More of a marble effect.
#4 shown above - (my personal favorite) I took sample #3 from above while it was still wet - spritzed it with lots of water. The spritzing makes the paint move around and some even runs off the tag. The colors are still separate but much more subtle. The thing I love about these paints is that they never become muddy. The colors blend but hold true to their original color.
If you like more movement in your paint, you can always swipe it through the paint or even twist it before you pick it up. If you don't get complete coverage with the first application, simply put the tag back in the paint.
#5 This tag was placed on the paint and then twisted before lifting
#6 This tag was placed next to the paint and then pulled through it.
You are never going to get the same results twice - so "embrace imperfection" and go for it. By the time you add Distress Ink and maybe some water splats, you'll be happy with your tag.
Another thing to remember is that once the paint has dried, it is there to stay, it will not react again no matter how much water you put on it. You can add paint on top of the surface as shown below.
I'm going to switch colors on you now - I made this tag but was not happy with so much red and pink. I wanted to add some blue so when the tag was completely dry I added some Broken China.
Much better!!
Unlike DI which is translucent, these backgrounds are going to be opaque. When dry they will no longer react with water so you can add to them without changing the paint surface.
So there you have the basics of Distress Paint backgrounds but if you care to stay awhile longer I will show you some other ways of using them. You can certainly use them as they are and they will be beautiful but below are a few samples of the same tags after some small additions.
Below are the before and after of the same three tags shown above. I will do my best to tell you exactly what I did with them. As you will see, even if you are not thrilled with your tag at first, you can turn it into something useful.
I intentionally tried to change the colors so you would see that any tag can be saved. Even though Distress Ink was added, the paint maintained it's original opacity.
#1 I used Peacock Feathers DI over the entire surface and then edged with some Mowed Lawn. I left this one as is but you will be seeing it in a future challenge.
#2 I stenciled with the Ruler Stencil and the Honeycomb Stencil both in Black Soot DI. Then I added some Dusty Concord DI around the edge, next came a sprinkle of water. When that was dry I added some white Distress Paint in random splats.
#3 I stamped this one with two stamps from Tim's stamp sets Time Traveler and Remnants. I stamped in black and embossed with clear embossing powder. I dry embossed the top part of the tag with Tim's Clock Texture Fade and then edged with Evergreen Bough DI and finally stenciled with the clock stencil.
I hope that you have picked up some good information and that you will give this technique a try. I am going to end with a tag made by "the man" himself. Tim gave me this signed tag at CHA in 2013 after he demonstrated the very same technique. Nothing like learning from the master.
So now I hope you will get busy and smear some paint on a tag.
Relax, have fun and get creative.
All products mentioned above can be found at Country View Crafts,
our generous sponsor


