This is a unique challenge blog where we are inspired by and focus on the Vintage; shabby; mixed-media; art journaling; industrial, timeworn and steampunk genres and encompass the talent, flair, expertise and ideas of many artists that we are inspired by. We welcome all types of projects - cards, journaling, assemblage, layouts, albums, atcs, altered art in fact whatever you want to share (as long as it is in good taste).

Friday 29 December 2017

Final Tag Friday of 2017

Welcome to Tag Friday! A few times a year we have 5 Fridays in a challenge month, meaning we get to hold our Anything Goes Tag Friday, and December is one of those months this year. It is always popular with the Creative Guides - we do love our tags, and it's always fun to see the different directions we all go in when there's no strict route to follow. Let's take a look at what everyone has created...


I decided to re-acquaint myself with my fabulous collection of dies, some of which I use all the time and others I completely forget about! I also wanted to use this fabulous quote along with some coffee stained papers sitting on my desk.  Do join me over at Live the Dream if you would like to find out more.


Since we're not even halfway through the 12 Days of Christmas yet, I make no apology for offering up a festive tag.  In fact, this tag is doing double duty - it's also my final tag for the Funkie Junkie 12 Tags of Christmas challenge... and the closing date is today!  Do come and visit Words and Pictures if you'd like to see all the details of this "leftovers" creation.  


Having kept all my Christmas cards flat for posting, I had great fun adding some embellishments to this wintry Tim Holtz Etc. tag. It's the small size, but still huge... If you want to see how it came together, please come and visit.


I had a set of ice skates left over from another project so I used them, together with one of Alison Bomber's wonderful sentiment stamps, to create a simple wintry tag.  You can see more over on my BLOG.


I was ready to move past the holidays and even the winter season for the moment and created an encouraging tag with a sentiment stamp from one of our own Alison Bomber's stamp sets,  creating my background using the 'Cling Wrap Technique' which you can learn all about on my blog post here!


After making many a Christmas tag, I decided to turn my thoughts towards a New Year's celebratory tag, filled with stars and glittery accents.  Happy New Year to you and thanks for your visits to my blog SewPaperPaint throughout 2017. 


My original design for my tag background didn't quite go as planned and it was destined for only one place - the bin! That is until the white paint and brayer that were sat on my desk caught my eye .......! Thanks to them the 'bin worthy' background was transformed and along with Seth Apters dies, stamps and woodchips  made into the tag I share today over on my blog. Please feel free to pop by for more details.


What started out as a mop up from cleaning my stencil turned into a icy winter scene with the help of some die cuts and a few new Christmas gifts. This tag proves there are two sides to every story. Thank you for all your support  in 2017 both here at A Vintage Journey and at my blog, sarascloset. Happy New Year!


For our last Tag Friday of 2017, I decided to embrace the new Pantone Color Of The Year 2018, Ultra Violet, and created a tag with multiple Distress products in various shades of purple.  Think a touch of the next upcoming holiday, Valentine's Day, may have crept in there too!  Hope you can stop by my blog for my how to and Happy New Year everyone!

____________________________

That's all from us in 2017 - though you've still got just a few days to join in with Sandy's lovely Winter Wonderland challenge - so we'll wish you a very Happy New Year right now.

We'll see you soon in 2018 for some more challenges on our Vintage Journey.  Greetings and good wishes to all our amazing followers and players from around the world.  We love having you on board for the journey, and enjoying your creative explorations as you play along with the challenges here.  Happy 2018 everybody!

Alison and the Creative Guides xx


Monday 25 December 2017

Destination Inspiration--Pulling in at Terminal Four!

Merry Christmas! It's Sara Emily here with you today to guide you through the 4th stop on this month's creative journey. Each Creative Guide is using the same four items in our travel bag. To review, we are using the following ingredients:

Product: Tissue Paper
Technique: Embossing (dry or heat)
Color: Silver or Gold
Substrate: Acetate


Since it's Christmas day, I could see nothing more fitting than a Nativity scene, so we can all focus on the real reason behind this wonderful day.

You can see how my talented teammates Jennie, Sandy, and Astrid used these same ingredients by clicking on their names. Like my teammates before me, I had to do a little finagling. Usually I start with my substrate, but like the others, my acetate was something to be added to bring the piece together in the end.


I started with this gift box with the cheapo gift still in it. I picked it up at a yard sale for 25 cents, not for the paperweight inside, but for the box, knowing I would need it for this post. First I did my best to clean up the acetate sleeve that slides off the box; it had a number of stickers on it. Next I gave the cardboard box several coats of gesso.


I colored the back, "ceiling", front and sides with Distress paints, spritzing with water to blend and fade. I think I used Faded Jeans in addition to the Tumbled Glass pictured above. I didn't take too much care on the back and sides because I knew they would be covered in tissue, nor did I paint the inside back wall, since that would be completely covered with paper.


Then using Distress Collage Medium,  I adhered printed tissue paper I saved from a package my teammate and good friend, Anne (Redanne) sent me last year. Thank you, Anne! Once dry, I trimmed and sanded for a timeworn look.


For the inside walls of my tiny box, I stenciled stars on Tim's plain tissue wrap using Prima clear crackle texture paste. When dry, I highlighted the stars with Brushed Pewter (silver) Distress crayon and adhered the tissue to the walls.


While the tissue wrap was out, I stamped a Bible verse which I adhered to the bottom ledge.


Back to the inside, I built my scene, using the snow fall die from Winter Wonderland Thinlits, with silver Deco Sheets to back it. I die cut some trees using the Treeline Thinlits die, and colored a portion of them and the background with Distress Oxides. I added some snow to the foremost trees using collage medium and Clear Rock Candy glitter.  To make the treelines appear more dimensional, I used scraps of foam core between the layers. Multi medium matte is my go to glue for adhering all these little details.


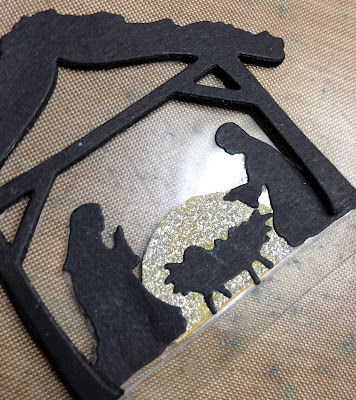
Now it was time to make my manger. I used an Impression Obsession die set and black card and cut a second manger from fun foam. I wanted baby Jesus to stand out and be given importance, so I cut a half circle of card covered with a scrap of gold Deco Sheet. I die cut the Star of Bethlehem from the same card. Additional color is from alcohol ink. Everything was adhered to my acetate substrate fussy cut from waste packaging. I scored the acetate at the bottom and folded. This bottom portion serves as a stand for the manger scene. After adhering the manger to the "floor" of the box, I smudged on Grit paste and sprinkled with Clear Rock Candy glitter to hide the workings and to add some snow.


To finish, I die cut "Noel" (Vintage Tidings) and a snowflake from the Mini Paper Snowflakes Thinlits sets. I colored them with  Distress paint; Noel with Brushed Pewter and the snowflake with Tumbled Glass. While the paint was wet, I sprinkled with Emerald Creek's Fractured Ice embossing powder, then heated. The two embossed (technique) die cuts were adhered to the acetate sleeve, and I slid this over the completed box.


One more look at the completed vignette box. I realized when finished this would have been really sweet as a shaker box, but if I did that I would have had to glue my box shut. Since I was planning on sliding a gift card into the back, I couldn't do that, so perhaps on the next one...

Wishing you all a joyful Merry Christmas day today! Please join us again next Monday when our 5th teammate will thrill you with her creation using these same four art ingredients. In the meantime, there is still time to enter our current challenge Winter Wonderland!

Hugs and Blessings!
Sara Emily

Monday 18 December 2017

Destination Inspiration arriving at Terminal 3

Hello lovely visitors, - Astrid here taking you on the next leg of our destination inspiration journey.
But first of all, hope you are all doing well during this busy time of year, just one week now until the big day..... hope you are feeling ready ;)

We have a bag full of exciting and diverse goodies, here is a little reminder of what they are this month:
Product: Tissue Paper
Technique: Embossing (dry or heat)
Colour: Silver or Gold
Substrate: Acetate
Now like my lovely teamies Jennie and Sandy who posted in the previous two weeksI cheated just a little bit, in that I did use Acetate, but not as the substrate. But let me start by showing you my finished project:
It's a little Christmas lantern, that was gifted to me by my wonderful friend Rita.
It started out looking like this:
I began by covering the two side panels with little bits of tissue paper, - a favourite technique to create texture.
I adhered it with gel medium, making sure there were plenty of wrinkles.
Next I painted over both panels with thick gesso
And finally coloured them with various layers of watery Decoart Media Acrylic paints: Titanium White, Burnt Umber and Raw Umber, mixing them with baby wipes and my fingers.
Finally the raised bits were highlighted with Treasure Gold in a mix of Renaissance Gold and White Fire.
Time to start on the other two panels: First I painted them with Gesso and then added some Raw Umber along the lower end.
I added some Crackle Paint over the brown and when the cracks appeared blended everything together first with white Antiquing Cream and then with a further wash of watery Umber paint.
The crackle paint I used was rather old so the cracks were ufortunately not very convincing.
Once the paint had all dried I covered the whole panel with Paper Artsy Metallic Glaze, which gave them a lovely subtle shimmer, which unfortunately does not show up in the photos I took of that stage.

On to the next ingredient, acetate: I cut two pieces to size to fit behind the open panels, coated them with the metallic glaze and added a few dots with a white gel pen for snowflakes. I then glued them  behind the panels.
Time to put the lantern together, or so I thought, until after I had done so when I suddenly realized I had totally forgotten about one of the ingredients, - embossing! Duh.... what to do now? Too late for any dry embossing which I could so easily have done with the acetate, so all I could do at this stage, was to rub some Versamark ink here and there over the side panels, sprinkle with gold embossing powder and like that add some more golden texture to it all.
It is a very subtle effect, but at least I lived up to the challenge and used all 4 ingredients.... (I must be getting old).....

Add this stage I also decided to add some snowy texture to the bottom of the front panels and some more colour to the deer. I used some really old and thick Decoart texture paste for that.


Anyway, that was it, - I'll leave you with a few more photos of the finished project.
During the day


And in the evening when lit up with a large tea light.

Well thank you for your visit and as this is a 5 week month there will be two more projects from team mates to follow, - and of course there is also some time left to play along with our Winter Wonderland challenge if you have not yet done so. Nothing like a bit of crafting to relief some holiday prep stress...
xxxxx
Astrid

Friday 15 December 2017

Welcome To Our Pinworthy Guest Creative Guides

Hello everyone, we have three amazing projects to share with you today from our September Pinworthy Mentions - Lula of U Lili, Helene of Lotsa Scrap and Pooja of Let's Get Crafty. They have all made wonderful creations for our current Winter Wonderland challenge, enjoy!

**********************************************


Hi everyone! My name is Lucyna Marynowska aka Lula.  Let me tell you all at A Vintage Journey I am absolutely delighted and honoured to be a guest designer here, this is such a talented design team! 

A little about me:  I come from the north of Poland.  Fifty-eight, retired widow, mum of two grown up boys and a happy grandma.  I started my crafting journey 6 years ago as a card maker and immediately became an addicted paper-lover.  After my husband's death it was crafting what helped me to conquer the pain.  I enjoy creating anything from cards to altered art and love to experiment with various types of mediums.  I am keen on colour and texture and I always try to find new ways to
express myself.   I love challenges to spark my creativity and making crafty friends all over the world makes me very happy.  You can find my creative project on my blog:  http://ululi.blogspot.com/.

For the current theme 'Winter Wonderland' I have prepared a canvas named 'Christmas Eve'.  I was inspired by my memories of this very special night when the whole family went to church about midnight to attend the unique Mass.   It is one of the most beautiful Polish customs.


I have used a 29.5 cm x 9.5 cm white canvas and lots and lots of mixed media stuff to make this piece.

You can follow the steps I am sharing on my blog.


I have used Lavinia stamps images to built the town and put a lot of snow - coarse structure paste on the roofs. 


The star is made of a birch-tree and I emphasized its texture by using heat embossing and some glitter.

Hope you like my project!


As a result of my Pinworthy Mention in September, I'm thrilled to be a guest designer at A Vintage Journey for this month's theme, Winter Wonderland.  I'm retired and live in a Victorian home built in 1894 in midwestern Illinois. My husband and I are retired and empty nesters, blessed with three grown children and their families. We love spending time with them. It's such fun to see my craft supplies through the eyes of my six-year-old granddaughter who is quite a budding artist. 

I started papercrafting in 2006, first making cards and then quickly transitioning to scrapbooking.  I've been honored to be on several design teams over the years.  I'm more commonly known by my childhood bonnet photo as 2amscrapper.  I have no particular style because I love to dabble in all forms of art.  Currently I'm part of a local mixed media group.  In my craft room, I'm concentrating on art journaling as well as digital composition. 

Having a tendency toward monochromatic and vintage design, I loved working with the current winter wonderland theme.


My substrate is peeled back corrugated cardboard painted with gesso and topped with the Tim Holtz Birch stencil using Prima Art Alchemy old silver Metallique wax. I liked it so much that I hated to cover it up.


I chose the Tim Holtz Snow Globe #2 thinlet die as my focal point, but used other products in my design.  I hope you'll visit my blog for the detailed list: LOTSA SCRAP from 2amscrapper.


Hello everyone this is Pooja from India, I am so excited to be here as guest designer. A little about me, I am a fashion designer but craft is my only passion.  I love experimenting with products and techniques and mixed media is my forte! Other than that I love altering things and making clay murals. You are invited to visit my blog Lets get craftyy with pooja

Today I am here to share my altered bottle which I have altered according to this months theme 'Winter Wonderland'. Have a look:


I used an old bottle, after cleaning it I've done some stencil work in front part and for side applied modeling paste. I have used corrugated sheet to make roof and pillars also pasted a piece of 4 x 4" card board to increase the width towards the lower end, using brown, white, yellow and a bit of green for base colors.

I used some small pieces of thin fabric (like cheese cloth) and dipped them in gesso and sprinkled some silver glitter fine dust and sugar dust to give it snow look.  I added some natural tree wood at the bottom and a frame with a vintage pic, added some moss, flowers and red cherry around the frame. 

Here are some more pics with different angles.


Thank you so much I hope you liked it and enjoy my work, please let me know in comment box how much you like it 😊

Thank you once again to A Vintage Journey team for this honor.

**********************************************

What beautiful Winter Wonderland creations from our Pinworthies, thank you so much for sharing your talent with us all!  And hope that seeing these beautiful projects has inspired all of you to join in our Winter Wonderland challenge, you have until January 4th to get your own wintery creations linked up, can't wait to see what you create!  Have a wonderful weekend everyone and happy creating!

Deb and the Creative Guides