This is a unique challenge blog where we are inspired by and focus on the Vintage; shabby; mixed-media; art journaling; industrial, timeworn and steampunk genres and encompass the talent, flair, expertise and ideas of many artists that we are inspired by. We welcome all types of projects - cards, journaling, assemblage, layouts, albums, atcs, altered art in fact whatever you want to share (as long as it is in good taste).

Friday 24 April 2020

Creative Card Making with Jo

Hello everyone! It's Jo from Let's Art Journal here with this month's Creative Card Making tutorial.

Today I'm sharing some Mixed Media cards that are suitable for different occasions such as birthdays, to say thank you or just simply to say hello!


I used some fun techniques to make these cards, here's how they came together ...


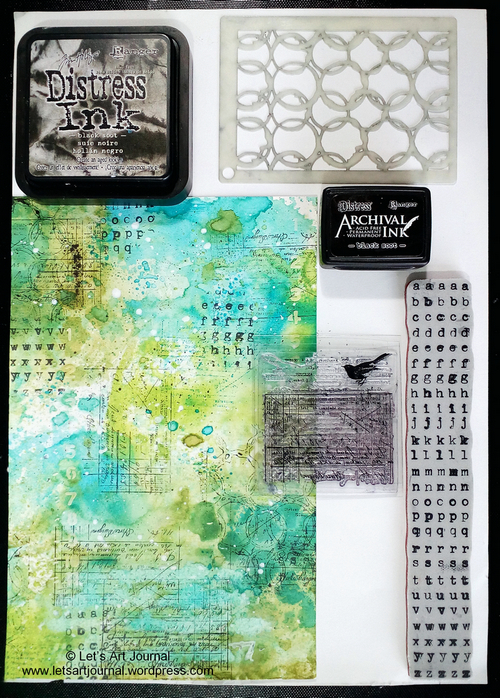
I started by creating a Masterboard from a piece of A4 Mixed Media paper using one of my favourite smooshing techniques by stamping Peacock Feathers, Twisted Citron and Peeled Paint Distress Ink onto a blending mat, spritzing with water and then pressing the mat onto the paper. I did this a number of times, drying the paper with a heat gun between each application of ink, until I created the intensity of colour I was after.


I used an Interlocking Circles stencil as a stamp by covering it with Black Soot Distress Ink and pressing it firmly onto the paper using a brayer. I also stamped a receipt stamp and a letter stamp using Black Soot Distress Archival Ink.

 
I added some texture by splattering the Masterboard with black and white acrylic paint and by applying some numbers using Texture Paste through a Tim Holtz mini stencil.


 I cut the Masterboard into four panels to create the backgrounds for my cards. Then I used two sets of Tim Holtz Thinlets to die cut some flowers and butterflies from white linen cardstock.


I stuck one of the flowers and a butterfly onto each of the background panels; the body of the butterflies were coloured using a black marker. I added a Small Talk sticker for the wording and then I edged each panel with the black marker.


To finish, I mounted each panel onto a card (approximately 6x4" in size) which I had made from white cardstock.

If you are interested, there's a full list of the materials that I used over at my blog here.


I hope you enjoyed my card making journey today, thanks so much for joining me!

Don't forget that you still have time to join our current challenge It's Gelli Time; it would be lovely to see you there!

Happy and creative wishes! Stay safe and well! Jo x

Friday 17 April 2020

Gelli Time Tutorial

As promised, today I'm sharing a tutorial for my Gelli Plate print framed wedding project made for this month's Gelli Time Challenge!
Here are the supplies I got out to create the print.  A 9"x12" Mosaic Flowers Repeat stencil from Stencil Girl, a 6"x6" Gelli Plate and a rubber breyer. (you can see that things don't get perfectly clean when you do this!)
Then I chose the acrylic paint colors I decided to use - Golden Liquid Acrylics in Quinacridone Magenta, Teal and Diarylide Yellow.  
(You may need to try a few colors until you find the mix you like with the stencils you have chosen.)
 
I dropped some yellow onto my gel plate and breyered it to cover all of it - not too thick.
I pressed a piece of white cardstock over the gel plate - pressed with my fingers over the whole thing a few times - and then peeled it off - they call this a pull.
Then I laid my stencil over the gel plate, dropped some teal and magenta over it and rolled the breyer over to cover all the openings of the stencil.
Here's how the gel plate looked when I removed the stencil.
I placed the yellow background 'pull' I made above over the gel plate being sure the yellow was centered.  And again, I pressed with my fingers all over the top of the gel plate.
This resulted in a very bright panel as shown here.  You can also see that there is quite a bit of acrylic paint left on the gel plate.
I saw this technique on one of the YouTube videos I looked at.  So the paint from the stenciling is pretty dry by now.  I added a few drops of the yellow on top
and spread it over the gel plate to cover with a thin layer using my brayer.
I waited just half a minute or so to let the yellow dry a smidge (technical term) and then pressed a clean panel of white card stock over the gel plate and rubbed really firmly over the whole area of the gel plate.
And this pull came out looking more vintage and not so bright.  The down side is that you can see on the left edge the paint didn't lift off - either I didn't press hard enough or the paint had dried too much. It was my first try with this technique.  There's a fine line between the ink drying and being too dry I think?!  But I love the look. And will have to try it again!
I painted a Tim Holtz/Idea-ology Vignette Frame with Carbon Black acrylic paint and let it dry.
I colored the bouquet, dress, lips, faces and hands of the Paper Dolls wedding couple with Copics, using similar colors to the paints I used on my panel.
I rubbed Bronze Age Metallique Wax over the black painted frame and added some Idea-ology rub-ons to the panel, laying the couple over the panel to help with placement of the words.
I adhered the panel to the back of the frame with glue, and added the wedding couple with thick foam dots - having them standing on the bottom of the frame.
I like the unexpected mix of modern brighter colors in the background of the vintage wedding couple.
I hope you have enjoyed my tutorial and that you will join us at A Vintage Journey this month by linking up a project you have made using your Gelli Plate!
You'll find the challenge here.
You have up to April 30th to join in!

Happy creative spring!
Julia

Friday 10 April 2020

Pinworthy Winners for our March Celebration challenge.

Hello Everyone.
We really enjoyed looking through all the birthday celebration winners projects, thank you to everyone who joined in we so appreciate the entries you all make. Thank you also for all birthday wishes you left for us on your posts.

So onto the three Pinworthy projects chosen by the Creative Guides and myself and you certainly made it difficult to narrow it down to just three. But after long deliberations (both from the CGs and me too) these three came out top of the lists and in numerical order they are -

#4  Lynn - Experiments in Paper

Wow what a way to celebrate nature and your brother's love of entymology but yes of course finishing the marathon line of finishing this beautiful set of albums. Well done Lynn.

#5 Shraddha - Creatif Edges

Shraddha your altered art candle stand is a wonderful celebration of mixed media, it's beautiful.

#10 Tracey - New Beginnings

Tracey I definitely think this is a celebration of the little things we have and hold so dear in our supplies. It's gorgeous.

Thank you ladies for sharing your wonderful projects with us they are amazing and have helped us celebrate our 6th birthday in style. Congratulations on being chosen the winners for March and we will be in touch very soon with your very well deserved Pinworthy Badges very soon. 


Before I go I would like to link back to our challenge post for April and ask you to share a gelli plate project. It's a great opportunity to have some fun with the plates and produce something to share with us all. If you pop to the post you will also see some fabulous and inspirational projects from the Creative Guides and a linky for you to add your project to. We hope you will join us and have a go at winning one of our Pinworthy badges for 2020.

Here in the southern part of the UK we have had a fabulous sunny week with some really high summer temperatures, however we do hope that wherever you are in the world with the Easter weekend and extra holiday days you will still observe the rules your country have set for dealing with, managing and hopefully ending this pandemic of the coronavirus. Apart from dropping some shopping over to my daughter's door step that I had delivered with my shopping delivery this week and going out to the front of the house to clap for the NHS and all other fantastic workers helping us to keep safe and alive I have not ventured outside of my house and garden for 3 weeks and I know many of you have been on lockdown for longer than that.
Please stay safe, stay home, protect all the front line people working hard for us and save lives.

hugs Brenda and the Creative Guides. xxx

Friday 3 April 2020

It's Gelli Time!

Welcome to the April A Vintage Journey Challenge.   Julia here as hostess this month and this is our new challenge!

It's Gelli Time!

Yes, get those gel plates out and have a play.  Printing and mark making are unique and somewhat addictive when you start so let us see what you create and how you use it in your project.  Just remember to create your project in one of our preferred styles: vintage, shabby, mixed media, art journaling, industrial, timeworn or steampunk.

There are lots of videos on YouTube using all kinds of media to print with a gel plate. If you need a little jump start inspiration please check that out!   We also have beautiful inspiration by the Creative Guides here on this post so please read on!

Julia
I have not played with my Gelli Plate very much (and definitely haven't previously made anything I liked!) so was excited to host this challenge, as it made me get into my craft room for a marathon gel plate printing session!   I watched videos and tried several mixes of colors and stencils before getting anything I liked at all but I'm very happy with this background piece I finally created!  I will be posting a tutorial on how I made this framed piece here at AVJ in two weeks, but for now I have more photos of my completed project and some of the other pulled prints I made as I was learning over at my blog, Create With Me, if you'd like to take a peek!


Well you know what it is like ... once you start with the Gelli Plate it is very addictive. I used both fabric and paper on my plate along with Acrylic Chalk Paints and had enough pieces to make a Needle Case for my large knitting pins and needles and some matching accessories. Do join me over at Live the Dream for more details and a little tutorial on how I made the Needlecase.

I decided to make a collage in my journal using some recent Gelli Prints. We all love taking the prints - but sometimes don't know what to do with them! More details today at Addicted to Art.

As anyone who's ever played with a Gelli plate knows, you can never pull just one print when you're playing.  I ended up with eight tags - front AND back - and a few spares!  So I turned them into a simple tag book with stamping and collages on each spread.  Come over to Words and Pictures to turn the pages with me.

For this fun challenge from Julia, I decided to add a spread in my art journal.  Just a little something playful with a nod to the Easter Bunny.  To see all the details of how I created this page, please join me at my blog here.

For Julia's challenge I have had great fun creating some stencilled gel prints using some of my favourite art supplies. I've used the prints to make myself an ATB desk tidy. If you would like to have a look around my ATB you are welcome to pop by my blog - ink-a-pink

I love experimenting with my Gelli plate! For Julia's fabulous challenge, I've been exploring image transfer techniques. If you'd like to see how I created this canvas, please hop over to my blog, and all will be revealed.

**********************************************

So please show us what you create using a Gel Plate and link up your projects below!  The link is open up to April 30th.
Just remember to create your project in one of our preferred styles: vintage, shabby, mixed media, art journaling, industrial, timeworn or steampunk.

We would like to thank you for sharing your beautiful art with us.  We always look forward to seeing the wonderfully creative ideas you have and how you bring them to life.

We also hope you, your families and friends are all healthy and safe in whatever country you call home during this unprecedented time of the Coronavirus crisis.

Good luck in the challenge, don't forget the Creative Guides choose their Top 3 for our Pinterest Board where your post will be linked to if you're entry is chosen.


virtual hugs to everyone!
Julia and the Creative Guides xxx

You are invited to the Inlinkz link party!
Click here to enter