This is a unique challenge blog where we are inspired by and focus on the Vintage; shabby; mixed-media; art journaling; industrial, timeworn and steampunk genres and encompass the talent, flair, expertise and ideas of many artists that we are inspired by. We welcome all types of projects - cards, journaling, assemblage, layouts, albums, atcs, altered art in fact whatever you want to share (as long as it is in good taste).

Monday 30 January 2017

Destination Inspiration - Arriving at Terminal 4

Hello Everyone!

Welcome!  Anne here to share the last stop for January - Terminal 4.  A
little reminder of what's in the travel bag this month:

Product -  Crackle Paint/Paste/Glaze
Technique -  Wrinkle Free Distress
Colour -  Hues of Blue
Substrate -  Wood

Since we are now looking forward to Spring and Summer I decided to create
an underwater scene using my favourite seahorses by Tim Holtz.  

The base of the clock is wood and measures 3.1/2" x 4.1/2".   I did the preparation of the base a while ago - the base was painted with white Gesso, a layer of PVA glue was applied once the Gesso was dry.  I immediately applied a layer of Tumbled Glass Distress Paint and left it to dry and some lovely cracks appeared.
Next I put some Distress Inks on my mat in Blueprint Sketch and Salty Ocean.  I spritzed
some water over the Inks and dragged the clock base through the inks until I got a result
I was happy with.
I took the Bubble stencil by Tim Holtz and dabbed Cornflower Blue Archival Ink
here and there over the base.
I die cut all the elements I wanted to use - seahorses, starfish and greenery using Tim
Holtz dies.  I coloured the seahorses and the starfish with  various Distress Inks and then 
gave them a good thick coat of Clear Rock Candy Distress Paint.
Here is a close up of the beautiful starfish.  The light is very poor at the moment so the Crackle Paint doesn't show up as well as it does in real life.
After adding the die cut greenery, I added some shells, a gift from a lovely friend.  The eyes are seed beads from my stash, I also added a few clear ones to resemble bubbles.  Finally,
I added the clock mechanism and a little stand at the back.  

Here is another look at the finished clock.
As a recap I would like to show you again what my lovely teamies did with contents of the 
same travel bag.

Terminal 1 - Alison
Terminal 2 - Amanda
Terminal 3 - Jennie
Aren't they just beautiful?!

Our current challenge 'Going Round in Circles' is still running and we have had lots of 
wonderful entries so far.  If you have the time we would love to see you join in!

Thanks for joining me here at Terminal 4.

Anne  xx

Friday 27 January 2017

January's exciting invited guest .......

Happy Friday everyone and here we are with another amazing guest designer who has created a really fantastic mini project with lots of crackle texture. We welcome Nikki Killinger with us today so scroll on down to see what she has made. 

**************************


Hi everyone, Nikki K here.  I am thrilled to be making my first visit here at A Vintage Journey.  I love everything mixed media, and have been creating since my teens, working in clay, resin, and on to papercrafting and paint, and still love to mix it all up a bit.  I currently reside on a couple of DT's, Tando CreativeCraft Stamper TIMI Challenge team, am Challenge Co-ordinator for IndigoBlu, and work as a freelance demonstrator on Hochanda. I'm very lucky to be able to do events and exhibitions with some fab people too!

I loved the theme of 'Going Round In Circles' this month, and decided to do a mini project to share with you.


I took a tiny matchbox, and used DecoArt Media products to paint and distress it.  I chose circle 'stain' stamps, and a postmark to embellish it.  


I love all the texture going on here! 


My circular bezel is sterling silver, and I've added cogs and a distressed stamped word, and used resin to complete.  It's an eclectic mix of shabby and weird all at the same time! 

If you'd like to know more you can stop by my blog - Nikki K Crafty Ramblings, to find out how it came together. 

Thanks for having me, 

Warm Regards,

Nikki
xx

**********************************

Thanks Nikki that's one very cool project for us today and I'm looking forward to popping on over to your blog to see more. We are so pleased you agreed to join us today and thank you for taking the time to create something so special for us.


Well that's the last Friday post for January so where did it go? Already the year is rolling on but we will be back on Monday with another Destination Inspiration post and next Friday will see the start of a new challenge. I just popped over to see how the current Circles challenge is going and there are wonderful entries to peruse and if you haven't had a chance to join in yet you have until Thursday evening to participate.

Thanks for being along on the Vintage Journey. Have a great weekend.

hugs Brenda, Nikki and the Team xxx


Monday 23 January 2017

Destination Inspiration : Arriving at Terminal 3

Hello and welcome to you all! 

Jennie here with you today welcoming you to Terminal 3 where I have a brand new project for you with this month's travel bag goodies.  A reminder first of what's in the bag!

Substrate : Wood
Technique : Wrinkle Free Distress
Product : Crackle Paint/Paste/Glaze
Colour : Hues of Blue


What a glorious collection! and here's what I did with them.


I started with a Calico Craft Parts Beechwood Panel which first got a coat of blue acrylic paint.


Then for the crackle I used DecoArt Weathered Wood and White Acrylic Paint. It was quite a large board to paint and as the crackle appears very quickly I got a bit caught out in places!


Then for some stamping: I used Andy Skinner's Chateau stamps which I stamped first on tissue and then added them to the panel with multi medium.  It never fails to amaze me how the tissue just disappears into the background and it really looks as though they have been stamped directly onto the board.


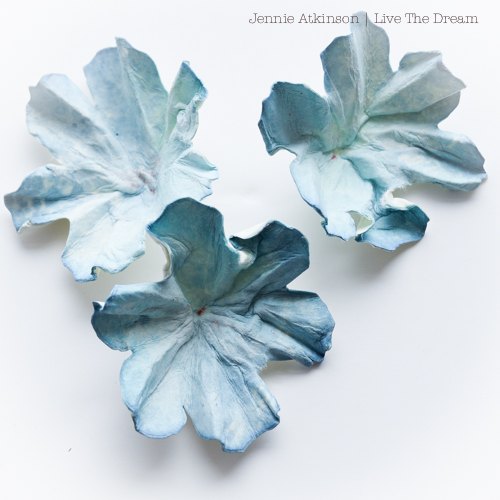
I decided to use the Wrinkle Free Distress technique on my embellishments rather than the board. These flowers got splotched into Distress Inks Stormy Sky and Tumbled Glass with a little Faded Jeans added around the edges.


The technique makes for a uniquely coloured flower. Check out my tutorial HERE on my blog if you would like to know how I make these shabby roses.


Then a leaf got the technique with Faded Jeans and Tumbled Glass. I did add a little stamping with a mesh stamp and Faded Jeans to give it a little texture.


I added more wood in the form of this lovely corner trellis .....


.... and some wooden letters, both from Calico Craft Parts.


As you can see I have added a few of my favourite vintage elements (muslin, string and pearl buttons) to complete the panel.

Thank you for joining me here at Terminal 3 and I hope that along with Alison and Amanda our travel bag projects this month have inspired you to use them too. Don't forget to pop back next Monday where another of our Creative Guides will be waiting for you at Terminal 4.

And don't forget our current challenge Going Round in Circles - we'd love you to play along!

Jennie x


Friday 20 January 2017

Pinworthy Guests - Going Round in Circles

Hi everyone, Nikki here to welcome and introduce our Pinworthy guests this month. Today we welcome our October winners to share a creation on our current theme - Going Round in Circles. Please welcome Leslie and Nicole! 

Hello everyone, I am Leslie Lineberry from the state of Montana in the USA. I am absolutely thrilled and honoured to have this opportunity to be a Pinworthy Guest for Vintage Journey.

I am fairly new to Mixed Media, but not to creating. I would described myself as a 'Hobby Hoarder' because over the years, I have painted in oil, acrylic and watercolor; done batik, quilling, beadwork and polymer clay - just to name a few. With Mixed Media/Assemblage Art, I've been able to put it all together and I feel like I've finally arrived where my artistic soul was trying to take me!

I love this month's challenge theme, Going Round in Circles. My contribution, Space Junk Galaxy, is an assemblage canvas featuring a spinning circle in space of all the little things that come up missing in our everyday lives, like a sock in the dryer, keys, buttons and all sorts of other odds and ends.
After covering the canvas with black gesso, texture paste and crackle medium, I cut a spiral out of paper to use as reference for adding my 'space junk'. Before adding color, the entire assemblage was coated again in black gesso.
Each corner of the canvas has a different 'gauge' such as a Lost & Found and a compass. I created these from wood circles which I stencilled, textured and embellished.
Adding all the 'goodies' took ages, but I do love picking through all my random bits and pieces and organising them on a canvas. Caught is this interstellar circle, you will find nuts and bolts; flowers, shells and screws; stars, wire, beads and buttons.

If you would like to see detailed information on how I created this canvas, please visit my blog at
www.artfordinner.gallery/blog

********************************

Nicole here from Nicole Wright Designs, hello travellers... I'm back! I am thrilled the AVJ Team is having me back as a guest. I have been around the blogger merry go round for awhile and I love to make a mess. Currently I design for Sizzix, Eileen Hull and Creative Scrapbooker Magazine in Canada. I love long walks in the snow and living in a very cold snowy part of the world. 

Thrilled to create for the Going Round in Circles for this month. I created this masculine canvas using Magenta Nuance Powder Dyes, Distress Paint, Gesso and Embossing Powders.
I created a focal point painting a large circle with gesso and stamping! 
Check it out, I used my cap from my distress paint to make some circles. The eraser on a pencil is another great circle option too.
Want to see more detail for this project? Stop by Nicole Wright Designs for a full tutorial on how I created this canvas, what products I used and Sizzix dies.
Always a pleasure AVJ Travellers.

***************************

Wow! I will be heading over to both Leslie and Nicole's blogs for more details on these fabulous projects - love all Leslie's details and wonderful design and Nicole's clever arrangement and grungy feel.

We love to welcome guests here at A Vintage Journey - so do enter this month's challenge for a chance to be a future guest and to win our random winner prize.

Nikki
xxx

Monday 16 January 2017

Destination Inspiration - Arriving at Terminal #2

Hello Everyone and Happy New Year to you all 

Its Amanda here and I'd like to invite you to travel with me on the 2nd leg of this months Destination Inspiration. Before we set off lets take a quick look inside the travel bag to remind ourselves of the contents
Product: Crackle
Technique: Wrinkle Free distress
Colour: Hues of Blue
Substrate: Wood .
As always, there's only a few supplies but I'm a big fan of travelling light so lets hop on board and continue the journey....

Here's what I have created


and how I created it...
The Wooden Frame
I primed the wooden frame with a couple of coats of Black Gesso which would serve not only as the preparatory coat on the wood but also as the colour to show through the cracks once they had formed. I then applied crackle paste with a palette knife and left to dry, after which I enhance the cracks using media fluid acrylic paint.


a close up


Wrinkle Free distress Technique
I inked up a panel of mixed media card stock using Tim Holtz Wrinkle free distress Technique. I prefer to use mixed media or watercolour cardstock for this technique as I find it can 'take' the water far better than regular card stock.
My ink selection


I used the top three inks for the first stage of the technique


and all the inks for subsequent smooshing, swishing, dipping and dabbing.
I then added more detail with some stamping using a couple of stamps with Archival inks


and stencilling using a layering stencil with both distress ink and Distress Grit paste


finishing the panel with a a few paint splatters and scratches before adhering in the window of the crackled frame .


The Wooden Hearts
I altered two wooden hearts the larger base heart by simply painting with gesso and paints


The smaller heart I covered with scrunched up tissue paper for a first layer of texture


 and then built up the texture further using both Distress Grit paste and Crackle paste allowing to dry between each application. Once dry I then 'worked' the texture with paints.


Here it is mid process....


and here it is finished, mounted in position and embellished with a Distress Grit paste circle and a Tim Holtz Ideology ring fastener.


adding not only texture but dimension too .


The finishing touches came in the way of Tim Holtz remnant rubs and a few pieces of ideology to embellish the frame


and a Tim Holtz small talk sticker provided an ideal title for my altered frame
'Listen to your heart it will show you the way '.


Thank you for accompanying me on the 2nd leg of this month Destination Inspiration. I hope both I and my fellow Creative guide Alison (terminal 1) have inspired you so far but be sure to stop back next Monday when a fellow Creative Guide picks up the travel bag of goodies and meets you at Terminal #3 to continue the journey. 
 We welcome you to join in our current challenge theme 'Going round in Circles'. 
We always love to see what you create and appreciate each and every one of your entries.
There's still plenty of time to enter as the challenge is open until the 2nd February.
Hope you all have a great week
Happy Crafting
Amanda x