This is a unique challenge blog where we are inspired by and focus on the Vintage; shabby; mixed-media; art journaling; industrial, timeworn and steampunk genres and encompass the talent, flair, expertise and ideas of many artists that we are inspired by. We welcome all types of projects - cards, journaling, assemblage, layouts, albums, atcs, altered art in fact whatever you want to share (as long as it is in good taste).

Showing posts with label Creative Card Making. Show all posts

Friday, 27 November 2020

A Vintage Journey's November Card Making Post

Julia here today with a card I made using the Die Cut Relief technique for AVJ's November card making post.

Here's how I put this card together.

I got out some dies that would create a layered scene:  trees, a fence, a wreath and a sentiment.  I also got out some dimensional sticker snowflakes.  I used a background embossing folder (Weathered from Taylored Expressions) to emboss the water color paper panel before layering the die cuts over it.  I cut all the dies out of watercolor paper and adhered them over the embossed panel using a Matte Medium.

Once dry, I brushed over the whole panel with the Matte Medium
Because the stickers were silver I went over the panel once again, this time with Gesso so it would all be white.

When Gesso was dry,  I started adding layers of acrylic paint. First, I dry brushed the panel with Manganese Blue Hue, being sure to get into all the cracks and crevices and removing any pools of paint in corners or depressions.

After this layer dried, I dry brushed with Burnt Sienna, just hitting the high spots and open spaces, not fully covering the blue.

After this layer was dry, I dry brushed the final layer of paint using Titanium White, brushing just across the raised pieces and open spaces, turning the panel and brushing from all sides so all the edges of the die cuts were brushed with white. 
I trimmed the panel and layered it to a white card base.

I hope you have enjoyed seeing how I put this card together. 

You still have time to join in on our November Challenge -  Toni's fun Pairs Trios and Sets Challenge.  You'll find it here.


Friday, 26 June 2020

Creative Card Making with Jennie

Hello everyone! Jennie here sharing the creative card making tutorial with you this month.


As our theme this month is Rustic Charm I decided to collect some "rustic" elements for my card. I didn't set out to make this particular design but used my "finds" to detail and design my card.


I found some great hessian pieces - paper and real! and little bits of lace and cork .....


... which all got stuck down in layers.

So here is how it all came together.


It was finding this hessian piece of paper in my stash which got me started on the Rustic Charm theme. I had no idea it was there and the edges were a bit tatty so it has been "around" for a while. I managed to cut it into a 5.5" x 5.5" piece which I thought would look good layered onto a piece of ivory card measuring 5.75" x 5.75" and then onto a kraft 6" x 6" base.


I decided to add a little more hessian. This was very difficult to cut straight !!! and I realised too that it would be difficult to glue. So I decided to stitch the edges of the card and catch it along the straight edges. Just enough to hold it in place.


I felt it all needed brightening a little so added the little ivory doily to match the layered card.


I find it is always best to get the base card stuck together at this stage - once the card starts to get decorated it is then very difficult to get it on to the base card.


Next up came a piece of cork which I also found in my bits box. There was enough (just!) to cut it using the Tim Holtz Trellis Die. 


This is one of my favourite dies for cards - it is so lovely and airy and just adds a wonderful vertical element to a card without being overbearing.


Next came a tiny little bit of lace. You can see the glue still wet here and I don't normally wait for anything to dry as it means I can lift things to snuggle other embellishments underneath. Once dry it is not possible to do that.


Muslin and some tea dyed ribbon came next. Sometimes a bow is too much, so by tyeing a knot in the middle of the ribbon this allows it to lie in a "bow" shape without all the bulk.


Finally I added a sentiment under the handmade rose .......


..... and tucked a stamped butterfly in behind the flower and muslin.


Finished! Relatively quickly and easy to put together with stash I already had.
I normally keep a bunch of handmade flowers and stamped butterflies ready for cards which saves a lot of time.

Thank you for joining me today and don't forget that there is still time to join us in our challenge RUSTIC CHARM. You can get all the details here.

Jennie x

Friday, 24 April 2020

Creative Card Making with Jo

Hello everyone! It's Jo from Let's Art Journal here with this month's Creative Card Making tutorial.

Today I'm sharing some Mixed Media cards that are suitable for different occasions such as birthdays, to say thank you or just simply to say hello!


I used some fun techniques to make these cards, here's how they came together ...


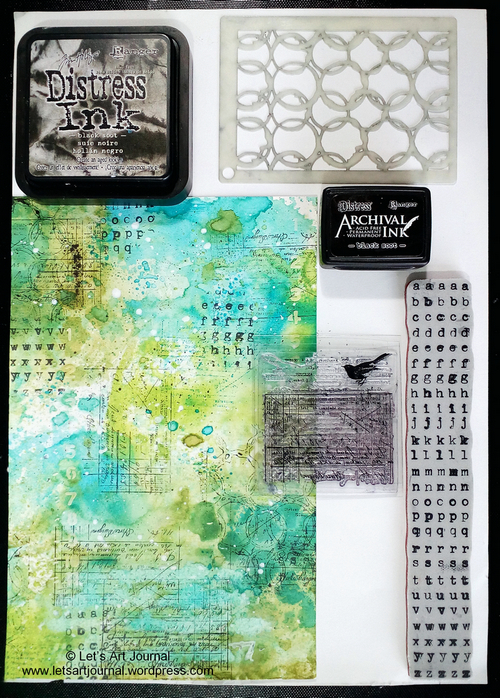
I started by creating a Masterboard from a piece of A4 Mixed Media paper using one of my favourite smooshing techniques by stamping Peacock Feathers, Twisted Citron and Peeled Paint Distress Ink onto a blending mat, spritzing with water and then pressing the mat onto the paper. I did this a number of times, drying the paper with a heat gun between each application of ink, until I created the intensity of colour I was after.


I used an Interlocking Circles stencil as a stamp by covering it with Black Soot Distress Ink and pressing it firmly onto the paper using a brayer. I also stamped a receipt stamp and a letter stamp using Black Soot Distress Archival Ink.

 
I added some texture by splattering the Masterboard with black and white acrylic paint and by applying some numbers using Texture Paste through a Tim Holtz mini stencil.


 I cut the Masterboard into four panels to create the backgrounds for my cards. Then I used two sets of Tim Holtz Thinlets to die cut some flowers and butterflies from white linen cardstock.


I stuck one of the flowers and a butterfly onto each of the background panels; the body of the butterflies were coloured using a black marker. I added a Small Talk sticker for the wording and then I edged each panel with the black marker.


To finish, I mounted each panel onto a card (approximately 6x4" in size) which I had made from white cardstock.

If you are interested, there's a full list of the materials that I used over at my blog here.


I hope you enjoyed my card making journey today, thanks so much for joining me!

Don't forget that you still have time to join our current challenge It's Gelli Time; it would be lovely to see you there!

Happy and creative wishes! Stay safe and well! Jo x

Friday, 27 March 2020

Creative card Making with Barbara

Hi everyone! It's Barbara ( Yayascrap & more) here and this is my first Creative Cardmaking Post!
In this difficult moment for each of us, I wanted to create a card that will make all united in the same effort, with the hope or better with the certainty of being able to slowly resolve the situation with our own sacrifices.
I chose two quotes to remind us of both our task and why we absolutely have to combine all our efforts!
Stay home because we have just one life!
Here are the close-ups and the tutorial.


Here's the tutorial
When I start a project the first thing I do is choose the colors I want to work with. This time my intention was to create a dark sky but with some gashes of light blue. Alcohol inks are perfect because they can create incredible effects. I chose the colors you can see in the photo and then I used the new product from the Alloy range in the Foundry color.
This is an amazing color. When I tried it I couldn't believe my eyes! The moment the drops come out of the bottle they look golden, then as they move the magic happens, together with the gold there is the silver. It's incredible!
I started with a few drops of various shades of blue together with a few drops of Alcohol Ink Blending solution on the Yupo Translucent paper. You have to move the sheet slowly because if you do it too fast the drops mix and you will no longer have those well-defined color effects but a uniform and a little boring coloring. If you move slowly instead you will be able to direct the drops. When you have obtained the effect you can dry from a distance with Heat Tool. At this point, drop a few drops of Alloy Foundry at random and immediately above them a tiny droplet of Blending solution.
You will see the golden color expanding and dividing creating lines similar to those of marble.
At the same time as these golden lines are created, the silver color appears on the surface. It is truly stunning! I really fell in love with these new Alcohol inks!
The background of the card is ready. The Yupo Paper Translucent is perfect for working with Alcohol Inks but it is a little transparent and if you have to use them on dark cardstock as I did, I recommend you to glue it on a white sheet cut in the same size using the roller to make exit any air bubbles.
At this point with the metal cardstock by Tim Holtz, I cut the urban landscape in two colors and I used an old embossing folder to give dimension.
 With the same metallic cardstocks and the Tim Holtz Alpha Numeric Tiny Type Upper Thinlits die I cut the letters to compose the phrase #Stay Home.
 At the base of the landscape, I inserted a strip cut with the 3D Star Trim die.
To complete the card I used a cutout that I had left from the colored base with the Alcohol Inks and I cut some hearts that I glued on the houses.
As a final detail I used the color Alloy Foundry to highlight the stars and added the "Just One Life" sentiment.
The phrase Just One Life is part of a set of Tim Holtz Stampers Anonymous stamps that will surely become a must-have because it really contains a huge number of sentences!
To stamp it I used Versamark and Platinum embossing powder. I chose the colors of the layers of the card and I finished the job by gluing them.
I hope you enjoyed reading the tutorial and I hope this card will help us understand that at this moment we must have a common goal and that there no exist boundaries like never before. If you want you can find the whole list of materials that I used on my Blog Yayascrap & more!
I also remind you that you still have a whole week to participate in our monthly Challenge: Celebration Time Come On!
Stay home!
Thanks for stopping by, see you soon!
Barbara


Friday, 28 February 2020

Creative Card Making with Amanda

Hi Everyone and Welcome

Amanda (ink-a-pink) here with you today sharing a card I have created for our Monthly Creative Cardmaking post

We began these posts back in March 2018 when we restructured our monthly timetable. The general idea is that each of the Creative Guides will take their turn throughout the year to share some ideas for creating a card in keeping with our preferred genres- vintage, shabby, mixed media, art journaling, industrial , timeworn or steampunk.

In contrast to the card I created and shared last year (Jan 2019) which was 'industrial, monochrome I have a much more colourful card to share with you today. I feel it has a mixed media, art journaling vibe going on so is inkeeping with a couple of our preferred genres. 


Whether creating my own cards or buying them from a high street store I can never resist a butterfly and meaningful words.


Now, I have to hold my hands up and say that I neglected to take any process shots but I will spotlight some of the main features of the finished card. 

I was very fortunate recently to add some of Seth Apters line of Izink 'Ice' from Aladine to my stash of art mediums. A belated Christmas treat! Good ol' Santa. 
Being keen to try them out was pretty much where the creativity all started as the card background is one of my first 'Ice' 'test' pieces.
In brief: Ice is a translucent gel that creates a wonderful coloured 'Ice effect' It also gives your art a glossy finish.
( more info about the product can be found here and here)

Let me show you with a few close ups


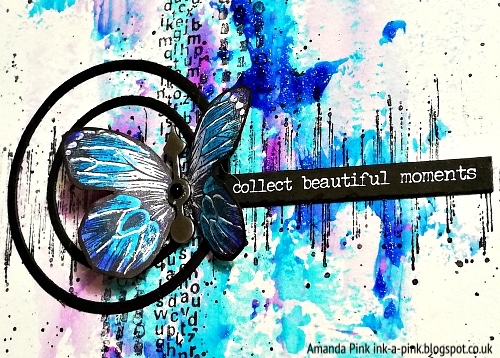
The 'Coloured 'Ice' effect.... 


.... so cool!


That glowing sheen..... Pretty special, don't you think?


I didn't want to cover or hide such fabulous colours and effects so I created the rest of my card design with this in mind.

I added some stamping down the vertical of the background. I used a couple of Seth's Impression Obsession stamps for this.


Another of Seth stamps provided a touch of stamped detail across the horizontal too.
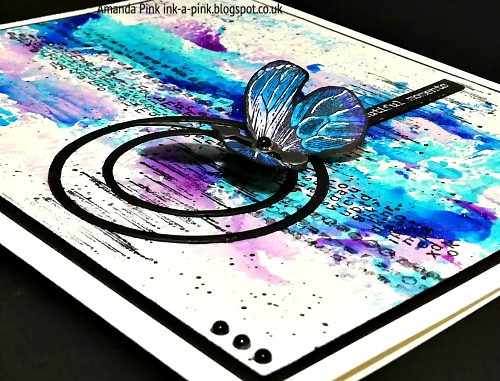
This helped create a foundation line for the placement of the focal feature: a few circular die cuts, a watercolored butterfly and a meaningful quote.


The thorax of the butterfly was embellished with a black beaded Ideology game spinner.


A few black gem beads saw there way to two of the opposing top and bottom corners of the card aswell. 


I  really enjoyed creating this card and am very happy with the result.

I hope you have enjoyed your time here with me today and that maybe I have offered some 'Creative Card Making' inspiration. 
Thanks for taking the time to stop by and for any comments you may wish to leave. Both are appreciated. 
Our current challenge 'Against the Grain' remains 'live' for one more week so you still have time to join us and submit an entry. Out new Challenge starts next Friday ( 6th March) so be sure to pop back then to find out all about it. 

Wishing you all a lovely weekend 
Creative Warm Wishes 
Amanda 
x