This is a unique challenge blog where we are inspired by and focus on the Vintage; shabby; mixed-media; art journaling; industrial, timeworn and steampunk genres and encompass the talent, flair, expertise and ideas of many artists that we are inspired by. We welcome all types of projects - cards, journaling, assemblage, layouts, albums, atcs, altered art in fact whatever you want to share (as long as it is in good taste).

Friday, 17 March 2017

Welcome To Our Pinworthy Guests

Hello everyone, it's the third Friday of the month and time to welcome our Pinworthy winners from December's Winter Magic challenge, Lisa Hoel of Creative Juice Fresh Squeezed and Georgie Connolly from the Little Blue Craft Box.  They have created wonderful projects for our All Aboard challenge this month to help us celebrate our third birthday here at A Vintage Journey, enjoy!

*******************************************


  Hello, my name is Lisa Hoel and I’m a lifelong craft lover. I’ve been ‘arting’ ever since I first picked up a crayon! Paper crafts have been my main focus for the past fifteen years or so and I love to make detailed, layered, textured, mixed-media type projects. I am not usually a clean and simple type artist. ;-) My background is in graphic design and I'm blessed to be married to the greatest guy in the world and have two dynamic boys. You can find me here:

 ***
I'm honored to be a guest here on the blog today and help A Vintage Journey to celebrate its 3rd birthday! With thoughts of an upcoming spring and parties in my head, I thought it would be appropriate to make a wee little fairy cottage in the woods. Maybe she's about ready to have guests over for a celebration... the welcome mat is out and everything is spick and span!


I altered a candle lantern to hold my little scene. The metal of the lantern itself I 'grunged up' with paint and crackle paste to make it look mossy and worn.


A little bird friend has made its nest up on the top! Do you believe in fairies? ;-) The ribbon is dyed seam binding and I made the nest out of spanish moss and small twings.


For guests that can't fly in, our fairy has a mushroom staircase leading up to the front door.  The house is made with several of Tim Holtz's Village Dwelling dies and roofed with Prima paper leaves dyed green.


Georgie


Hi there!

I'm Georgie C, from LittleBlue blog. I live on the south coast of England in Dorset, with my hubs, little boy, three dogs and two rats - yep we're a handful ;) But wouldn't have it any other way! 

I love exploring and trying everything in our wonderful arty, crafty, creative world. From bold, contemporary and modern, to vintage/olde-world and shabby chic. However, I love colour most of all, it's always the part that grabs my attention in any project, it doesn't have to be completely 'out there', even the subtle flow of colours blending can be mesmerizing.


I'm so happy to be here today as a guest for A Vintage Journey, and for their birthday month I thought I step out of my normal comfort zones and try something a little different. Something I have wanted to try for ages - an assemblage piece using Tim Holtz Idea-ology.


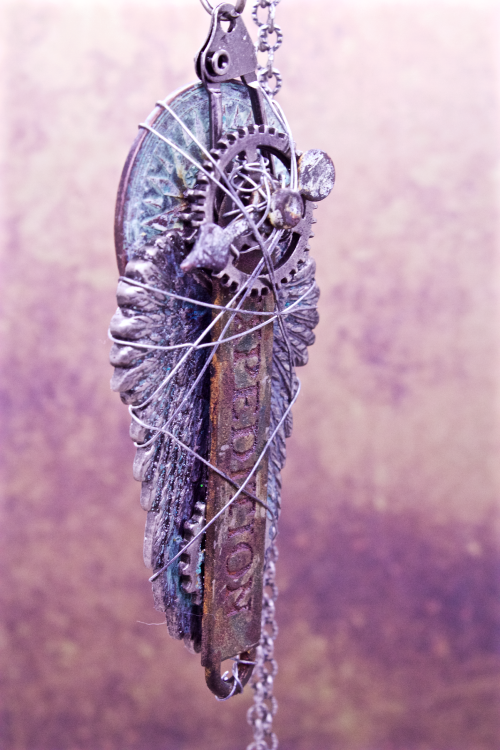
This was so awesome to make, I loved going for a old, steampunk, another world-style mysterious pendant. The biggest trick was in the layering of pieces to get the word band level


I chose the word band 'expedition' to match the compass at the top, so it has the mark of a traveller about it, like it belonged to some explorer of olden times. The 'expedition', compass and spinner with brad were both given coats of paint from Ten Second Studio, with a spritz of the Patina spray to start the rusting and patina process. I absolutely love how natural this is and those colour that have come through, especially in the rust. Those patches of earthy greens, orange and yellow, so subtle but super cool and very authentic.


Here you can see what I mean about the layering. I used mini gears to help build up from the compass and the swivel clasp is a substitute for a pendant bail. I go in to more detail with the products and layers over on my blog. I finally finished up with touches of Archival, Jet Black ink.

I really hope you have enjoyed my post and a huge thank you to AVJ for having me here.
Hugs
Georgie
xx

 *******************************************

Wow, what fabulous projects, thank you so much Lisa and Georgie for joining us here at A Vintage Journey for our 3rd birthday celebrations!  And we hope that all of you will join us for our All Aboard Anything Goes challenge this month as well, we always love to see what you create.  Thank you again for stopping by today and be sure to come back on Monday for our next stop on our Destination Inspiration journey for March, see you then!

Deb

Monday, 13 March 2017

March Destination Inspiration - Arriving at Terminal #2

Hello fellow A Vintage Journey travelers!   Julia here today welcoming you to Terminal #2 of our March Destination Inspiration  posts.  
This month we have the following supplies in our travel bags:
Product:  Acrylic Paint
Technique:  Layered Stencils
Color:  Turquoise and Teal
Substrate: Canvas
I didn't have a framed canvas hanging around in my craft room but I did have some Natural Sticky Back Canvas so I used that for my substrate.  
For my first layer of color, I rubbed Cracked Pistachio Distress Ink on my craft mat, spritzed with water and pressed the canvas panel into it.
For my second color I used one of my brandy-new Distress Oxide Inks - Broken China - again rubbing the ink onto my craft mat and pressing the canvas into it.
I let this dry and then randomly sponged over Tim's grid stencil using Distress Cracked Pistachio.
I used Tim's floral stencil with white acrylic paint for my second layer of stenciling. 
 (be sure to wash off your stencil right after using when you use paint!)  The canvas curls with the wet ink but lays flat once you adhere it to a piece of card.
While I let this dry -  I die cut Tim's Bird Branch and colored it with Oxide and Distress inks.
(I actually cut one out of white card stock and one out of a manila tag - and I show inking the white one but then ended up using the manila tag one on my card.)
First I pressed the branch part into Vintage Photo Distress Oxide that I had sponged on my mat and spritzed with water.
Then I colored the bird using the same technique with Distress Oxide Broken China - you can see I didn't try to completely cover the piece.  I let the colors drip and dried with my heat tool.
And finally, I inked some of the white spaces on tree and bird with Cracked Pistachio Distress Ink from the mat.
Once the paint was dry, I removed the backing from the canvas and adhered it to a slightly larger piece of kraft card.  I sponged the edges of the canvas and the bird with Vintage Photo Distress Oxide.  Then I layered the bird branch over the canvas with foam tape. 
I added Idea-ology Clippings Stickers and 3 tiny brown buttons from my stash.  I love the way the coloring on the branch looks like layers of bark with the different colors 
(totally unplanned but happily appreciated!)

I hope you have enjoyed seeing how I created something using the materials in our March Travel bag!  I'm really happy with how this came out - my first time trying the Distress Oxide Inks too!

Next Monday someone else will be arriving at Terminal #3 with another project using these supplies!   If you missed Terminal #1 - you'll find Astrid's beautiful project here.

I'd also like to invite you to join in the A Vintage Journey March Challenge - where we are celebrating our 3rd birthday!  You'll find the challenge and details here.


Friday, 10 March 2017

Winners and Pinworthies of the February Challenge : Words That Are Special

Hello everyone and welcome to our Winners and Pinworthies day here at A Vintage Journey for the February "Words That Are Special" Challenge.

There were so many wonderful entries showcasing your special words that selecting the winners has been very difficult but as always we really enjoy seeing your creative projects and every entry was special and a winner in its own way.

_________________________________

To start us off today, here is today's winner drawn by the Random Generator...

That's #70, Neha of Happiness Handcrafted, with this wonderful dimensional tag.


Congratulations, Neha!  You'll receive your prize shortly, and we hope you'll join us on the journey as a Guest Creative Guide in the future.

_________________________________

And now for the Pinworthies (in no particular order!) chosen by myself and my fellow
 Creative Guides

Kasia : Papierowy Wymiar


#54 Changes, Chances, Choices
I loved the simplicity of Kasia's chosen words on three fabulously
 vintage, textured mixed media tags.

Jan : Scrapbooking from the Attic


#84 Dreamer
Fabulous shabby vintage layers from Jan evoking the single
word "Dreamer"

Zelda  : Out of Africa Creations


#83 Africa Smiled
Amazingly creative use of a poem
very special to Zelda.

I do hope you will take the time to visit the individual blogs to see more details of
these wonderful projects.

Congratulations to all three of you! Your Pinworthy Badges will be on their way to you shortly and we hope you will join us here as Guest Creative Guides at some point in the future.


Many thanks again to all of you who joined in with the February challenge and for sharing your amazing creativity. I hope you are enjoying Brenda's All Aboard : Happy Birthday Challenge this month and of course don't forget our Destination Inspiration each Monday - there are some amazing goodies in the travel bag this month.

Happy crafting travels!
Jennie and the Creative Guides


Monday, 6 March 2017

Destination Inspiration Terminal 1

Hello dear friends and fellow travellers, - this is Astrid, delighted to start you off in this our birthday month with our first Destination Inspiration post.
Like always, we have some wonderful goodies in our travel bags this month:
Substrate: Canvas
Colour: Turquoises & Teals
Product: Acrylic Paint
Technique: Layered Stencils

So here is a little canvas I put together to share with you:
I started by choosing a selection of acrylic paints in the two colours, it's a mix of Paper Artsy and Distress Paints.
 I put  them down in pretty random fashion, just adding some yellow for a bit of contrast, drying carefully between colours to avoid mud.

Next I selected a few different stencils, a couple of Tim's Layering stencils, a stencil by Seth Apter and the word came from a Crafters Workshop stencil. As March is the month when Spring starts here in the Northern Hemisphere, I decided to give my canvas a Springtime feel.
I used a mix of products to stencil with. This is what I love about layered stencils, there are so many different options. I used paint, Archival Inks, Distress Crayons and even some Distress Inks for a subtle effect in the background.
Below some close ups of different corners:


Time to start working on the foreground. I decided to work with Tim's Wildflowers, both the stamps and the dies. I stamped the chosen stamps on tissue paper, always a good trick when you want to add more than a bit of background stamping to a canvas.
I went around the stamped images with a water brush, this helps to tear around the stamping and creates a feathery edge, which helps to merge the stamping in the background. I adhered them to the canvas with matte gel medium.
Next I die cut a selection of the flowers and painted them in a very dark teal (Paper Artsy Inky Pool)
Then all that was left was to put it all together.
I added a strip of tissue wrap around the bottom of the canvas, to anchor my flowers a bit. Wrapped some twine around, including a bow, a sentiment (cut from some scrapbook paper) and a few metal elements for a bit of additional interest.
A little fussy-cut butterfly to add to the Spring Time feel.


Some subtle background stamping, I never seem to be able to create a project without a little bit of that, usually using a text stamp or two.
And of course on a canvas, you cannot forget about the edges. I went around all the sides of the canvas with some Hydrangea Archival Ink, just to frame it a bit and add some subtle shadow effect, and that was pretty much it.


Well, that was the first stop of our Destination Inspiration this month. Hope you'll come back next Monday to see what one of my teamies has made, and of course we would all love you to play in our birthday challenge too!
Have a super crafty month and thanks so much for your visit today!
xxxxx
Astrid

Friday, 3 March 2017

ALL ABOARD - HAPPY BIRTHDAY AVJ

Wow can you believe we have been travelling our vintage journey now for three years and today sees us celebrate our 3rd birthday, I can't believe it's been so long and yet the time has flown past so quickly. We have an amazing band of Creative Guides some of whom have been on the long haul voyage having signed up at the very beginning and others who have stepped aboard at different destinations along the way but each and every one brings something new and unique to the crew who travel this expedition together. There are times when we all like to stop a while at a destination to go sight seeing or take a detour but we catch up later to join in again which is why you won't see every Guide on each of our monthly stops but they are still around to advise, support or show the way as part of the well oiled machinery that keeps these challenges, guest posts and destination inspiration stops going.  We rely on each other to bring fresh ideas and skills to constantly improve and expand our projects and enable us to continue travelling and exploring new routes so we have recruited two new guides to join us and to lead some of the trips we take you on, I think you'll love seeing them both here on A Vintage Journey sharing their unique styles, techniques and ideas.

Welcome Autumn


and Welcome Sara - Emily

It's wonderful to have you both with us sharing your amazing talents and I know you will be enjoying the journey in a completely different way now as you both have been very staunch supporters of the challenges. Welcome Aboard. 
If you would like to know more about these two and any of the Creative Guides we have a dedicated page and you can find the link in the sidebar.

************

Now onto our birthday challenge which we have called 

ALL ABOARD


This is where you choose what you want to step aboard with and although we still need to see you working with the styles and genres listed in the banner at the top of the page you can choose whether you share a card, some altered art, a journal page, a painting, in fact whatever you fancy, but with no theme to follow. Let's have some fun, share our current creations and enjoy the informal feel of our birthday celebrations!

So let's take a peek at the amazing inspiration and creative updates the wonderful Creative Guides are supplying for your pleasure, motivation, excitement and interest.

Brenda
Something completely different from me today, exploring abstract mixed media. I am wanting to experiment and play more with this style but I know I have got lots to learn and develop but that's what art is all about right? So I'm 'All Aboard' for a new artistic journey.


I'm celebrating this milestone in our Vintage Journey with some Tiny Greenhouses (yes, I know they're really tiny green houses, but I like the play on words).  They're full of birthday references so do come over to Words and Pictures to discover all the details.


As we celebrate our Third Anniversary, I created this very large (10" x 5.1/2") tag as a homage to our leader Brenda's wonderful collage style, using one of the new Tim Holtz Etcetera tags.  If you would like to see more detail please visit my blog HERE.


We are already planning our summer cruise in our yacht Mrs Muir and so the sea is very much on my mind at the moment and so I was drawn to altering this Tando Dinghy Kit for Brenda's birthday challenge. I had lots of fun weathering the greyboard and rusting the embellishments, however, the results were not always what I was expecting! Do please join me over on Live The Dream for more details.  (PS I am pleased to say that our dinghy is in much better condition!)


Can I just take a minute to tell you how excited I am to be posting my first post here as a Creative Guide?! To celebrate our third anniversary, I created a grungy vintage card that expresses my delight in finding A Vintage Journey three years ago. It is truly 'love found'! I hope you'll visit my blog to see how I made my inky background and how I aged Tim's ephemera.


For this our 51st challenge, I decided to go back mostly to our Tim inspired roots. I pulled out my Distress Paints, Sprays, Tim Holtz stamps and one of his wonderful Found Relatives cards. You can find a description of how I built this up on my blog


To celebrate our birthday I have created a layered canvas featuring new dies by Tim Holtz and stamps by Lin Brown. If you would like more details please visit Addicted to Art.


To celebrate the passing of time since A Vintage Journey began 3 years ago I have created a fully functional faux metal clock. If you've got a few minutes to spare please feel free to stop by my blog to find out more and see the clock ticking .....


I am thrilled to be a part of A Vintage Journey 3rd year creative journey anniversary. My inspiration this time around was new products in the form of the Etcetera Tags from Tim Holtz along with the new Layering Stencils, Tiny Houses Die and Distress Oxides. I love to add layers to my design and this piece has them in abundance. Pop along to my BLOG for the full list of ingredients to my homemade artwork .


Happy birthday A Vintage Journey!  To celebrate this wonderful occasion, I decided to make a Woodland Spring vignette box filled with Tim Holtz Idea-ology products old and new.  It will be a while yet before we see Spring here in British Columbia but a girl can dream!  I have some step out photos on how I created it on my blog, hope to see you there.


Autumn here, simply thrilled to be stepping on board this fabulous team of established artists.  To celebrate my arrival and the 3rd birthday of A Vintage Journey, I decided to created a project in my most comfortable medium, watercolor, with my favorite substrate, cardboard.  See how layer upon layer of torn cardboard come together in this vintage mixed media project on my blog, SewPaperPaint.


Hi everyone x So lovely to have you here for our  3rd Birthday Celebrations. 
I have altered a bottle for my Celebratory Project. To view the other side of the bottle  and for more details on products used please visit my blog HERE . 
Can't wait to view your entries.  Huge Hugs xx


All Aboard!
What a great way of celebrating our third anniversary - with art and friendship. For my tag, I decided to celebrate the arrival of Spring as well with some bright - yet vintage colors. I invite you to stop by my blog to see more details.


********************

Oh my gosh I have been super excited to see all these amazing creations in the line up together and our fabulous Creative Guides never cease to amaze me with their incredible talent and ideas that come through each month. You have all pulled out the stops again for this one, thank you for your attention to detail and the quality of projects you always bring to the challenge station.


So now it's over to you our readers and followers to hop aboard with something for us to peruse this month. There are no restrictions on the number of times you can enter but please look at the styles in the banner to ensure you comply if you want to be entered into the draw to be a winner. And talking about winners we are very happy to have Country View Crafts aboard again supporting our challenges and offering a £20 voucher to whoever gets chosen by Random Org and who knows there might be another couple of surprise packages on offer at the end of the month and of course don't forget we always choose three that we award a Pinworthy badge to and alongside our winner we pin your work on our Pinterest boards and offer a guest spot as well. So have fun and jump aboard with us to celebrate our birthday.


We so look forward to seeing what you share for our March celebrations.

hugs Brenda and all the Creative Guides. xxx