This is a unique challenge blog where we are inspired by and focus on the Vintage; shabby; mixed-media; art journaling; industrial, timeworn and steampunk genres and encompass the talent, flair, expertise and ideas of many artists that we are inspired by. We welcome all types of projects - cards, journaling, assemblage, layouts, albums, atcs, altered art in fact whatever you want to share (as long as it is in good taste).

Monday, 8 May 2017

Here we are at Terminal 1

Hello Vintage Travelers, it' S@ndy with you today.
Here we are at Terminal 1 so let's see what we have in the travel bag this month.
 
Product - any ink or acrylic paint
Technique - brayering
Color - pale blue
Substrate - book
 
 Since part of the challenge is a book I've gone to my art journal.  The great thing about an art journal is that it's an opportunity to play and experiment - no right or wrong. 
 
 
  Everyone is excited about and playing with the new Distress Oxide Inks and I am no exception so I took this opportunity to do just that - play. 

 
The first thing I think of when I hear "brayer" is Gelli Plate so I got mine out for this project.  I first put some PaperArtsy Fresco Finish, Buff, on the plate and then used my brayer to spread it out.  Next dropped some Oxide Reinker, Broken China, and then spread it out with the brayer.


Since oxide inks are opaque I used black paper.  I pressed the paper on the Gelli Plate and got the results shown above.  I did this twice for a two page spread shown below.

 
Tear all the edges by pulling forward, leaving a black edge all around.


Next came stamping, I masked off the parts of the stamp that I did not want, stamped and repeated the process for the second page.  Archival Black ink was used because I will later add more stamping and stenciling.  This way the ink will not run or blur.


This stamp by Tim Holtz is perfect for this project because I am simply doing what I love, playing. Using a background stamp, I stamped randomly all over using Archival Ink.
 

My two journal pages were prepared by covering the first page with black paper, tearing the edges of the next two pages and finally covering the fourth page with black.   Peeled Paint Distress Oxide was added to the edges then randomally stamped with two different background stamps using Archival Ink once again.  More Broken China ink was added to the center to cover the binding. The pages were then adhered to the black pages using matt medium.

 
Add the blue panels.

 
Using a fun stencil from Art Anthology, I stenciled the face in black. 

 
Last week while watching a YouTube video I saw the artist stamp an image on tissue paper and add to the page using matt medium so I decided to try it.  I used a Jane Davenport stamp, you will see her in the corner of the page.  This technique worked very well and I will try it again.  Some hearts were added using a Tim Holtz stencil.  Since I love orange - I just had to add some to the pages.  I added the orange by dropping some Orange Marmalade Oxide reinker on my craft mat and then applying with a paint brush.  To get a smoother look I smugged it with my fingers while still wet. 


I was happy with the page and the colors but thought it still needed more. Using a stencil brush and the Faded Jeans Oxide ink pad I stenciled on some Harlequin design in a random manner.

 
For the final step, some gesso was watered down and splattered on using a fan brush.
 
 
I hope you have enjoyed my play time and will take some time to play for yourself.
Have a creative week,

Friday, 5 May 2017

Use A Quote

Hi everyone and welcome! Jenny Marples here, hosting the next of our 2017 challenges here at A Vintage Journey. The theme for this one is called 'Use A Quote' so unsurprisingly we need you to use a quote! Any quote! Whether it be on a stamp, a sticker, handwritten or sourced from the internet, make it the focal point of your vintage, shabby chic, mixed media, art journaling, industrial, timeworn or steampunk project.

Our generous sponsors this month are That's Crafty!


That’s Crafty! are an online retailer and bricks and mortar shop based in the UK. They sell an extensive range of papercraft and mixed media supplies along with a large range of branded stamps & stencils. In addition they produce and sell their own stamps, stencils and surfaces. Surfaces include shrines, tags, hearts, panels, journals, uprights and stacks and come in varying materials - MDF, white/grey board and acrylic. 

That's Crafty! are offering a £20 voucher to their store for our randomly chosen winner.The Creative Guides will also choose three Pinworthy winners who will receive a badge to display on their blogs, as well as an invitation to be a guest designer here at A Vintage Journey for one of our future challenges.

Let's get you started with some inspiration from the Creative Guides, who have each selected a That’s Crafty! surface for their project this month.

I just loved creating a scene inside this beautiful little Matchbox Art Shrine from That's Crafty! Being newly retired - this is how I'm looking at the next phase of my life - who knows what adventure awaits! If you'd like to see how I put my Adventure Awaits scene together - please venture over to my blog!

I had an acrylic stack from 'That's Crafty!' in my supplies and decided this would be a good time to try out stamping and painting the layers. Well actually if you visit Bumblebees and Butterflies I tell you the real story lol, but I had great fun playing with the stamps and acrylic paints to get this artsy layered look and I learnt a lot along the way. Pop over to see how I did it if you have time. xxx

I decided to go all out vintage with my craft surface and had great fun playing with paints and inks. These surfaces from That's Crafty! are fabulous to work with and so easy to put together. To get a quick run down of how I  created this, just visit me here.

When I first laid eyes on this beautiful Upright Arch at the That's Crafty! shop I knew I wanted to create a vintage garden. But when I actually received the surface and held it in my hands, I was so impressed with it's size and sturdiness. I knew then I had to build the hardscape before I could landscape. I hope you'll find some time to stop by sarascloset to see how this came together.

My craft surface from 'That's Crafty' is a very sturdy 9" x 4.1/2" MDF rectangle. I used my favourite quote and lots of other Tim Holtz products. You can see more on my blog here.

I had a vision of a cascade of spring flowers flowing around this little gothic arch and just about managed to fit in one of my favourite quotes! It was great fun working with the That's Crafty! MDF surfaces and there are more detailed photos on my blog (plus a little secret!)

Seth Apter Steering Wheel die, That's Crafty upright and lots of rust - by Nikki Acton
I created this very aged piece with my That's Crafty! rounded top MDF upright - featuring Seth Apter's new Steering Wheel die, a quote from Gandhi and so many layers of paint and texture! Do hop over to Addicted to Art where I have all the details.

As soon as I saw the challenge, I knew which quote I wanted to use, as I am a great believer that "it's the little things that make life big". This sentiment may not take centre stage on my piece of art today but it makes a big statement! Pop by my BLOG for the step by steps.

Autumn
I challenged myself to create a tribute to my favorite quote of all time, thus this "tree house." I used a variety of die cuts and inking techniques to create the foliage and background in my woodland scene.  That's Crafty! substrates accept ink like a dream! I hope you will visit SewPaperPaint for the inside scoop and closeups.

For this challenge I have created a piece of grungy Art using a That's Crafty! 6x6 MDF Panel that allows my chosen 'Quote' (one I use often) to take centre stage. There are more details on my blog if you fancy stopping by .

That wonderful quote from Wendy Vecchi's Fun With Art stamp set and the shape of That's Crafty's Large House art shrine led me down a creative path that resulted in my Circus Fun art shrine.  I couldn't think of anything much more fun than a circus or much more fearless than putting your head in a lion's mouth!  I've some step out photos on how I created it on my blog, hope you can pop by for the how to.

For Jenny's fabulous challenge I am playing with a That's Crafty Surface Extra Large Art Shrine House, which is 6.16ins x 8.64ins x 2ins deep. My Quote is very true in that "Knowledge is the Key to Success" in all aspects of daily living. For project and product details please hop over to my blog by clicking HERE.

Jenny
As soon as I saw this clear acrylic light bulb surface on the That's Crafty! website I knew it was a match made in heaven with a brand new, as yet unreleased, A5 stamp set from IndigoBlu. Yes folks, you're getting a sneak peek of some of the images/words from the set right here first! And what encouraging wise words they are from everyone's favourite Hogwarts master. The fun bit was working out how to paint and stamp in reverse as all the colour is on the back of this once clear bulb! Find out more on my blog HERE.

So that's all of the amazing inspiration from the Creative Guides for this challenge. We do hope you will join in with us and 'Use A Quote' this month - you can link up your entries below to be in with a chance of winning. 
(Do remember to check the Travelling Instructions to make sure you qualify for the prize draw and Pinworthy badges).

Take care of yourselves and get creative! Jenny xxx


Monday, 1 May 2017

Destination Inspiration - Arriving at Terminal 4

Hi everyone.............Annie here for the last stop in this month's journey  xx 
It's also the first  day of May and according to tradition young girls would rush out and wash their faces in the morning dew !!! So in the hope of having a younger face by the end of the day I got up early and carried out the task........wonder if it works for feet too as I was barefoot !!!!
Anyway, today I am sharing my creation using the contents of our fabulous Travel Bag, which are as follows:

Product  - Distress Inks/Paints
Technique - Stencil Mono Printing
Colour - Green
Substrate - MDF

For my substrate I used  a That's Crafty MDF panel
Here is the panel prior to painting/inking

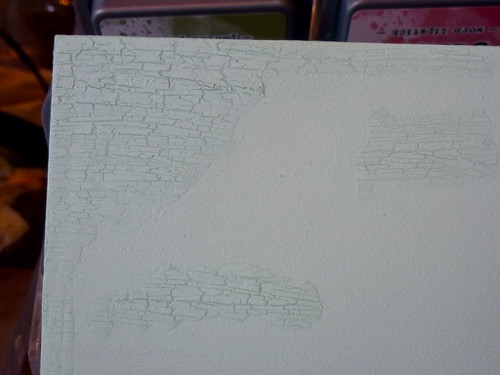
 I painted the panel with Decoart Chalk Paints in Refresher, which is a lovely light shade of green.

 After giving the panel two coats of paint I  randomly applied some Decorate Crackle Medium.

 You can see the crackle achieved in the pic below. I

 Also painted the panel in Decoart's new Vintage Wash Paint ( Patina), wiping it back in some areas with a baby wipe.  Distress Ink  was  then applied  using a Crafters Workshop Stencil.

 And finally some gorgeous Paper Dolls  with wings applied and a very Large flower/card from  the Tim Holtz Botanical Collection, which were edged with Vintage Photo DI.

The word Memories is from Calico Craft Parts and was kept in its natural state.

Thank You for staying with me on this journey and just to remind you here are some photos of the wonderful, inspirational projects by my fellow Creative Guides. If you click the  word Terminal it will transport you to that post.

Terminal 1 the lovely Tracy was your guide
Terminal 2 the lovely Deb was your guide
Terminal 3 the lovely Anne was your guide

And don't forget there are a few more days to go in our Magic of 3 challenge, which ends on Thursday 4th May at 18:00 hours. You never know you could be our randomly drawn winner or even a Pinworthy with a chance to guest here at A Vintage Journey. We would love to have you join in on our journey.

Have a great week

Hugs Annie and the Creative Guides
xxxxxx


Friday, 28 April 2017

A new amazing Guest Creative Guide

Welcome to this month's Guest Creative Guide post and we have a fantastic artist who makes the most incredible time worn and grungy projects using loads of different mediums, paints and usually somewhere there will be some incredible textured embossing. I would like to introduce you to the amazing Dee Adams, let's go take a look at what she has designed for us today to fit in with our current challenge 'The Magic of Three'.

************

Hi everyone! I am very pleased to have been asked by Brenda to be your guest today. If you are not familiar with my work I love the aged worn look, metals, embossing and generally shabby, bit like myself! I also quite like a mythical feel to art but generally love it all inks and paints and my passion is mixed media.
Today I have taken the topic literally and gone with what it says on the tin! A wooden number 3. 


I started with various bits including texture sand paste, art stones, anything that will achieve texture.


You then glue it to the wood frame just don't use salt.


Next came a good coat of black gesso followed by raw umber to cover the three.


   DecoArt's weathered wood came next and once this was dry it was followed with DecoArt Media crackle paint.


 I swiped the uneven areas with a Versamark ink pad then I sprinkled Stampendous chunky gold embossing powder over the areas and gave a quick shake as you only want it to take in those places.


Once happy with the embossing powder I followed with the beads these were glued into position which can be quite messy.


Raw umber, Quinacridone gold & Prussian Blue hue were used to highlight and age the project around the embossed areas.


A very watery wash of Quinacrine Gold and Raw Umber were used over the crackle I think I did two coats but it's up to you.


The inside surface was a watery wash of Prussian Blue.


I made a little embellishment with a glass pebble and a clock stamp which I glued to the bottom curve then, I glued three gem stones to the upper curve.


For the butterfly I used a Stampendous butterfly from their Jumbo Butterfly Trio. I used watercolour  to paint it on a base coat of clear gesso. Beads were used to create the body of the butterfly.

I hope you have all enjoyed my interpretation of this amazing challenge.
'The Magic Of Three'

Thank you it has been a pleasure to join you


Cheers Dee x


My personal blog www.deeadamsart.blogspot.co.uk
designer blog: www.tando-creative.blogspot.co.uk
designer blog: www.sandee-and-amelie.blogspot.co.uk
designer @: www.stampendous.com
https://www.facebook.com/deeadamsart.blogspot.co.uk
Pintrest https://uk.pinterest.com/grungyart/


*********************

What did I tell you? Dee has used all her favourite supplies to design and create this amazing project for us, just everything she has used fits together amazingly to produce such wonderful grungy, aged and textured results. Thank you so much Dee for altering this number three in such a brilliant way and sharing the steps with us. I don't know about anyone else but I want to get making and follow your steps to see what happens for me and I'm sure there will be lots of people reading this who have been inspired in the same way.


Well after you've left some love for Dee and hopefully popped over to her blog as well, I hope you'll spend a moment looking at our challenge that still runs till next Thursday.  We've had some fabulous projects entered already but there's always time and room for some more so we'd love to see you there.

Have a wonderful bank Holiday weekend if you're in the UK, that usually means for,a lot of people there is an extra one day holiday on Monday to look forward to.

Take care and see you Monday for the next DI installment.

hugs Brenda, Dee and the Creative Guides. xxx


Monday, 24 April 2017

Destination Inspiration: Arriving at Terminal 3

Hello everyone, Anne here, welcoming you to Terminal 3 of April's Destination Inspiration.

We have been using these items in our travel bag this month:
Product - Distress Ink / Paint
Technique - Stencil Mono-printing
Colour - Green
Substrate - MDF

When I planned to use Wendy Vecchi's Art Parts, I mistakenly thought they were MDF, but I think they are close enough as I don't have any other MDF in my stash....  I went for a clean and simple design with my project. 
 
I wanted to use one of my favourite Wendy Vecchi stamps - rules to live by.
The base is from Wendy's Artful Shrines Art Parts, I just used the inside piece and coated it with some white Gesso.
I gave the base a good coat of Distress Paint in Bundled Sage.
For the mono-printing element I used Tim Holtz's Honeycomb stencil and Fossilized Amber Distress Ink which I hoped would give a nice contrast.
I applied the ink directly to one side of the stencil, spritzed it well with water, laid it on top of the base, pressed all over with a piece of paper towel and dried it with my heat tool.  Heat setting it really brings it to life.  I love that this technique does not give a 'perfect' print but I am always amazed at how well it works (apologies for the shadow, I was crafting at night time)!
Once dry I stamped with this lovely Wendy stamp, I just love that some of the words are bold.  I keep this stamp on show in my craft room for encouragement!
I did not do a step by step of the flower but these are Wendy Vecchi Art Parts too.  I painted the large flower with Scattered Straw Distress Paint and the smaller one with Spiced Marmalade Distress Paint.  The leaves and stalk were painted with Pine Needles Distress Paint.  I gave each piece two coats and then overstamped with Hero Arts Newspaper Background stamp.  I added the little copper 'nut' (Prima I think) after painting the word 'Art' with Pine Needles DP.
Finally, the whole piece was edged with Pine Needles Distress Ink.

Like I said, clean and simple but it shows how well the mono-printing technique works, I hope that our projects this month have encouraged you to try the technique, if you have not done so already!

Our current challenge 'The Magic of Three', hosted by the lovely Annie is still running, we hope you will join in HERE.

Thanks so much for visiting, please come back next Monday for some more inspiration using our April Travel Bag! 

Hugs,  Anne xx