This is a unique challenge blog where we are inspired by and focus on the Vintage; shabby; mixed-media; art journaling; industrial, timeworn and steampunk genres and encompass the talent, flair, expertise and ideas of many artists that we are inspired by. We welcome all types of projects - cards, journaling, assemblage, layouts, albums, atcs, altered art in fact whatever you want to share (as long as it is in good taste).

Showing posts with label April. Show all posts

Monday, 25 April 2016

Destination Inspiration - Arriving at Terminal #4

Hello Everyone
Amanda here and I'd like to welcome you to travel with me today on the penultimate leg of this months Destination Inspiration 
Here's a quick reminder of the contents of the travel bag
Product- Gesso
Technique- Crackle
Colour- Spring Green
Substrate - Kraft card   
Yes, as always there's only a few supplies but I love to travel light so lets hop on board and continue the journey.

I have chosen to make a card as its something I haven't made in a while but I can also see this card working as a piece of wall art.

I began with the background and after adhering some torn tissue tape to a piece of cream card cut to size I added colour using Tim Holtz Wrinkle Free distress technique and a few distress inks in 'Spring Green' colours - Shabby Shutters, Peeled Paint, Twisted Citron and  Brushed Corduroy. 
Once happy , I then blended in more colour using the blending tool and Twisted Citron distress ink 


Next came the stamping and stencilling. I used a selection of stamps and stencils, stamping in both Fern Green and Coffee Archival Ink and stencilling in Brushed Corduroy, Peeled Paint and Shabby Shutters distress ink .
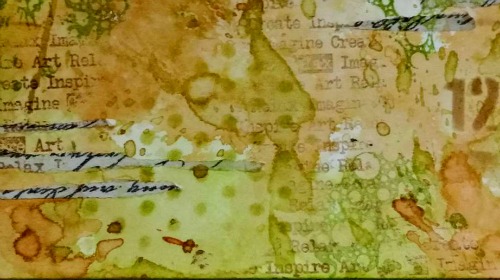

I also applied Paper Artsy Grunge paste through Tim Holtz Harlequin stencil to the top left and bottom right of the background . Once the paste was dry I repositioned the stencil and using a dry brush painted the stenciling using Walnut stain distress paint . 


Now it was time to introduce the Gesso. Using my finger picking up a little white Gesso I caught the surface of the background in quite a 'free and 'loose' way ensuring I caught the textured harlequin stencilling as I worked. I do like the effect and appearance Gesso creates when applied like this.
With my much loved splatter brush I added some Gesso splats and a few Gesso circles created with bottle tops. 
I used Tim Holtz  Distress Crayons to darken the edges of the background panel and enhance the textured stencilling, smudging as and where needed. Love the shadow the smudging created around the harlequins!


I adhered the finished panel to a white and brown card stock mount before adhering to a Kraft card base. With the background finished and mounted I moved onto the elements and this is where I introduced the crackle. I die cut a circle, primed it with Gesso, painted it with Walnut Stain distress Paint snd crackled it using Finnabair's Platinum Crackle paste . Once air dried (overnight) I smudged distress crayons over the surface with my finger to enhance the cracks and give it a more grungy look .


I adhered a book plate to the cracked disc placing a word sticker in the window and adhering two green gem dots as faux fasteners. (photo to follow) .
The wood grain embossed strip is one I found in my stash that I'd coloured using distress crayons and the narrow corrugated strip again was found among my off- cuts and distress crayons used to add a touch of 'Spring Green'. 


Now it was just a matter of playing around with all the elements until I was happy with the composition and adhered them in place.


Oops nearly forgot , I added a couple of Ideology game spinners and hitch fasteners to two of the card corners


and my card is complete.


 Thank you for accompanying me on the 4th leg of Aprils Destination Inspiration. I hope I and my fellow creative guides, Debs ( terminal 1), Anne ( terminal 2) and Astrid (terminal 3)  have inspired you to go and have fun creating.  Don't forget to stop by again next Monday to see the final Destination Inspiration post this month
and our current Challenge 'Spring is in the Air'  can be found here
Hope you all have a great week 
Happy Crafting 
Amanda x


Monday, 18 April 2016

Destination Inspiration - Arriving at terminal 3

Hello all and welcome to this third leg of our journey This is Astrid inviting you along for the ride to see what I have done with the content of this month's travel bag.
If this is your first time here in April, - or if you need a little reminder, these are the fun things we are unpacking for you this month:
Product: Gesso
Technique: Crackle
Colour: Spring Green
Substrate: Kraft
I decided to have fun and experiment particularly with different types of crackle mediums and altered a frame as an integrated part of a vintage mixed media piece.
I started with a simple chipboard frame purchased a while back at a craft fair and gave it 2 coats of dark brown acrylic paint.
Next I added a fairly thick coat of Decoart Americana Weathered Wood crackle medium and when it was touch dry added some light blue acrylic paint. After the crackle had done its magic it looked like this, - all I did still was add some Walnut Staid Distress crayon around the edges.
Now for the inside of the frame: I cut a piece of kraft card slightly larger than the aperture of the frame and covered it with Tim Holtz Tissue wrap.
You can just see the brown tones of the kraft through the tissue wrap. Next came another crackle experiment. I added some Finnabair translucent Crackle paste through the Tim Holtz  Crackle layering stencil  to double the crackle effect. But as I wanted it to blend in with the blue tones of the frame I added some Salty Ocean and Blue Sapphire Distress Crayons over it, blending the colours carefully with a damp baby wipe to let them seep into the cracks and then adding some more to retain the blue tones.
I also dabbed a little watered down Salty Ocean Distress paint with my finger to intensify the colour further still.
Alright, now for the decoration of the frame, and oops I had not yet used any gesso....
So here goes: I die cut the Tim Holtz Thinlets Globe die from Kraft card and covered it with Gesso and when that had dried added some Distress Crazing medium for some much more subtle crackles.
Next I used Peeled Paint and Twisted Citron Distress Crayons to achieve my Spring green, plus some Vintage Photo around the edges. I also added tiny bits of gold foil which are very hard to pick out on the photo. The crackle was very subtle, but it is there...... :o)
The arrow shows where you can hopefully just make out the crazing crackle, it looks so much better i.r.l....
Time for the finishing touches you'll be glad to hear:
I gathered a collection of die cuts and ephemera pieces, making sure to include some Spring green and Kraft card.
A larger piece created with the help of a La Blanche stamp and some heavy distressing using Vintage Photo and Ground Espresso Distress Inks.
A little bunch of die cut Spring Flowers, using Tim's wild flower dies, for this occasion I decided to give them a more realistic wild flower look with the help of Distress Markers. a tiny bit of gesso and Inktense pencils.
And finally my last crackle experiment, using Deco Art Media Crackle glaze (not very successfully, it was rather old and sticky and kept falling off, - beware this easily happens with any crackle glaze when it gets old).... To preserve the little crackle I had,  I gave both the frame and the letters a good coat of Decoart Traditions multipurpose sealer, very important if you want to keep crackled layers in place!

Some stencilling was added to the frame still and then it was all put together. I arranged most pieces around the frame and then used the bunch of flowers to kind of tie it all together:

 And finally voila the finished piece.....

There is of course a whole story behind this project, - of an Edwardian gentleman travelling the globe for some very special wild flower specimens for his loved one, - but as I have kept you long enough already, I won't bore you with that....

If you haven't done so already, make sure to visit the projects my fellow guide created with these same ingredients, you can find them here and here. I am always amazed to see, how different people can come up with such different things, using the same ingredients. Our current challenge with the theme of Spring is in the Air can be found here

Thanks so much for you visit today and don't forget to come back next week!!