This is a unique challenge blog where we are inspired by and focus on the Vintage; shabby; mixed-media; art journaling; industrial, timeworn and steampunk genres and encompass the talent, flair, expertise and ideas of many artists that we are inspired by. We welcome all types of projects - cards, journaling, assemblage, layouts, albums, atcs, altered art in fact whatever you want to share (as long as it is in good taste).

Monday, 11 September 2017

September Destination Inspiration - Arriving At Terminal 2

Hello and welcome to the second Destination Inspiration for September.  Tracy here with you today with our set of ingredients for September.

This month we are using the following products:


Product : Gesso
Technique : Any form of Resist
Colour : Olive Green
Substrate : Chipboard

I opted to create a card this month for a loved one. I don't often use Olive Green so this made a lovely change to step away from my usual colour choices.
I began by placing the Tim Holtz Chevron Layering Stencil onto a piece of white card (4.5" x 6.5") and I then dabbed Gesso over the stencil using a piece of Cut 'n' Dry Foam.
Remove the stencil and then dry the Gesso with a heat tool.
I found the perfect colour 'Olive Waistcoat' by IndigoBlu for my background. I simply brayered the paint over the Gesso'd background and then I used a damp babywipe and removed the paint from the Gesso areas. The Gesso resists the paint perfectly.
Dry the card with a heat tool.
Paint a chipboard heart with 'Olive Waistcoat' paint, dabbing the paint onto the heart to add further texture and then dry the paint with a heat tool.
Place the Chevron Layering Stencil onto the chipboard heart and then dab Gesso over the stencil.
Apply 'Olive Waistcoat' Paint onto the background stamp from the On The Farm Stamp Set, dabbing the paint lightly onto the stamp using a piece of Cut 'n' Dry Foam.
Stamp the background image onto a piece of fabric and then adhere the fabric onto the background of the card.
Ink the Simple Sayings Sentiment with Black Archival Ink and stamp onto the chipboard heart.
I adhered the heart to the card adding cotton threads behind for added texture. I also included a circular piece of rusty wire stapled into place using my Tiny Attacher.
I also included a smaller chipboard heart for further interest.
I added a couple of lengths of decorative tape and a sentiment from one of Tim Holtz tapes. I also added some delicate splatters of white paint.
I added a touch more stamping using the same background stamp, this time with Black Archival Ink.
I love how all the layers are visible and the Gesso Resist in the background really lifts the whole design.
I also added some paint lines around the edges of my card using black paint and an old credit card and also included a couple of Index Clips for added interest.

Hope you enjoyed the second leg of our journey. If you would like to see how Jennie was inspired on the first leg of our journey then you can see Jennie's fabulous step by steps HERE.

We have a fabulous challenge this month ALTERED ART hosted by Alison, the Creative Guides have created some wonderful pieces to inspire you this month.

Please pop back next Monday when another Creative Guide will be taking you through their use of the travel bag contents.


Thank you for joining me today.

x


Friday, 8 September 2017

Winners and Pinworthies for our August Challenge: Watercolour .

Hello Everyone 

Welcome to our Winners and Pinworthies post for our August Challenge: Watercolour. 
We had some fabulous entries and the Creative Guides really enjoyed viewing your creations and selecting their favourites. You are all so talented!

So lets begin with the Winner of our Sponsored prize as selected by Random Generator...


Congratulations Monika!
Your prize details from our generous sponsors for this challenge, Craft Obsessions, will be with you shortly, as well as your Winners badge to display on your blog. 

Now on to our chosen Pinworthies. It is always difficult for us to narrow our choices down to just 3 with so many wonderful and worthy submissions but after much deliberation here are our Pinworthy winners.

In no particular order...


Congratulations to our Pinworthies. You certainly worked wonders with your watercolours! 
We will be in touch shortly with your badges and invitations to be Guest Designers here at A Vintage Journey in the near future. 

Thank you so much to everyone who joined us in this Challenge. We really do appreciate all your entries and always enjoy seeing all your creations.
We hope you will join us this month for Alison's fabulous challenge: 'Altered Art'.
All the Challenge details and an inspirational gallery of projects created by some of the Creative Guides can be located here. 
One of us will be back Monday to share the latest Destination Inspiration so until then
we wish you all a lovely weekend.

Amanda 
and all 
the Creative Guides
x

Monday, 4 September 2017

September Destination Inspiration - Arriving at Terminal 1

Hello and welcome to the first Destination Inspiration for September.  Jennie here with you today with a whole new set of items in the travel bag.

Let me introduce you to the wonderful things we are playing with this month:

Product : Gesso
Technique : Any form of Resist
Colour : Olive Green
Substrate : Chipboard


Here in the north Autumn has very much set in and yet there is so much green around in the leaves on both the trees and the flowers. So with this in mind I decided to create an "autumn falling leaves" board but with green leaves.


I started with a chipboard base and used some old dressmaking patterns and loads of multi medium to create a textured background. I then applied three coats of Gesso and a little more texture along the bottom using a much loved stencil.


I then spritzed the whole lot with PaperArtsy Olive Tree Infusions and used loads of water to get this lighter effect. I love how there are tiny little flecks of orange in there too, so not all green!

Three of my travel bag items used at this stage.


Turning to resist techniques was my next step as I wanted to do something a little different. I have seen wax resist/faux batik techniques on Pinterest but have never tried it. I spent some time watching many videos.  It was all fascinating but in the end I had to just get stuck in and have a go. There are no pictures of the process as it all happens rather quickly!


  • the first step was to emboss a piece of wax paper (I used the Tim Holz Papillon Embossing Folder)
  • secondly I placed this between two pieces of reasonably heavy cardstock 
  • thirdly I ironed the tag sandwich however do make sure you have them on a wood block so they don't sink into the ironing board ...... ! and yes do turn off the steam ...... ! (took me a few goes before I worked these out!)

You can't see much on the tags at this stage but when inked, or in this case spritzed with the Olive Tree Infusions beautiful batik style patterns emerge on the paper.


I die cut my leaves from the tags (using Tim Holtz's Tattered Leaves die) and then added Gathered Twigs Distress Ink around the edges to give them a little definition.

Then it was down to adding them to the background.


I added a little text paper (softened with a coat of watery gesso) to make the leaves more prominent .....


I also added some glass beads which look like water drops .......


This lovely quote seemed most appropriate.

And finally as I still have a few tough daisies left in the garden borders I decided to finish off with an Autumn flower.


Unfortunately since I made this little project we have had horrendous gales and torrential rain, so the falling leaves are not really falling but going in a rather horizontal direction past the house!

Thank you for stopping by for this short tutorial today. Do please pop back next Monday when another Creative Guide will be taking your through their use of the travel bag contents. And of course check out our new challenge ALTERED ART and the wonderful pieces made by the Creative Guides.

Thank you for joining me today.

Jennie x


SaveSave

Friday, 1 September 2017

Altered Art

Hello all! It's Alison here to welcome you to the start of a new challenge theme here at A Vintage Journey. This month we'd like to see your Altered Art, please.

We'd like you to get creative with recycled objects in a vintage, shabby, mixed media, art journalling, industrial, timeworn, or steampunk style. Turn something unloved and unwanted into a work of art. Try some repurposing - make something new out of something old, or incorporate an unwanted object into your artwork.  Think tin cans and jars, old bottles, toothbrushes, unwanted packaging - the more inventive the better.

We're delighted to welcome a new sponsor this month. The fabulous Simon Says Stamp store are offering a $25 gift voucher for one lucky randomly drawn winner.


 And there couldn't be a better month to have Simon Says Stamp on the journey with us, as they're celebrating Stamptember - so do check out all the action there too!


Of course, you might be selected as one of our Pinworthies and invited to join us as a Guest Creative Guide here at A Vintage Journey. Do check our Travelling Instructions to be sure your project qualifies for that honour and for the prize draw.

To get your creativity buzzing, the Creative Guides have been busily altering away, and I think you'll be amazed at the results. Just take a look at some of the Altered Art created to inspire you.


I took inspiration from my own Destination Inspiration post from last month, but instead of Candlelit Foliage, I've used various jars and Tim Holtz's fabulous Thinlits dies to create a set of spooky lanterns to go in the window for Halloween. If you'd like to see more, do come and visit me at Words and Pictures... if you dare!


I love altering coffee tins and I used lots of Andy Skinner techniques to create this rusty, patchwork version. All the details can be found at Addicted to Art today.


I love Alison's Altered Art Challenge! It gave me the opportunity to use a little two compartment gift box that has been sitting on my desk for weeks. To see more, please visit my blog HERE.


I am home from my summer travels and wanted to join the fun this month with some Altered Art. I picked up this bird on sale at a shop during my travels and knew I wanted to do a Steampunk theme. I hope you will join me at My "Crafty" Life on the Internet where I will show you exactly how I made it.


My altered object is an old terracotta plant pot from my greenhouse which got the French Shabby Chic look with Fresco Chalk Paints, Texture Paste, Decoupaged Napkins and Crackle Paste. Do please join me over on my blog where I have a number of close up photographs which show how wonderfully shabby the crackle is!


I decided to alter a sardine tin which I had kept for a just in case moment, and this was one of those moments! For more details and step by steps, please pop by my BLOG.


I found this house shape block on sale in Sainsbury's and decided it would be great to alter. If you have a moment please pop over to Bumblebees and Butterflies where you will see what it says on the other side and there are photos and a step by step so you can see how I changed it up. xxx


For Alison's challenge I have made a journal by recycling some strong packaging cardboard and an old pair of much loved jeans that were well passed their 'wear by date'! There are more details of how I gave my old jeans a new life over on my blog if you fancy stopping by


For Alison's fabulous challenge I have altered a Book Box and Candle. For more details please visit my blog HERE. Looking forward to viewing your amazing entries x


Well, I should think that's got your creative engines started! We can't wait to see the Altered Art you'll bring along for A Vintage Journey this month.  Think outside the box for this one to capture the attention of the Creative Guides, and you might end up being selected as one of our Pinworthies, and remember one lucky randomly drawn winner will be going shopping at Simon Says Stamp.  Good luck everybody!

Alison and the Creative Guides xx


Please enter your 'Altered Art' challenge entries HERE - GOOD LUCK!


Monday, 28 August 2017

August Destination Inspiration - Pulling Into Terminal 4

Hello everyone, Deb here today with the final stop on our Destination Inspiration journey for August.  If you will remember from Nikki, Alison and Annie's posts our travel bags are packed with the following supplies:

Product - Texture Paste
Technique - Layering
Colour - Neutrals
Substrate - Glass

Now I cannot tell a lie, I had one heck of a time deciding what I was going to do with these ingredients!  After much indecision and rummaging through my craft stash I came upon some of Tim Holtz's Mini Mason Jars and the accompanying Photo Clip Kit and the idea for my Beware Halloween altered mason jar was born.


It went through a few design changes and bumps along the road as you'll see in my step out photos but I really love how it turned out in the end.  I even ended up adding a battery operate votive to make it into a spooky Halloween night light.


Read on for my how to if you'd like to make one of your own.

I initially was going to use the large skull and crossbones stamps from Tim Holtz's Regions Beyond stamp set inside the jar so I used the stamp as a template to see where to put the texture paste on the outside of the jar.  I added both crackle paste and sanded texture paste in the beginning but the crackle paste flaked off once dry so I ended up going over the jar again with more of the sanded texture paste.


Once dry, the texture paste was sealed with matte medium and then washes of beige, brown and dark brown acrylic paints were added, letting each wash dry thoroughly in between.

To line the inside of the jar, dark brown kraft core cardstock was run through the Poison Labels Texture Fades embossing folder and sanded to reveal the kraft core (I forgot to take a picture before I put it inside the jar so this is a remnant that was left over!).


The embossed cardstock was curved around the back 'wall' on the inside of the mason jar and crushed walnut shells were coloured with dark brown acrylic paint and mushed into the bottom of the jar.

I decided to use the small skull and crossbones from Tim's Mini Halloween stamp set instead of the larger image, so stamped it onto Heavystock mixed media cardstock that was coloured with Antique Linen and Old Paper Distress inks and then spritzed with Pumice Stone and Gathered Twigs Distress Spray Stain.  To emphasize the eye sockets, I coloured them in with a black Sharpie and fussy cut the stamped image.


The skull was tacked on the inside of the mason jar with a bit of matte liquid adhesive and a couple of Lost Zombie hands that I had left over from a previous project were added in the same manner, positioned so that they appeared to be reaching up from the dirt to grab you bwa-ha-ha-ha!  You can't see it in the picture but I also added a 'toxique' label from Tim's Curiosities Ephemera pack layered overtop of the embossed cardstock in the back.

The Photo Clip Kit that coordinates with the Mini Mason Jars was stippled with multiple colours of brown, rust, teal and black acrylic paints for a rusty appearance.


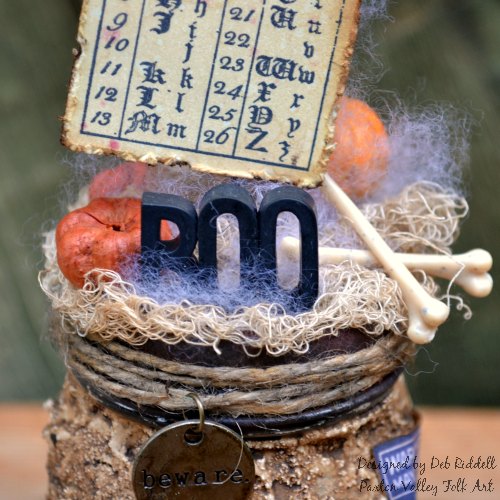
Jute string was wound around the edge of the lid and coloured with shades of black and brown Distress inks.  A piece of coffee stained cheesecloth was inked with the same colours and added to the top of the rusty lid.  Some labels from Tim's Curiosities and Halloween Ephemera packs were added to the sides and back of the jar.


The word BOO from Tim's new Halloween Typography letters was adhered together with some liquid adhesive.

The Gothic alphabet stamp from the Mini Halloween set was stamped onto more Heavystock that was coloured with Antique Linen and Old Paper Distress inks and then some 'blood spatters' were stenciled onto the stamped image through the Speckles stencil with Aged Mahogany Distress ink.


A wee chipboard bat was coloured black and adhered onto the top of the bulldog clip.

Then in my usual style I got on a roll and forgot to take anymore in process pictures so here are some close ups.

A 'beware' Halloween Typed Token was coloured with Mushroom alcohol ink and attached to the jute twine around the lid.


One of Tim's Pumpkin Pieces and a couple of putka pods from my stash were added to the top of the lid along with the BOO word and a couple of Boneyard Findings bones.


No Halloween make would be complete without a spider so I coloured a chipboard spider with a black marker and added him to the back of the Photo Clip, hanging him off some fiberglass spider web that was in my stash (no idea what this material actually is but it makes great spider webs!).


And here are a few more close ups of the finished jar.


 I hope that you've enjoyed seeing how I used the contents of my travel bag this month!


And here's a review of the other projects made by the Creative Guides participating in our Destintion Inspiration journey this month.


Love the diversity of these projects!  Thanks so much for stopping by today and hope that you have entered our Watercolour challenge this month, if not you have until September 1st so break out those watercolours and join in the fun!  Have a great week and as always, happy creating!

Deb xo