This is a unique challenge blog where we are inspired by and focus on the Vintage; shabby; mixed-media; art journaling; industrial, timeworn and steampunk genres and encompass the talent, flair, expertise and ideas of many artists that we are inspired by. We welcome all types of projects - cards, journaling, assemblage, layouts, albums, atcs, altered art in fact whatever you want to share (as long as it is in good taste).

Showing posts with label Home Sweet Home. Show all posts

Friday, 9 October 2015

Home Sweet Home Winner, Pinworthies and Guest Day


Hello Fellow Travellers and Welcome on this special day of the month when we announce our winner and Pinworthies for the Home Sweet Home Challenge. Thank you all so much for joining me in my challenge and I had a great time visiting all your wonderful creations. However, before I make the big announcement we are thrilled to have Ana K with us as our Guest Designer today. Anna has created a stunning art journal project based on our current challenge and you cannot fail to be inspired!

Hello everyone... I'm really honoured to be here with you again. My name is Ana Kavcic and I am from beautiful Slovenia. Creating came into my life by accident, but quickly I became addicted...I love everything old or old looking and that you can find in my creations...


I thought that this month challenge theme Art Journaling with Tim is perfect to make covers for my new journal book...


I started creating background with Gessoing paper. I torn and glued pieces of Melange tissue paper. Then I continue with heat embossing resist techniques, which Tim used few times on his famous tags...I used stamp from Steampunk set and clear embossing powder. When background cooled, I decided to add more stamped images; I used stamps from School Desk and Curiosity sets. Then I mixed Distress stain – Broken China with water and painted surface. I didn’t like it, as I thought I will so I painted over with coffee.


Blue colour was still visible in few places around embossed images and I added also some green with Crushed Olive Distress ink.


Satisfied with beautiful, dynamic background I decided to embellish the front cover. As this is my fourth journal I chose to cut out four kids (sorry for the little boy, he have to go) from Found Relatives Cards. Edges were distressed with Vintage Photo Distress Ink and added Remnant Rubs - Botanical. I glued kids to the background and added pieces of vintage paper, lace and leaves cut with Spring Greenery Sizzlits Strip. Journal book cover wouldn’t be perfect without some inspiring words, so I added Small Talk sticker. 


Happy with results I glued covers to the cardstock and made holes for binding. I chose simple ribbon binding, which is perfect because allow me to take pages out when needed.


I hope you like my book covers and hope I give you some inspiration to join Alison’s challenge….


Hugs and kisses from Slovenia

_______________________________


Your vintage book covers are absolutely stunning Ana - thank you so much for sharing them with us today. 

And now onto our Winner and Pinworthies - drum roll please!

First up is our randomly chosen Winner who will receive our monthly voucher from Country View Crafts. And the winner is ………


Congratulations Cuka! I loved your wonderful little house and the beautiful scene through the window.

And now our three Pinworthies chosen by our Creative Guides. As always it is a difficult job as there are always so many beautiful and worthy entries. But these are the three which caught the eye of all of us. And so in no particular order here is our round of applause for the Home Sweet Home Challenge:


#8 Cazzy


#8 Kerstin


#15 Sarascloset

Congratulations to all three of you - your projects were each amazingly unique, full of Tim goodness and fabulous interpretations of the challenge. Your blog badges and invitations will be on their way to you soon.

We do hope you will join us in our current challenge hosted by Alison - Art Journalling with Tim - and also pop back on Monday for our Destination Inspiration to see what one of our Creative Guides has created with the current travelling bag of goodies!

Happy Creating!

Jennie and the AVJ Creative Guides

Friday, 25 September 2015

Welcome Annette to AVJ and new Creative Guide call

Happy Friday everyone. It's week 4 of our September schedule which means lots of inspiration and a magnificent tutorial from our Guest Creative Guide - I'll let her introduce herself and what she is sharing today.


**************************


Hello everyone, it's Annette Green from Melbourne, Florida, USA. I'm proud and honored to be your Guest Creative Guide today here at A Vintage Journey.

My creative journey began when I was very little when I realized I had a talent for drawing. I entered contest after contest and actually won quite a few! Although I graduated college with a degree in the business side of Advertising, I quickly adapted to graphic design instead, and spent 15 years doing so. When my daughter was born, I stayed home full time to be a mom and began scrapbooking, quilting, cross-stitching and stamping. I loved it all! Over time, I have evolved into a full time paper crafter, designer and instructor and love every single day that I get out of bed in the morning because I'm doing what I love!

I first heard about this Tim Holtz guy way back when he created his first series of his 12 Tags of Christmas. I was totally and completely in love with his style! His products are some of my all-time favorites. I absolutely love all things vintage and distressed, so his products really speak to me. I incorporate so much of his line into everything I make. To see more of my creations, please visit my blog aptly named Annette's Creative Journey.

For the current Home Sweet Home challenge theme, I chose to create a welcome frame/home decor piece for the table in our foyer. Something for everyone to see when they enter my home. Fall is my favorite time of year, so I gave it a warm, Autumn feel.


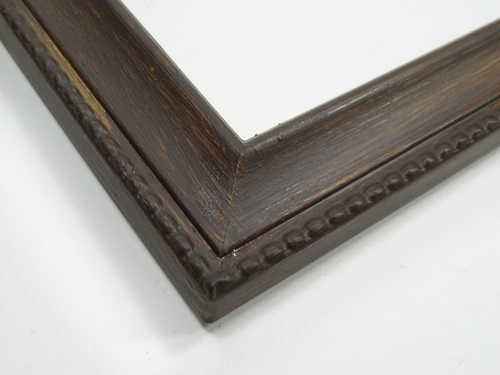
My creation started with this thrift store frame I found for less than a dollar.


I took out the glass and cleaned it well, then painted the frame with two coats of white gesso.


Once the gesso was completely dry, I painted two coats of the new Ground Espresso Distress Paint. I made sure to leave streaks so it resembled wood and had a distressed feel. Once the paint was dry, I sealed it with a coat of Glue & Seal.


For the background in my frame, I cut a 4 1/4" x 11" piece or Ranger Mixed Media Cardstock and used Tim's Distress Ink Blending/Spritz & Flick technique to blend warm earthly colors like Forest Moss, Fired Brick, Fossilized Amber and Rusty Hinge.


In addition to the Spritz & Flick, I misted some water onto the large stamp in the Papillon set (CMS106) by Stampers Anonymous and stamped it onto the Distress background, letting the water do its magic. Once this was heat set and completely dry, I added a few spritzes of Perfect Pearls Perfect Copper Mist.


With the glass for the frame now clean, I stamped the leaves from the Falling Leaves set (CMS097) with Timber Brown Staz-On ink and set that aside to dry.


With Forest Moss Distress Paint, I painted the Letterpress letters spelling out Welcome, having to cheat a bit for the first E, using the ampersand. I did two coats of paint for this too.


Next, I die cut Kraft Core cardstock pieces from the Tattered Pinecone and Tattered Leaves dies, and gave each piece a light sanding.


I used Tim's Faux Tea Roses technique to create small distressed flowers and starting assembling my frame, using hot glue.


I veined my leaves, inked them, and spritzed with more Perfect Pearls Mist, using various colors like Perfect Copper, Heirloom Gold, and Forever Green.


I wish you could see this detail in person. The stamped leaves seem to float above the background layer. The photo just doesn't do it justice.


Here's another look at my finished Fall Welcome Frame, which is now sitting on my foyer table. Thanks for taking the time to follow my tutorial. I hope you've enjoyed it. And thanks for having me here today!

****************************

This is utterly delightful Annette and we are so pleased you have shared this wonderful frame with us. The stamped flowers on the glass look stunning over the inked background - such a great idea. Thank you for taking the time to create such a special project to share with everyone.

One more week left folks to join in the current challenge 'Home Sweet Home' and a new challenge beginning next Friday at midnight (BST). We look forward to seeing you here again.

For anyone who may be interested we are looking for
  two new Creative Guides 
to join our talented team. If you would like more information and details please email me at brenda_brown25@hotmail.com by Monday 5th October. Many thanks.

Have a great weekend.

hugs Brenda and the AVJ Creative Guides. xxx


Friday, 4 September 2015

Home Sweet Home


Hello fellow travellers at A Vintage Journey! 

Jennie here as your host for the September challenge - however before I give you the details I want you to join me in welcoming a new Creative Guide to our fabulous family. We are so very pleased to have


Tracy Evans of Craft Addicts


joining us on our fabulous creative vintage journey. Tracy's mixed media style is truly eclectic and she will be a fabulous addition to our diverse team.
So now on to our challenge! which this month is 

Home Sweet Home 

For most of us the summer holidays are over, schools are back and it is nice to be home and back in the usual routines. So for this challenge we want to see you create a project which sums up "home" (either past or present) and using Tim's fabulous array of products and techniques.

Remember that this is a Tim Holtz inspired challenge so please make sure that Tim's style is clearly evident in what you make. You do not have to use Tim products, but we we do want to see that your project is inspired by one of of his wonderful techniques that he so freely shares.

You can make anything you want, as long as it clearly follows our Travelling Instructions. Just click HERE if you want to double check before entering.

Our challenge is a monthly one and a randomly chosen winner will receive a £20 gift voucher from our very generous sponsor, Country View Crafts. We also award our Pinworthy badges to the Top 3, chosen by the Creative Guides.

And now without further ado it is time to unveil the Home Sweet Home projects created by our Creative Guides far and wide.


_____________________________________


Whilst I loved my summer holidays as a child I couldn't wait to get home to make a box to keep all those wonderful treasures I had collected. I had boxes all over my bedroom full of the most amazing bits and pieces of junk! So in memory of those cereal/wallpaper boxes I have made a box using many of Tim's products in my own vintage style and thought this photo booth picture looked a little like me when younger! There are more details on my blog if you want to see more.


My first piece for A Vintage Journey was inspired by one of Tim Holtz sentiments "Enjoy The Journey". I feel creating a piece of art should be about enjoying the process, the creative journey. I decided to alter an old embroidery hoop, giving my piece a real homespun feel, combining old and new products, highlighting just how versatile the products are and how well they all work together. You can see more detailed instructions and pictures on my blog. I would also like to take this opportunity to thank the team for inviting me along for this exciting creative journey.


Jennie's lovely challenge couldn't be more fitting for me. I have just returned to "Home Sweet Home" and so happy to be here. I used lots of Tim's goodies on this page of my art journal - Distress Paints, Layering Stencils and Grunge Lettering. Please stop by my blog My "Crafty" Life on the Internet for more details and photos.


I love to have vintage touches around my home and decided to make a wall hanging with all my favourite things using different crackle techniques, paints, stitching and distressing. Love to have you pop over to my blog - Juliz Design Post to see my ongoing process x


It was one of those rare occasions when I knew exactly how I wanted to tackle the theme, adding a heart to the centre of a 3D house, as for me 'home is where the heart is'. Then when the pages of my 'Compendium of Curiosities 3' fell open at the page showing Tim's altered burlap techniques it seemed as if fate had intervened to show how to cover my little house. And as it progressed further many more of Tim's ideas came into play too. You can see more on my blog.


I decided to use a technique from Paula Cheney to create a canvas for this challenge. I also decided to use my new and what turned out to very bright distress paints! I love each one of them, but may not use them together next time! Do pop over to Addicted to Art to see the details today.


I have just received the new tea time die and just had to have a play with these gorgeous tea cups. I have created a shadow box and used Tim goodies and Wendy Vecchi's faux gilded technique that she taught us on her workshop I attended recently. Although I prefer coffee to tea I can see me having lots of sun with these cups.


With my dollhouse connections I love little houses, so as soon as I saw Jennie's theme I knew I wanted to create some with the Artful Dwellings die. As I played, I was thinking about what it is that makes a house a home. If you want to hear some of the thoughts I came up with, as well as see some close-ups (this one really is tricky to capture in one photo!), do come and visit me at Words and Pictures.

__________________

Well who could not be inspired by so many wonderful projects! So now it is over to you and we are all looking forward to seeing what you create.

Jennie x