This is a unique challenge blog where we are inspired by and focus on the Vintage; shabby; mixed-media; art journaling; industrial, timeworn and steampunk genres and encompass the talent, flair, expertise and ideas of many artists that we are inspired by. We welcome all types of projects - cards, journaling, assemblage, layouts, albums, atcs, altered art in fact whatever you want to share (as long as it is in good taste).

Monday 30 March 2015

Destination Inspiration : March Recipe #4

Hello Everyone - Jennie (Live the Dream) here with you today and welcome to the last of this month's (new look) Destination Inspiration. As you know four Creative Guides will each month nominate a substrate, a main colour, a technique and a product to be included in each of our projects.

The March Ingredients are:

Substrate - Tag
Main Colour - Peacock Feathers
Technique - Spritz and Flick
Product - Idea-ology Metal

So this is what I cooked up with these fabulous ingredients.


Apart from the addition of a little Frayed Burlap Distress Ink you could call this 50 shades of Peacock Feathers! It is amazing the different colours you can achieve by blending softly, adding more pressure, or even changing the material.


This was my background: Lightly blended Peacock Feathers and Frayed Burlap Distress Inks which were then spritzed and flicked with water.  I then overstamped with Tim's wonderful text stamp using the Peacock Feathers again. I say overstamped I actually lay the tag onto the stamp and press lightly to get this random look as it is such a large stamp.

I then added some Ranger Texture Paste which as it was drying picked up a little of colour underneath.


Flowers were made in my usual way (tutorial here!) using the Tattered Floral Die and the Peacock Feathers again with just a little Frayed Burlap around the edge. I love the way the ribbon and the die cut take the ink quite differently and so again more shades of PF!


I even managed to paint the jumper in the Photo Booth picture!  Finally I added some black embellishments and Rub Ons to set off all these "shades".

We really hope you have enjoyed this new look Destination Inspiration and now we hand the baton over to another four Creative Guides for a completely different recipe. 

But for the record here are our four pieces for this month so you can see how we have each in our different styles interpreted the same ingredients. I think you will agree four very different pieces which just goes to show how versatile these wonderful products are.


Week 1 : Alison


Week 2 : Nikki


Week 3 : Chris


Week 4 : Jennie

Thank you for joining us today!

Jennie 

Friday 27 March 2015

Guest Creative Guide - Paula Cheney


It is with great pleasure I welcome the fabulous Paula Cheney as our first Guest Creative Guide in year 2 of our vintage journey. Those of you who know Paula will already be aware of her amazing projects, her love of all things 'Tim' and her  incredible creative talents. Whether she is using inks, paints, junk, dies or fabrics she can turn out the most inspiring works of art that get us wanting to see and  know more. Well today you have more - but Paula and I have a 'game' for you to play too - read on to see how it unfolds.


Hello everyone! I am grateful for the opportunity to be here today on A Vintage Journey! Maybe a little background information is in order for those who don’t know me. I have worked in the scrapbooking/mixed media industry for almost 10 years now. The last three for Tim Holtz, as his Creative Coordinator for Tim Holtz brands. That means I do a little bit of everything! It might be creating something for a magazine ad in the morning, move on to design ideas for idea-ology by lunch and finish out with a sewing project for Tim’s fabric line, Eclectic Elements. Really a jack of all trades around here! I also write a blog called One Lucky Day where I test out product, share what I make, and also share my love of junk! 

I live on the central coast of California (half way between San Francisco and Los Angeles), about 20 minutes from the Pacific Ocean. I have been married to my husband Jay for 28 years. He is very supportive of all of my crazy ideas and would you believe, he does all my Sizzix cutting for the classes I teach. He even has his own Vagabond machine. 

I’m also a Downton Abbey, Doc Martin, Midsomer Murders junky. I don’t know what we’d do without Masterpiece and Masterpiece Mysteries on Sunday evenings! In a few short days I am taking my first ever trip to London, so I thought I better include a little bit of the UK in today’s piece...I’m sure you will spot it right away when you see it.


I started this project over on my blog, One LuckyDay...I hope you will pop over to see the beginning steps of how I painted the blossoms. Now lets continue on to see the finishing work and the final project...


I wanted to add a metal Wordband to the piece but also wanted to change up the color of the band. I did that by pouncing gold alcohol ink over the top. Once dry, I added Picket Fence Distress Paint over the debossed lettering (wiping away the excess), then finishing with Iced Spruce Distress Paint on each end. 


As I said before, my frame is vintage. It already had two large eye screws for hanging (no wire though) on the back of the fame. I decided to use these to my benefit, by stretching an idea-ology Elastic Band across the frame. As you can see, I slid the Wordband onto the elastic before I fed the barbed end of the elastic into the second eye screw. 


Once I had the Elastic Band in place, I created a focal point to coordinate with the background. I mounted a piece of ephemera (Emporium pack) onto chipboard. Then added a couple layers of cheesecloth (what you don’t see if that I sewed the cheesecoth to a scrap of paper I dug out of the garbage can). Cheesecloth is way too wonky to control without a stable surface to stitch it to. Once the sewing was complete, I cut away any paper that was showing beyond the edges of the cheescloth. I added a Photobooth photo to the center of the stitching. This photo was already tinted so no need to do that here (maybe that is a blog post for another day). I also added the phrase, “be your beautiful self” from the Small Talk sticker set. The Mini Numerals are enhanced with Iced Spruce paint and gold/mushroom Alcohol Ink. 

Please note: I did not glue any of these pieces to the main chipboard until I got the correct spacing of the elastic band in the next step.


Once the chipboard backing is in the frame, you can gauge where to mount the center picture. Once added to the board (I used 1/2” Wonder Tape), I was able to add a skinny strip of foam tape along the bottom half of the Word band. 


Peel the backing paper off and adhere the foam tape right below the Photobooth photo (it should fit up nice a snuggy against the picture).


My idea was to use the Elastic as a “clothesline” for trinkets. I added a Heart Charm and some vintage mother of pearl buttons to two Loop Pins and hung them on the line.


Now just secure the backing and we’re done! That was a lot of words for a very easy project! So many techniques here to try. I sure hope you will!


Well, what can I say? This is a most gorgeous frame Paula and as you say full of wonderful ideas and techniques and I for one have just fallen in love with the washing line idea. Oh I so want to try that on a project soon. Thank you so much for sharing such a special project with us and for joining us over at One Lucky Day too.
I hope you have the most wonderful time in the UK when you come over and enjoy some great sightseeing and shopping. Just a shame you aren't teaching here ...... maybe 'one lucky day' we will have that opportunity.

It's over to you our lovely readers, have fun visiting Paula to see how she started this off and let us know how you enjoyed the excursion.

We hope to see you Monday when our fourth (and last) Creative Guide for this month will share her ideas and inspiration for our monthly recipe of product, technique, colour and substrate which for March has been idea-ology, spritz and flick, peacock feathers and tag. I hope you have been enjoying all the different projects that have been emerging.

Take care and have a wonderful weekend.

hugs Brenda and the Team xxxx

Monday 23 March 2015

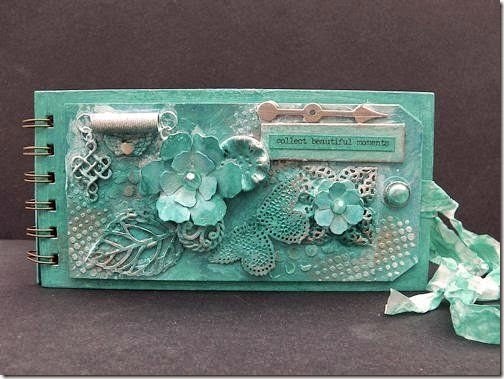
Collect beautiful moments - Destination Inspiration #3

Good morning everyone!

Starting this month, our Destination Inspiration (DI) makes are based upon the various elements that each of the contributors have chosen and for March these are:
  1. Product:  Idea-ology metal
  2. Tim technique: Spritz and flick
  3. Colour: Peacock feathers
  4. Substrate: Tag
This is what I put together…

Here is a brief overview of how it has been made…

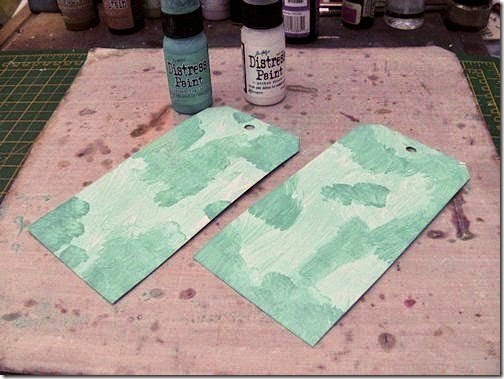
I started off with two tags, Peacock feathers and Picket fence DPs:

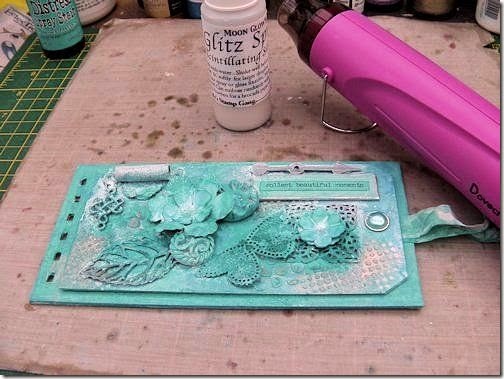
Add some Glimmer mists then some Texture paste using Layering stencils:

This is my selection of Idea-ology metal and other embellishments:

Mounted tags onto prepared album bases and coated with white Gesso:

Sprayed with Peacock feathers DSS and some more Glimmer mists:

Add gilding wax, beads, ribbon, Kraft card inner pages and bind:

For a complete set of step x step pictures you can hop over to my blog to see the details.

Thanks for dropping by, have a great week!

Chris xxx

Friday 20 March 2015

Guest Pinworthies

Welcome to the third Friday in the monthly challenge and today we are welcoming three lovely ladies with guest projects for you. They are the Creative Guides choices for the Pinworthy Mentions from challenge #24 Love is in the Air. In alphabetical order we have -


Hi, my name is Berdien Weideveld and I am very honoured to be asked to be today's guest designer on this blog !
I am 42 years old and married to William. Together we have two very beautiful daughters: Celine, 15 years and Kyara, 13 years old. We live in a small village in the Netherlands.
Approximately twelve years ago I started scrapbooking. At first I scrapped only with photos, but when I discovered Tim Holtz on a creative scholarship four years ago, I was immediately in love with all his products and techniques.
From that day I have ink on my fingers every day !!! 


I made a collage of sorts Tim Holtz papers and ephemera, all edges are decorated with black distress ink. The clock was edited with silver paint.


The key is punched out of chipboard and edited with silver embossing powder and black ink to give him a nice old look.
As a finishing touch I made some rub-ons and chitchat texts.


The title 'Remember the now' is a stamp. I have stamped the word 'now' an extra time, cut out and then applied with foam in 3d.


I hope you all like my project and I wish to thank the Vintage Journey-team for this great opportunity that I got !! 


I’m so excited to be here! This blog and all of the incredibly talented designers have been a great source of inspiration for me. To be Guest Designing is certainly a thrill! 

I’m New York born and raised. I live about an hour north of NYC – with my husband of 30 years. We’re new Empty Nesters and although I miss having the kids at home, it gives me a lot more time to craft! Before I found Paper Crafting 17 years ago, I always considered myself “Craft Impaired.” What originally began as a hobby quickly evolved into a full time passion! Card Making is definitely my first love but since I discovered Tim Holtz, I am obsessed with Distress! My husband calls Tim “My Boyfriend” because every time I see one of his techniques or products, I disappear into my craft room for hours – so he jokes that I must have “My Boyfriend” in there with me. ;) I create in all different styles but Vintage is my favorite. I loved my Grandmother and each time I create something “old,” it makes me think of her.

I thought long and hard about what I could design for you that would be worthy of this honor. I love Tim and all of his techniques and I wanted to use every one of them along with all of his products! This project, sort of, started to create itself and then took on a life of its own. I hope you like it. Additional photos and instructions can be found on my blog – www.StampsAndScrapbooks.com


Project Description: This project is a lot easier than it appears. It uses 2 sheets of card stock cut down the center and scored at graduating intervals to create a cascade effect. 


 The Manila Cardstock is distressed with various colors of Distress Stains, Stencils and Embossing Folders. Distress Inks were applied through different stencils on all of the card stock pieces. Photos, Ephemera, Die Cuts, Remnant Rubs, Idea-ology Pieces, and other Tim “ Treats" were used to decorate the individual pages. Vintage Photo and Evergreen Bough Distress Paints were used to age the die cuts and charms. Finally, Linen Thread was used to “bind” the pages together.


Hello everyone,
I am Rupa from Bangalore, India. It gives me great pleasure to be here as a guest and when Chris asked me if I could be one, there was no saying “NO”. I strongly believe in “Dreams Come true” and this is one! I found out about AVJ 6 months back and have been participating since then and a pin worthy twice in their challenges. A blog that inspires and influences me the most, it is such an honor to be here for their blogoversary! I have a mega altered, up cycled project which has loads of Distress and Vintage ( my fav words in crafting). Oh my! What would we do without those…I always feel anything can be altered with his wide range of products, what say??


My interest in arts started when I got married and had to set up my own house. I had a flair for interior decoration but no formal training, which is when I started learning various forms of art and painting just to decorate “my home” ! After the birth of my first son ( a child with special needs) I was forced to be a stay at home mom and that’s when my passion and hobby became work too. I started taking art classes from home and have been doing so last 10 yrs and still do. My son now is 16 yrs and I have a 5yr old daughter too and my entire family is very supportive of my passion.

My entry into crafting was accidental 2yrs back when I just bought the Big Shot machine in an impulse. I discovered my style was Vintage with lots of textures and most importantly , altered art. My USP is up cycling and have hoarded a lot of trash at home and they all get their time to get pampered and have a new lease of life. I love doing 3D projects and today too I have an up cycled project where I have used a card board packaging box and a couple of empty brown tape rings to make a deco piece which can light up a table!

I have been wanting to have a drift wood decor piece for a long time and today I present to you my “faux drift wood” deco item which can light up any table. After all we are talking about celebrations at AVJ, right…


To make the drift wood, I used a horizontal piece of box, made a few circular openings on the top ( you will see why in a while) and inserted the empty tape rings.

 I stuck layers of tissue paper and cheese cloth and then spread homemade texture paste with a spatula all around the box. Once dry, I took my first collection of Distress stains, picket fence, walnut stain, brushed pewter and weathered wood and applied them and voila, my lovely faux drift wood piece was ready. Doesn’t it look like it one of those pieces “washed off “the shore?


For the front panel: I have printed this lovely table quote from the net on kitchen tissue and have adhered it on canvas cloth with gel medium. I aged the canvas with DI antique linen and Vintage photo and splattered black soot distress stain too. The edges have been given a shabby look by machine stitching. I have fastened the banner on the panel with TH hardware findings, which have been painted with black soot and brushed pewter D Stains and then “rusted up” using paper Artsy rusting powder.

The side panels: I made a faux frame using garden twigs and painted it with picket fence and brushed pewter D stains. I then printed the table manners quote and then framed it behind the frame with an acetate sheet too from packaging. Simple embellishments here, with a resin star fish cracked up with picket fence distress crackle and then walnut stain to highlight the cracks.

The back panel: A miniature banner that says it all. I dipped it in UTEE to get a glassy finish and have hung with natural twine. I have a thick layer of coconut coir for some dimension and texture here. I wanted the back to be simple to reveal the “faux texture” here. Looks good right?


Floral embellishments in the front: I love making them! All these lovelies are made using mostly TH tarred florals, it’s amazing that you can make a wide range of flowers with this single die. One of my favorites and I can’t do without it! The foliage too is mainly TH and the lovely ferns are using Tattered lace die. The subtle colors of the flowers are all using distress inks and I wanted a soothing color palette on the drift wood, nothing too bright. I also did a “Tammy Tutterow” bow …colored the seam binding with DI and made the bow using her instructions to make a handmade bow maker!

The butterfly was my first experiment with D stains. When I got the package, I just opened the package and tried out the marbling technique with the few colors that I have and ran a water color paper over. I took all the stains in a lovely rainbow pattern and I use the monarch butterfly die to get this one. One dip in UTEE and this delicate thing turned out to be a toughie!

The little bee is a stamp and has been colored using D inks and sipped in UTEE too. A closer look and you can see the rusted hardware and a customized Ideology token! Do you see it hanging there, lol…yes I made that with a token die and D stains and wrote “avj” just so that it reminds me of this wonderful day!

The entire piece weighs like real drift wood and some wooden feet colored with picket fence D stain helps it to balance well!
Phew! Ready for a little more…
The Top panel: is where the surprise is…remember the circular cut outs? What do you think it is for???
Have a look…this is ultimately how I envisioned this drift wood to be on the table…


After all, “The fondest Memories are made gathered around the table” right… and with celebrations on here at AVJ, don’t you think the table needs to be brightened up…here it is…
A closer look at the center and you can see a battery operated LED candle glowing beneath the lovely lotus!


The back side with the lighting ”BON APPETIT”!

Finally, the end is here. Thank you so much for putting up with my loooong post…I had to share every bit with you, after all it took me 4days to finish this!
Thank you Chris, Brenda and the entire AVJ team for this opportunity and hope this satisfies your creative needs and makes you play along the “anything Tim” challenge.
Until my next creative journey,
Happy Crafting and re cycling.
Cheers.

A huge thank you to all three of you for taking the time to create us a special project for our birthday challenge month. It's so lovely to see three very different but amazing projects together.


Please take a visit to these wonderful blogs to see more details and if you haven't joined us yet for our Anything Tim challenge you still have some time and it would be lovely to see you. Don't forget we have our ever wonderful sponsor Country View Crafts providing a £20 voucher for the winner, but there are also some other wonderful prizes donated by Tim and Mario for this month only for the Creative Guides Pinworthies selection and a special prize too for someone who has left a comment on the challenge post. 

Thanks for joining us.

hugs Brenda and the Team xxx

Monday 16 March 2015

Destination Inspiration - March Recipe Number 2

IMG_6901 copy
Hi everyone, Nikki here from Addicted to Art. Welcome to the second of the new format Destination Inspiration posts where the creative guides each use the same substrate, colour, technique and product to create a project. Alison introduced this month's formula last Monday ( if you missed her post you can see it here) – but to recap we are using:

    Colour – Peacock Feathers 
    Substrate – a Tag 
    Technique – Spritz and Flick 
    Product – Idea-logy Metal

    I decided to create a layered tag and began by taking my tag and some spare card stock for the other layer and the butterflies. I sprayed each with some Pumice Stone and Iced Spruce distress sprays and then proceeded to colour all the card with peacock feathers distress ink. For the tag (top layer) I then took my water and spritzed and flicked over the card – allowing the water to do it’s magic!
PicMonkey Collage 1-1
For the base piece of card I took that great background stamp from Tim’s Papillon stamp set and stamped with versamark and clear embossed (important to make sure the base colour is completely dry first). Having done this I covered the whole tag with Gathered Twigs DI and wiped away the colour from the embossed areas before spritzing and flicking again.
PicMonkey Collage 2-1
I then began tearing the top layer to the desired size. I embossed each piece with an embossing folder and then added gathered twigs over the surface and around the edges to highlight the raised areas.
PicMonkey Collage 3-1
I took an ornate plate from Tim’s idea-ology range and added distress paints to alter it. I confess at this point I needed Peacock Feathers DP but don’t have it, so I cheated a little and used Evergreen Bough for one layer and once dry added some Gathered Twigs.
IMG_6903-1
Finally on the spare peacock feathers coloured card stock I stamped the butterflies from the Papillon stamp set in archival ink and fussy cut them out before adding a little more Peacock Feathers to the surface and Gathered Twigs around the edge. I coloured some seam binding and with the same colours.
IMG_6904-1
To finish off my tag I added a little treasure gold around the edges of the tag and the butterflies.
Do pop back next Monday to see the third creation in this month's Destination Inspiration series!

Thanks for visiting today.
Nikki
IMG_6893 copy

Friday 13 March 2015

Happy Friday Everyone.

So how did you like Alison's first DI post with the new changes, good eh? And there are still three more of them to come, all with the same ingredients but I can guarantee the projects will all be very different and you are bound to pick up some tips, tricks and inspiration along the way. Watch out on  Monday to see the next one ....... and I wonder who it will be?????

Onto our second Friday post of the month where we continue with the Winners theme. Here we are showcasing a project from one of the previous challenge winners and we announce the next winner and pinworthies from the last challenge too. My Special Numbers theme was up last up so if you entered it you might like to take a  scroll down. It might be you mentioned in the list.

So today I am very pleased to introduce you to Ruth who has joined us with a very special make. Ruth has joined us from A Love To Create and I would recommend a visit to see her lovely work. Lets see what she has made us.

...................................................


Hi everyone, my name is Ruth and I was just delighted to be asked to design something Tim inspired following my recent win and had absolutely no hesitation in saying YES to such an honour, this is such an inspirational team and blog. Then when I found out it was their first birthday I felt so lucky and twice as so thrilled …and twice as scared… no pressure then! 
There are very few photos of me as a child but in keeping with the DT guides photos I found this one of me as a bridesmaid.


I just love creating (hence my blog title) and have done so since a child. My mum had a haberdashery shop which we lived behind and I have very fond memories of firstly having a real shop to play ‘shop’ in and secondly just spending ages in the shop once closed  just looking at all the colours and textures, drawer upon drawer of velvet ribbons, silks, threads, wool etc….oh happy days! I’m sure this started my lifelong love of colour and texture and of course my mum taught me all sorts of skills, so the 2 combined.
I started stamping about 25 years ago and then later discovered Tim’s distress inks. Vintage is definitely my favourite genre although I will dabble in most styles…and vintage is definitely Tim inspired. When I found out what the topic was I decided to try and do it all on a small scale, so this is my Tim Technique Tin!


I’ve used favourite and probably iconic stamp images and my favourite techniques, though I feel I’ve only just scratched the surface.


It started life as a tea caddy about 3.5” x 3”.


I aged it by heating it on the hob/ stove…outside on a barbecue might be safer! It takes on a gorgeous patina.


I stuck to a brown and blue colour scheme so the piece would look more cohesive. For the lid I’ve used alcohol inks and metal.


The front has a steampunk winged heart, the large cracks weren’t deliberate but I embraced the imperfection and like it. Some stamping and distress glitter is going on as well.


Moving to the right around the tin, the background’s are distress inks…of course..clear embossing paste through stencils, diecut tattered florals out of clearly for art ( had to include a flower somewhere) and the blue stamping is my new favourite cobalt blue.


The back of the tin is the type of mixed media, journaling style of page I like doing. We have some rusting, ephemera going on and for the background I’ve used an embossing  folder .


Lastly and probably my favourite, we have the shabby chic technique on the diecut and I've used perfect pearls, rock candy stickles and crackle paint. I've also used my favourite stamps, that text and those butterflies!  Hope you enjoyed and I want to take this opportunity to  thank Brenda and the team so much for inviting me….ooh and Happy Birthday! 
Ruth x

And a huge thank you too you too Ruth, what a fantastic altered tin you have made with each side so beautifully decorated and embellished and with a wonderful rust and blue colour palette. We are so pleased you joined us and that you made this wonderful creation with our initials on. That is so very special.

..................................

Onto the winner and pinworthies from the last challenge. The Creative Guides have given me their preferences and I have had a very difficult job pulling their choices together, but here they are -

Our winner for the Special Numbers challenge is -

I love this very vintage shabby card full of wonderful textures and techniques.
Congratulations Pamellia your badge and voucher from Country View Crafts will be on their way soon.

Next up are the Pinworthy mentions and in no particular order we have....

#11 Suzz


#13 Nicole

#22 Deb

Thanks ladies for your wonderful contributions and sharing your amazing talent with us. Your badges will be on their way soon too.


Thank you for all the amazing comments we have received on the challenge blog for our fist birthday, we are so thrilled and amazed at how many of you have been so encouraging and supportive about the challenges and about our projects. We love what we do and feel so buoyed up with all the incredible things you have said.  If you haven't seen the new changes and haven't seen the theme and prizes that are up for grabs then you must pop over and take a look. It's now a whole month you get to create something and to join in and the winner now gets a £20 voucher from Country View Crafts.

See you over there.

hugs Brenda and the Team xxx