This is a unique challenge blog where we are inspired by and focus on the Vintage; shabby; mixed-media; art journaling; industrial, timeworn and steampunk genres and encompass the talent, flair, expertise and ideas of many artists that we are inspired by. We welcome all types of projects - cards, journaling, assemblage, layouts, albums, atcs, altered art in fact whatever you want to share (as long as it is in good taste).

Friday 27 November 2020

A Vintage Journey's November Card Making Post

Julia here today with a card I made using the Die Cut Relief technique for AVJ's November card making post.

Here's how I put this card together.

I got out some dies that would create a layered scene:  trees, a fence, a wreath and a sentiment.  I also got out some dimensional sticker snowflakes.  I used a background embossing folder (Weathered from Taylored Expressions) to emboss the water color paper panel before layering the die cuts over it.  I cut all the dies out of watercolor paper and adhered them over the embossed panel using a Matte Medium.

Once dry, I brushed over the whole panel with the Matte Medium
Because the stickers were silver I went over the panel once again, this time with Gesso so it would all be white.

When Gesso was dry,  I started adding layers of acrylic paint. First, I dry brushed the panel with Manganese Blue Hue, being sure to get into all the cracks and crevices and removing any pools of paint in corners or depressions.

After this layer dried, I dry brushed with Burnt Sienna, just hitting the high spots and open spaces, not fully covering the blue.

After this layer was dry, I dry brushed the final layer of paint using Titanium White, brushing just across the raised pieces and open spaces, turning the panel and brushing from all sides so all the edges of the die cuts were brushed with white. 
I trimmed the panel and layered it to a white card base.

I hope you have enjoyed seeing how I put this card together. 

You still have time to join in on our November Challenge -  Toni's fun Pairs Trios and Sets Challenge.  You'll find it here.


Friday 20 November 2020

Pairs Trios and Sets Tutorial

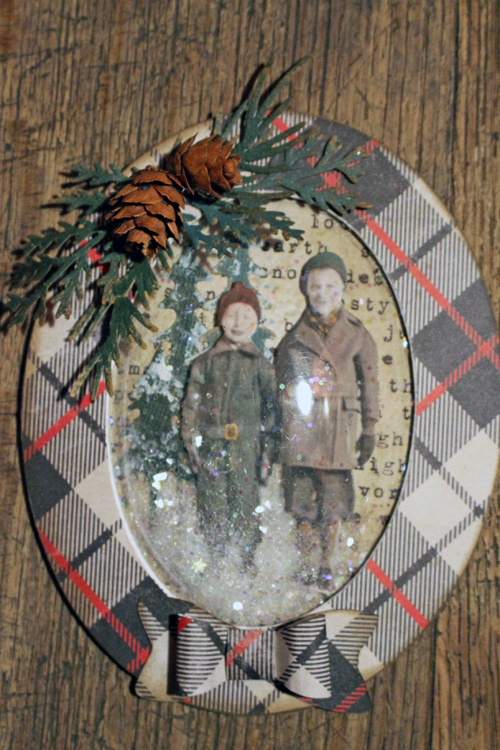
 Hi everybody! As promised I'm back with a tutorial showing how I made my shaker decorations, for our latest challenge, Pairs Trios and Sets. Lets get started....

I started off with these domed frames I bought from a craft show bargain bin several years ago. There were 5 in the pack and I've lost count of the number of times I've picked them up, looked at the, waited for inspiration to strike  and then put them away for another day. Luckily for me, this time inspiration was not far away! 
I used some lovely papers by Tim Holtz, from last year's Christmas release. Firstly, I cut out an oval shape, just a little bigger than the outer frame. I adhered this to the surface, and used a craft knife to cut away the centre. I then used a sanding block to remove the paper from around the outside edge.......
Sanding the inside edge of the oval was a little more tricky, to do this, I wrapped a piece of sand paper around a pencil. This made it much more easy to remove the surplus paper. Once this was done, I blended a little Vintage Photo Distress Ink around both the inside and outside edges of the frame. I then followed the same procedure for the other two frames, using different but similar papers from the pack.
 I covered the centre of the base of each frame, with an oval piece of paper, slightly larger than the open frame. I also drew around the inside of the frame to help with the placement of the elements that go inside the dome. 
I cut several pieces of foliage, using these Tim Holtz dies and some Craft Core paper. I dotted a little white paint on the surface to suggest snow.
I added a little colour to the Paper Dolls using my Distress Markers, as well as dimensional tape to the backs. It was then time to assemble the elements.....
I firstly adhered the background foliage die cuts and then the slightly raised Paper Dolls. Next I secured the acrylic dome using strong clear glue. I left about 1 1/2 inches unglued at the top so that I could add the 'snow'. Once the glue was dry, I gently lifted the open part and spooned in the glitter.....
 I used three different types of glitter, Diamond Dust which is slightly heavier and more like glass glitter, I also used some very fine holographic glitter, as well as a sprinkling of tiny glitter stars. 
I then secured the opening at the top of the dome with a little more clear glue, and attached the outer frame. The finishing touches, were to add an arrangement of die cut foliage with some tiny pine cones, and a little die cut paper bow. 

This was a most enjoyable project to make. I have one more dome left which I think I will use to make another shaker decoration, and this time, I shall use pictures of my own dearly departed ancestors. 
I have enjoyed seeing the wonderful projects you have uploaded for our Pairs Trios and Sets Challenge. If you haven't had chance to join in yet, don't worry as you have until 18:00hrs on December 3rd. Plenty of time ! x 


Friday 13 November 2020

Numbers Pinworthies


Hi everyone, 
Annie here to announce our Pinworthy winners for October's 
"Numbers" Challenge Theme. As usual we had many fabulous entries and we want to thank each and every one of you for taking the time to hop on board with us. It is so hard to narrow our winners down to just three, but after due consideration, these are the entries the creative guides have chosen in no particular order:


Congratulations to you all! 
I will be in touch shortly with your Pinworthy badges and Amanda will be pinning your winning projects to our Pinworthy Winners Pinterest board 
We hope you will join in with our current challenge Pairs, Trios & Sets hosted by my very talented teamie Toni. 
Toni will be sharing the tutorial for her own challenge project next Friday so I hope you can drop in then. Meanwhile the current challenge details and an inspirational gallery of projects created by some of our  uber talented Creative Guides can be located HERE
 
Have a lovely weekend and keep safe
Annie xx


Friday 6 November 2020

Pairs, Trios and Sets

Hi everybody ! It's Toni here and I'm delighted to host our November challenge. The theme this month is 'Pairs, Trios and Sets'.  We would like you to create a set that works together. It could be ATCs, tags, triptychs, or any other grouping. Just remember to create your project in one of our preferred styles: vintage, shabby, mixed media, art journaling, industrial, timeworn or steampunk. I think  you'll agree that there is something for everyone with this fabulous, new challenge !  


I've made a trio of vintage style, shaker decorations. I've used  Tim's Paper Dolls and some of  his  gorgeous Christmas papers, hoarded away from last year! I'll be back in a couple of weeks, with a tutorial, detailing, how to make one of these.

 Deb

Winter Deer Triptych - Deb Riddell Designs

 For Toni's November challenge, I decided to create this winter themed deer silhouette triptych, pop on over to my blog for the how to. 

Jo


 Autumn Greetings! I had fun creating this art journal page with its set of pretty autumnal tags and a faux bark background to display them on. To see how everything came together and a list of materials, please pop over to my blog Let's Art Journal.


I have created a set of three collages for the signatures of a book I am currently making to journal knitting notes. I realised I had been knitting since the age of six so my three signatures reflect the passing of that time as a knitter. Do join me over on Live The Dream for more details of these little collages and the book they will decorate.


This is definitely a challenge after my own heart - I create in pairs, trios and sets more often than not, so I had a wonderful time making this autumnal leafy trio, counting down the moments before I put my dreams and thoughts into action with my autumn move to a new country and a new way of life.  Come and see more at Words and Pictures.

 Barbara

Fall vibes is a theme I love so much and the last two Facebook Live by Tim Holtz inspired me! I created a pair of bookmarks with autumn colours with the help of a lot of dies, stamps, and stencils! If you want to read how I made this project check out my Blog Yayascrap & more.

Amanda 

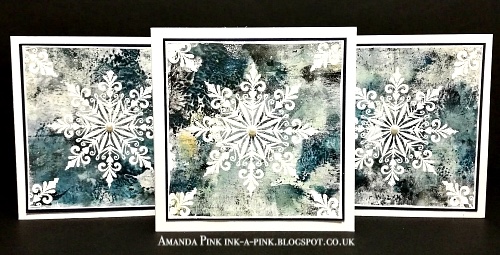
This challenge seemed like the perfect opportunity for me to make a start creating some Christmas cards. So armed with paints, gel plate, brayer, stamps and embossing powder the festive mixed media creativity began.  To  see and read more please feel free to stop by my blog, ink-a-pink


I think you'll agree with me, that The Creative Guides have once again, excelled themselves with a fabulous array of inspirational projects. Please hop over to their individual blogs to see the projects in more detail. Either follow the links, or just click on a Creative Guides name, to be transported to their blog. Of course, we would like nothing better, than to see your take on the challenge. You have until 6.30pm GMT, on the 3rd of December to upload your project. Happy crafting! 


You are invited to the Inlinkz link party!

Click here to enter