This is a unique challenge blog where we are inspired by and focus on the Vintage; shabby; mixed-media; art journaling; industrial, timeworn and steampunk genres and encompass the talent, flair, expertise and ideas of many artists that we are inspired by. We welcome all types of projects - cards, journaling, assemblage, layouts, albums, atcs, altered art in fact whatever you want to share (as long as it is in good taste).

Friday 26 April 2019

Creative Card Making with S@ndy

Creative Guide Call Update
Many thanks to everyone who has expressed an interest in becoming a new Creative Guide at A Vintage Journey.  The call is now CLOSED. We will be in contact very soon with everyone who has applied. 

Hello fellow travelers,

It's S@ndy here with you today to share a card making tutorial.  I have decided to stay in the Neutral Zone for this one as that is our theme for the month.  
So let's get started!

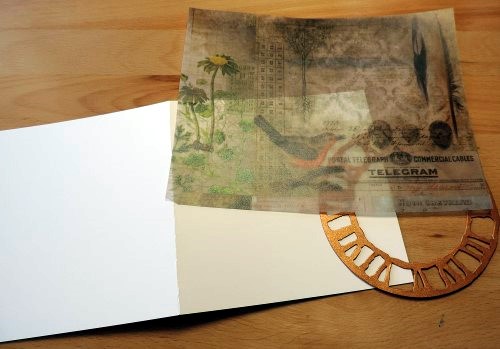
This card measures 5.5" square so I started with a base of manila cardstock cut 5.5" X 11" with a crease in the center.  Using the Tim Holtz Printed Vellum paper pad, the piece with the bird was selected.  From copper paper a clock face was cut using the Weathered Clock die.

Next comes some color and for that the card front was masked off with some Tissue Tape and then Forest Moss, Walnut Stain and Wild Honey Oxide Inks were applied using a blending tool.

A little water was spritzed on and then dabbed off making some lovely splates on the paper.  To add even more texture the front of the card was embossed using this circle embossing folder.  The card is actually wider than the folder so the embossing was joined in the center by running it through the die cutting machine twice.  The seam will never show once all the other elements are added.  Finally the entire front was edged using Walnut Stain Oxide Ink.

For a nice trim, a piece of lace was added and then topped with ribbon.  In order to hide the ends of the lace and ribbon an opening was cut in the fold of the card and the trims were pushed through (shown by the arrow above) and then secured.  The other end was wrapped around the edge of the card front and secured on the back.  In order to make the inside of the card look clean and neat, an additional (slightly smaller) panel was placed on the back of the front panel as shown below.


Card front


Next the clock was cut again using Grunge Board, you could use any thicker material for this part, giving added texture once the card front is assembled.  

The copper piece and Grunge Board piece were stacked and glued together and placed on the card front.  Next the vellum piece with the bird was stacked and attached to the inside panel.  A little fussy cutting was done around the piece and it was placed and glued in the clock.

It was at this point that I realized that I had made an OOPS!  I wanted to add a word band on the ribbon but the ribbon was already on the card.  Instead of taking it apart, I simply put the word band on another piece of ribbon and glued it over the first piece on top of the clock piece.

Now that the oops was corrected it's time to move on to the decorating.  

Making these little flowers are a bit fiddley but worth the effort on the finished card. 
I made a few Baby's Breath using a die from Elizabeth Craft Designs.

I had some vines from a Karen Burniston die with Nuvo Drops in my stash - so used them.  I cut some extra ferns and made two Shasta Daisies.

There was a yellow Helenium sitting on my work table so used it as well.  I arranged all the pieces in a way I thought they looked best and glued them in place.


On the inside of the card another piece of vellum from the same paper pad was used.  It has dotted lines in the pattern which will be nice for writing a personal message.


To find out more about the products I used - please visit my blog here where I have provided links.

I hope you have enjoyed yet another journey to the Neutral Zone,
S@ndy

Friday 19 April 2019

Neutrals Project Tutorial - Crackled Pebbles and Mottled Faceted Heart

Crackled Pebbles and Mottled Faceted Heart Tutorial
Hi everyone, Nikki here with this month's project tutorial.  I thought I would share how I created my project for our current Neutrals challenge but also re-created it in different colours too! 
Here is the original:
Crackled Pebbles and Mottled Faceted Heart Tutorial
The base of these projects is an 8inch square piece of MDF - on top of which I have added 4 coaster size altered pieces of greyboard (each 4 inches square).
Crackled Pebbles and Mottled Faceted Heart Tutorial
Although it may not be obvious the coasters were done in pairs, with slight differences between them.
Apologies - I realise the text on the above image is not clear! My first step was to paint the surfaces - 2 in black and 2 in an off white colour. Onto these I then added crackle paste through my selected stencil. I went for a pebble effect but anything should work. Once dry I added Deco Art Antiquing Cream - I added white on the black coasters and black on the paler ones. I wiped away until I was happy and left to dry.
I sealed each surface with matt medium so I could add more paint without the antiquing cream moving, and added watery washes of  black and metallic paint to add tonal differences.
The blue version was an identical process just using varying tones of blues.
Crackled Pebbles and Mottled Faceted Heart Tutorial
The hearts were die cut from heavyweight card stock and the creases burnished to make this easier later. 
I painted the surface with Silver paint and once dry created a resist using hair wax - adding in patches so as not to cover the entire surface. I then added black paint over the surface and allowed to dry naturally, so as not to melt the wax, before wiping away the black paint.
Next I created a watery wash of black paint and covered the surface before sprinkling salt over the surface. Leave to dry and then rub off excess salt.
I didnt add the salt on the blue version but sanded the edges carefully and emphasised with more silver paint.
Crackled Pebbles and Mottled Faceted Heart Tutorial
For both I layered the heart on some altered circles / cogs and added flowers and a word chip.
Crackled Pebbles and Mottled Faceted Heart Tutorial

Crackled Pebbles and Mottled Faceted Heart Tutorial
Thanks so much for stopping by! Don't forget our Neutrals Challenge runs until 2nd May and we would love to see your designs. Sandy is here next week with our monthly card making tutorial.

See you soon!
Nikki

Friday 12 April 2019

Birthday Celebration Winners and Tag Friday Winner

We really enjoyed looking through all the birthday celebration winners posts, thank you to everyone who joined in and some of you who shared more than one project with us - that is sooooo supportive and we so appreciate the entries you all make. Thank you also for all birthday wishes you left for us on your blog posts.

So onto the three Pinworthy projects chosen by the Creative Guides and myself and you certainly made it difficult to narrow it down to just three, But after much deliberation these are the ones highlighted for this month and because you made it so difficult I made it four!


Kerstin


Hazel


Tracey


Irina


Unfortunately we are unable to choose a winner for the Tag Friday post due to a lack of entries. We hope that more will join in next time.

I would like to link back to our challenge post for April and ask you to share a project here focusing on "The Neutral Zone" where we are creating with the black, white, grey, beige, cream and brown colour palette. There are wonderful inspirational projects from the Creative Guides and a linky for you to add your project to. Inlinkz have changed their platform and ask you to register but they say you only have to ever do this once and in the future you will not have to repeat the process.

In the challenge post you can also read about a call out for anyone interested in maybe becoming a new Creative Guide - that might be you, so please do go take a look to see how you can find out more information about the role and please email me if you are interested.

Thanks for all the support we receive both in comments and entries and we look forward to another happy year of themes and wonderful creative projects.


hugs Brenda and the Creative Guides. xxx

Vintage picture courtesy of the Graphics Fairy

Friday 5 April 2019

Neutral Zone - April Challenge

Challenge and Creative Guide Call


Hi everyone, Nikki here from Addicted to Art to host our latest challenge - Neutral Zone. But before I introduce this month's theme we are excited to be holding a Creative Guide Call!

Creative Guide Call....
Are you interested in joining our popular challenge blog as a new Creative Guide? We are looking for one or two new people to join the team, to create projects in one of our favourite styles and to share in the hosting of challenges and commenting on entries. We are an extremely friendly group, helpful, supportive and positive in all ways. We have a flexible schedule for completing a minimum requirement of projects and you can choose which months suit you best, you are not expected to join in every one. If you would like to find out more about what you would need to do as a Creative Guide then email Brenda at brenda_brown25@hotmail.com and she will send you more information for you to see whether the commitment is right for you. We're looking forward to expanding the team a little more so as to provide even more flexibility for our wonderfully talented members. 

Challenge time......
Back to our April challenge and it is time to banish colour! We are creating in the Neutral Zone. You can create with blacks, whites, greys, beiges, creams and browns but whatever you make, and whatever style, it needs to stay in the neutral zone. And remember to create in one of our preferred styles of vintage, shabby, mixed media, art journaling, industrial, timeworn or steampunk.

Here are our designs which we hope provide a little inspiration to get you started.

Textured Wall Art with Tim Holtz / Sizzix Faceted Heart die
My 8x8 inch panel is full of varying textures but only black, grey, silver and white. For some close ups and a sneak peak of a second version I made, do head over to my blog. I will be back here in 2 weeks with our project tutorial (April 19th) - with all the details of how I made this.

I have taken the chance to create a wrapped journal using one of Eileen Hull's fabulous dies. The outside is shabby vintage in a neutral palette but I have left the option to add some pastel colours when I create the inside pages. I decorated the back of the journal too. Lots more photos and details can be seen at Bumblebees and Butterflies if you have a moment to pop by. xx

I decided to create a mixed media shadow box for Nikki's 'Neutral Zone' challenge filled with all of the wonderful Tim Holtz Wildflower dies that we now have available to us.  Pop on over to my blog to take a stroll through my neutral garden!

I really gave myself permission to play in my art journal for Nikki's Neutral Zone challenge. I hope you stop by my blog for the details.
I made an eggshaped tag for Nikki's fun challenge seeing this month we will celebrate Easter. I then thought to use the tag to decorate the cover of my latest journal insert. In the last moment I decided to add one of my dried ferns, which of course adds a little spot of colour, but I hope this will still qualify as most of it is definitely in the neutral zone....If you want to see how it all came together, all you need to do is click here.

When I hear neutral - my mind automatically goes to brown, yellow and manila.   I made a card front for a future card that will go to a family member who is coming to town later in the year.  My parents are celebrating their 75th wedding anniversary.  You can see more details on my blog here.

I have created a Mixed Media Canvas for Nikki's challenge working with a neutral palette of black white, grey and silver - one of my favourite palettes to create with!  It features one of the many 'Faceted Hearts' I have had lying around my desk for the past few months - Thanks Nikki for providing the ideal opportunity to finally feature one of 'the many' in my art. You are more than welcome to pop by my blog to see and read more.... 

Alison
Well, I don't need much persuasion to step into the Neutral Zone... and this made for a lovely return to the craft room after two months away.  There were some long-neglected leftover bits and bobs on the table which all just fell into place on this MDF tag.  Do come over to Words and Pictures to see all the details.

******

We very much look forward to seeing how you use this neutral palette in your projects! This challenge is open until 2nd May so lots of time to get the thinking hat on and the fingers messy. In the meantime we will be back next week with our Pinworthy winners announcement from the last challenge. Happy crafting everyone.

Nikki xxx

You are invited to the Inlinkz link party!