This is a unique challenge blog where we are inspired by and focus on the Vintage; shabby; mixed-media; art journaling; industrial, timeworn and steampunk genres and encompass the talent, flair, expertise and ideas of many artists that we are inspired by. We welcome all types of projects - cards, journaling, assemblage, layouts, albums, atcs, altered art in fact whatever you want to share (as long as it is in good taste).

Friday 31 July 2020

July Tag Friday

Hello and Welcome!

We have another fifth Friday in the month ..... where do the months go!! ..... and the Creative Guides are here to share with you our usual inspirational tags. We all love the chance to create without a theme, experiment, use up scraps, generally just have fun!

So do please join us to see what we have created.
_____________


For July's Tag Friday I decided to make a tag with a set of stamps that I like very much "Flower Shop". You'll find all the details on my blog post here.


Hi everyone! Spending more time in my garden means that my art is being inspired by some of the beautiful flowers blooming at the moment, so today's double-sided tag features purple poppies and rudbeckia. To see how they were created and a full list of materials used, please pop over to my blog Let's Art Journal.


My tag this time is part of a larger project and will be part of a journal I am working on.
If you want to see more, please visit me on my blog


I just had to get out my new Gertrude die for my tag today.  Her long neck and legs fit perfectly!  You'll find more details on how I put my tag and Gertrude together on my blog post here!


The Earth Laughs In Flowers Watercolour Tag - Deb Riddell Designs

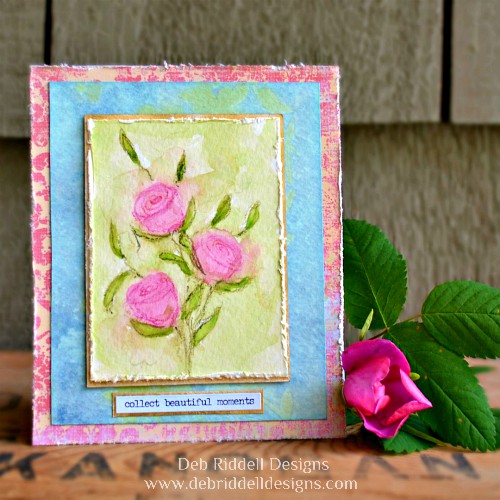
I decided to keep with our July theme of Watercolour Wonders when I created my Tag Friday hang tag, pop on over to my blog for more details and the how to.


It's so nice to be able to join in with Tag Friday. As you can see I have created a shabby chic tag using heat embossing, layers of lace and a cluster of images from my stash. To view a close up/view tag details, available on my blog, click HERE


Hi everyone! happy to be here for our Tag Friday! This month I have a new obsession: Alcohol Inks, so I'm sharing with you another project I created using them! If you want to read how I made my tags and see the details check out my Blog Yaya Scrap & More.


It is always fun to use tags to try new techniques and I have been experimenting with Embossing Glaze to create the background for this tag. Do join me over at Live the Dream for all the details.


Ah - Tag Friday... happy playtime!  I've been playing with Speckled Egg Distress (easily now in my top 3 colours of all time!) and some simple collaging over a crackled background, with a quote stamped on acetate in a very now-you-see-it, now-you-don't way.  Come and see more details over at Words and Pictures.

___________

What an amazing collection of different designs, techniques and styles! We hope you enjoy them. We also love it when you join us, so do share your creations with us by using the link below.

Have a great crafting weekend and join us next Friday for the start of our new challenge theme.

Jennie and the Creative Guides x


You are invited to the Inlinkz link party!
Click here to enter

Friday 24 July 2020

Creative Card Making with Barbara

Hello everyone! Barbara here, I'm so happy to be your Creative Guide for this month!
Today together with you, I want to start the Halloween season for this year. I couldn't resist! I used the new die by Tim Holtz, Arthur. I adore this owl, it's simply magic!
Here's the card...


Here's the tutorial, let's go!
The first thing I do when I realize a project is to choose the colour palette I want to use. For today's card, I decided two of the various colours that characterize this celebration, purple and green.
For the background I used Alcohol inks and Yupo Paper White.


Arthur is a fabulous die and it's very easy to assemble, but it requires a little bit of precision and above all it requires cutting all the pieces to be used in advance. Here they are below.


I adore Arthur's eyes and his face expression!!!


Do the same with the branch. After assembling it, I used a 3D die that creates the faux wood effect, Lumber.


To complete the first Halloween card, here is another brand new and truly versatile die, the Spider Web. I cut two of them and coated it with two embossing powders from Seth Apter, Blizzard and Rustic Indigo. I like playing with powders, overlapping them, mixing them ...
Once I got my pieces I completed the background using a stencil together with Alcohol Ink Lift. The effect is very beautiful, it is a very easy and fast technique that makes any background particular and not ordinary.


Same powder along all the edges of the card.


Now you can assemble all the pieces!
Finished! Below I took some pics of the details, hope you like them!


I hope you enjoyed reading the tutorial! If you're interested, you can find the whole list of materials that I used to create this card, on my Blog Yayascrap & more!
I also remind you that you still have a whole week to participate in our monthly Challenge: Watercolour Wonders! You can get all the details here.
Thanks for stopping by, see you soon!
Barbara

Friday 17 July 2020

Watercolour Wonders Tutorial

Hello, it's Deb back with you again to share a tutorial on how I created my Beautiful Moments watercolour painting for our current Watercolour Wonders challenge.

Beautiful Moments Watercolour - Deb Riddell Designs

If you missed our July challenge, here is the brief:

This month we want to see what can you create with water reactive mediums. There are lots of options - watercolour paints, dye inks that react with water, or any of those wonderful powders that bloom to life when sprinkled onto a wet surface. Just remember to create your project in one of our preferred styles: vintage, shabby, mixed media, art journaling, industrial, timeworn or steampunk.

I decided to paint my little floral watercolour study using watercolour paints and watercolour pencils.

Beautiful Moments Watercolour Tutorial

It was super easy to do and believe me, if I can do it anyone can because I am most certainly not an illustrator!   The secret I have found is to hold the watercolour pencil near the end and lightly sketch your florals without worrying about how realistic they look.  You are looking for a representation of the flowers, not a botanical study.  I've made a quick little video to show you how I made my sketch with the watercolour pencils.


See, easy right?  After sketching, mix a little green watercolour paint and apply it to the sketched leaves in a loose fashion with a round paint brush.

Beautiful Moments Watercolour Tutorial

Then mix some pink or red watercolour and apply it to the sketched flowers, don't worry if the paints bleed together a bit, that's part of the joy of watercolour!

While the paint is still wet, go back to the leaves and flowers and sketch back over them with the watercolour pencils.  Add some 'swirls' to the top of the flowers to simulate petals.

Beautiful Moments Watercolour Tutorial

Make a light green wash and colour in the background around your flowers, letting the paints mix and blend.  Add a little bit of clean water here and there to help the paint colours move into each other.

Take the green watercolour pencil and sketch the stems back in while the paint is still damp.  Set the painting aside to dry.

Beautiful Moments Watercolour Tutorial

Add another water reactive medium to your painting by creating a background with Distress Ink.  Ink up the BACK of a floral stencil with blue Distress Ink, spritz the inked stencil with water and press it firmly onto a piece of watercolour paper.  Blot up any of the ink that comes up through the stencil.  Let the blue ink dry.

Replace the stencil over top of your monoprint, lining it up, and then ink with green Distress Ink through the stencil as you normally would.

Beautiful Moments Watercolour Tutorial

Trim your watercolour floral to size and tatter the edges with a distress tool or your scissors.  Mount the watercolour painting on to a piece of sanded gold Metallic Kraft Stock with a scant 1/8" reveal.

Cut the stenciled background about 1/2" larger on all sides than your watercolour painting and mount the painting on top with foam strips or squares.

Beautiful Moments Watercolour Tutorial

Select a sentiment and mount it on another piece of sanded gold Metallic Kraftstock with a scant 1/8" reveal.  Centre the sentiment below the painting.

Select a piece of coordinating scrapbook paper for your background 'frame' and lightly distress the edges with a distress tool or your scissors.

Beautiful Moments Watercolour Tutorial
If desired, add a die cut easel to the back of the scrapbook paper frame for display or you could also add the assembly to a card blank to make a lovely all occasions greeting card.

Centre your watercolour painting on top of the scrapbook paper frame and you are done.

Beautiful Moments Watercolour Tutorial

Here are a few more pictures of the finished painting.

Beautiful Moments Watercolour - Deb Riddell Designs

Beautiful Moments Watercolour Detail

Beautiful Moments Watercolour Detail

Beautiful Moments Watercolour Detail

Beautiful Moments Watercolour Detail

I hope that you've enjoyed seeing how my little floral watercolour study came together and that you will join in our Watercolour Wonders challenge with your own watercolour project, you have until August 6th to enter.  Can't wait to see what you create, thanks so much for stopping by and happy creating!

Deb xo

Friday 10 July 2020

Pinworthy winners for Rustic Charm challenge

Hello all and welcome to our pinworthy winners of last month's challenge, which was Rustic Charm.

We had many fabulous entries, and like always, it is so hard to narrow our winners down to just three, but needs must, so after due consideration, these are the entries the creative guides have chosen in no particular order:
 
We loved this entry for it's originality, the materials used and the wonderful theme of finding yourself. I think we all need to find the angel within our selves.

She was one of our winners last month already, but we so loved her entry, paying tribute to her grandmother, that we could not help but choose her again.

And last but not least
A Steampunk mushroom house for a glue gun. Not only does this entry ooze rustic charm, but we loved its functionality, and sheer cleverness of design.

So once again, thank you to all of you who entered our challenge and shared your creativity and congratulations to our winners.
I will send you your pinworthy badges shortly and we will share your fabulous creation on our dedicated Pinterest board.

Our latest challenge Watercolour Wonders  is in full swing at the moment, so we hope you will all join us for that one too, and of course don't forget to come back next week to see Deb's tutorial for her entry to that challenge!

Meanwhile, happy crafting and thank you for joining us here today!
Astrid and the Creative Guides

Friday 3 July 2020

Watercolour Wonders

Hello everyone and welcome to our July challenge, Watercolour Wonders! It's Deb here and this month we would love to see projects created with any watercolour medium that you have in your stash. Here is the challenge brief:

This month we want to see what you can create with water reactive mediums. There are lots of options - watercolour paints, dye inks that react with water, or any of those wonderful powders that bloom to life when sprinkled onto a wet surface. Just remember to create your project in one of our preferred styles: vintage, shabby, mixed media, art journaling, industrial, timeworn or steampunk.

The Creative Guides will choose their three favourites from all of the entries and each winner will receive a Pinworthy Badge to post on their blog or website as well as having their project pinned to our Pinworthy board on Pinterest.  You have until August 6th to enter our challenge so get out your paints, powders, inks and pencils and start creating!

As usual, the Creative Guides have some projects to help inspire you, be sure to visit their blogs and leave them some comment love.

***************************************************************


Beautiful Moments Watercolour - Deb Riddell Designs

For our challenge I created a little floral watercolour painting with watercolour paints and watercolour pencils, it was super easy to do and I will have a step by step tutorial to share with you here at A Vintage Journey in a couple of weeks time.  In the meantime, pop over to my blog for a few closeups of the finished painting.

Although I am challenging myself to some daily watercolouring for World Watercolour Month, I actually used water-reactive Distress Inks for Deb's lovely and well-timed Watercolour Wonders theme.  If you'd like to see some more details of these thistle tags, do come and visit Words and Pictures.


I love using Distress Inks as a watercolour medium and had fun painting these wonderful cone flowers and then going back to some basic watery Distress Ink Techniques for the background and ribbon. Do join me over at Live The Dream for all the details.


For Deb's lovely watercolour challenge, I've chosen to break out my Brushos, Pixie Powders and watercolour pens to make this sea themed home decor piece. If you'd like to see how it came together, feel free to hop over to the Artistic Craft Dabbler blog with this link.


***************************************************************

Wonderful projects as always, as I'm sure you will agree, and hope that you've been inspired to start playing in the water as well.  Link your projects up below, we can't wait to see what you create!

You are invited to the Inlinkz link party!

Click here to enter
Deb and the Creative Guides