This is a unique challenge blog where we are inspired by and focus on the Vintage; shabby; mixed-media; art journaling; industrial, timeworn and steampunk genres and encompass the talent, flair, expertise and ideas of many artists that we are inspired by. We welcome all types of projects - cards, journaling, assemblage, layouts, albums, atcs, altered art in fact whatever you want to share (as long as it is in good taste).

Monday 29 December 2014

Destination Inspiration – Distress Paint layers

IMG_6058 copy
Hi everyone it is Nikki (Addicted to Art) to share a ‘Destination Inspiration’ post with you today. I thought I would share this card with you I have made for my niece’s birthday using distress paints in different ways to build up the layers of my card. I primarily used just 3 colours of DP – Antique Linen, Scattered Straw and Stormy Sky but have used them with my brayer, stencils and to stamp with as well some painty dabbing!

There is nothing very sophisticated about my techniques today but I love the versatility of these paints and how they can be used in varying ways.

Stamping and stamping with a layering stencil
For the base layer of my card I took the Tim Holtz honeycomb layering stencil and covered it with DP before quickly placing my card on top and gently rubbing so the paint transfers. (A clean brayer is good for this too). I then also took a traditional stamp and painted some stormy sky DP on it and randomly stamped. (Always clean your stamps quickly if you use paint on them.)
Stamp collage

Using a Brayer
The second panel was created using the same colour paints and my brayer. I started with a mixture of scattered straw and antique linen and then added the stormy sky. I find that building it up in layers gives me the best results otherwise I can be too heavy handed! A little paint on my craft sheet – brayer a few times – less paint than I think I need and then carefully remove off the edges of brayer (to avoid lines) before adding to my cardstock. I painted 2 pieces of card – one with slightly more blue so I could die cut my circles later to add to the card.
Brayer collage 1
Brayer collage 2

Layering Stencils
For the next layer I used my layering stencil in a more traditional way, sponging a little paint through the surface. After the paint had dried I added some scattered straw distress ink to take away a little of the white card underneath the blue bubbles of the stencil. I then toned it all down a little with a small amount of picket fence DP and my brayer.
Stencil Collage

Marbling Fun!
Finally I wanted to use my favourite Tim Holtz Dragonfly which I cut from corrugated cardboard using the Bigz die. I then embossed him using a folder from my stash rather than the one that accompanies the die. I gave the cardboard a coat of gesso and once dry randomly dabbed my DP’s onto the card. I spritzed with a little water to partially blend the colours. Once dry
I gently sanded the surface to reveal the original embossing underneath.
DFly Collage

Onto layering up my card. I distressed the edges of my layers and added a little ink. I die cut some circles from the remaining brayered card. The sentiment was also stamped using distress paints.
IMG_6086-1


Many thanks for joining us today at A Vintage Journey.
Nikki

Friday 26 December 2014

Ring out the old - Ring in the new.

Welcome everyone, it's Brenda here wishing you and your families happy Boxing day. I hope you had a wonderful Christmas day yesterday with family and friends and hopefully some lovely presents too.

I am hosting this last challenge of the year, and what an amazing year it has been since March when we started AVJ. We have the most amazing group of regular Creative Guides, some fantastic guests and pretty awesome readers and challenge entries.

So to complete the year and take us into 2015 we would like you to -

Ring out the old and Ring in the new.

I found this poem to help focus us -

“Ring out the old, ring in the new,
Ring, happy bells, across the snow:
The year is going, let him go;
Ring out the false, ring in the true.” Alfred Tennyson

Think about the key words from the poem - old, new, bells, snow, year etc. and interpret one or more of them in anyway you like. So for instance use something old/new on a project; include bells or snow on a card; design a new year card/project/invitation etc. Be creative in your interpretation and just tell us what your links are to the theme and/or key words from the poem and what your Tim inspiration is on your project.

Let's have a look at how the Creative Guides have interpreted it and what Tim inspiration they have incorporated.

Ok what has a telephone book got to do with the theme you might ask? But every new years day we ring family and friends to wish them a Happy New Year, we ring out the old and ring in the new. My telephone/address book is getting old but holds a wealth of information collected over the years. Being part of this wonderful group of talented crafters this year and running the Secret Santa, I realised I could do with a separate telephone/address book to keep their details in. This is just a kraft coloured book with pages made of what seems to be brown wrapping paper which I have made into an ideal place for all those useful numbers.

For my take on Brenda's fun challenge, I focused on old and new along with snow and bells and all while "ringing out" the craft year with Tim's 12th tag of 2014! For all the details, please click Here. Wishing you all the best of 2015!


My interpretation of Brenda's fun challenge was to upcycle one of my previous projects.  I used Tim's Assemblage Clock for a second time.  Please come on over to my blog here to see the details.
Wishing all of you a "safe" and  Happy New Year


Here in Scotland the last day of the year, Hogmanay, is very important to the New Year celebrations and much used to be made of getting everything in order for the New Year on that last day. But for those few minutes before the ringing of the Midnight Bells it is the time to wish for health and happiness for the year to come. As soon as the bells have rung, the visiting and partying starts! 

I decided to interpret those few moments before midnight by making a New Years Card using one of my favourite Tim dies - the weathered clock. There are more details on my blog if you would like to know more.


My focus is the bells ringing in the New Year as the clock strikes midnight on my snowy wreath
Using Distress Inks, Sprays, die cutting and embossing 
Please click here for more details
Happy New Year, all the best for 2015!

For Brenda's challenge this fortnight - I highlighted the fresh beginning we all get with the ringing in of a new year.  My main focus is a portion of The Prayer of St. Francis that I photocopied out of a book.  I used several techniques from Tim's Dec 2014 tag on my project - using Distress Paint to color my grungeboard die cut figures, sprinkling Clear Rock Candy Glitter on the moon, covering the arch with Frosted Film, adhering some Industrious Stickers in various places and adding a little bell!
To see more details and close up photos of how I put this together - please visit my blog post here


My card has old rusty (but happy) bells ringing in the New Year across the spattered snow; my old Christmas neutrals bumping into the bold vivid blues and greens that I reach for in January; and lots of new Tim Holtz toys - the Festive Gent (all new and sparkly, and in a hurry to get to the party before midnight!), the Holly Bough embossing folder, the Holiday Greens and Distress Sprays.  Come and see more details as well as the decorative envelope for the card over at Words and Pictures.


As a lover of windchimes, I decided that I would create my own as my way of ringing out the old and ringing in the new.  My main inspiration for these, other than angels, is Tim's fabulous 'Riveted patchwork' technique which you can find in CCC VII, P57.  The products and steps are featured on my own blog here if you want to see them.  Chris xxx

As always the winner of the challenge, as chosen by the team, will receive a £10.00 gift token from our wonderful sponsor Country View Crafts. Do check them out as they carry a huge amount of Tim products as well as other amazing lines. We also choose three other people as a Top 3 who become out Pinworthy mentions and all winners are pinned to out Pinterest site.


My thanks to all of the amazing Creative Guides for their wealth of ideas, their inspiration and their eagerness and enthusiasm in making projects and sharing everything with us all. Don't forget to use our labels in the side bar if you ever want to find something 'old' on the blog and to become a Follower if you want to keep up with all the 'new' posts coming through.


Before we finish today we are announcing the winner of the Secret Santa Giveaway. Thank you to all 27 of you who took a jaunty trip around all the Creative Guides blogs and left such wonderful comments. we really appreciate you taking part and joining in the fun of the season. We didn't get to include the second and third prizes but stay with us on our regular trips out as I will include them in another Giveaway soon. Random Org has chosen the winner ...........


...... and she is -

SHARI from 'Ain't that Artsy Fartsy'

Congratulations Shari on your win, please email me with your address so I can get your prize in the post to you. My email address is brenda_brown25@hotmail.com

**********************************************
(picture courtesy of the Graphics fairy)

So as we ring out the old and ring in the new we all wish each and every one of you 
HAPPY NEW YEAR
with peace, joy and good health in 2015.

huge hugs Brenda and the Creative Guides xxx


Monday 22 December 2014

Welcome Linda Cain

It is my pleasure to welcome Linda Cain today as our Guest Creative Guide.  Linda resides at ‘Friends In Art’ where she shares with us the most amazing projects. She has a very eclectic style and every time you visit you are welcomed with a different vintage, retro, steampunk style creation that entices you in and leaves you with a head full of ideas and inspiration.
 
Linda Create 2

Hello everyone, Linda Cain here as your Guest Designer on A Vintage Journey.
I started my journey with Tim Holtz at my first CHA show several years ago in Chicago. I’d gone there with a couple of friends to see the “Master” in action. As I recall, I stood for at least 2 hours and watched him demo. I was hooked! Distress Inks and Glossy Accents just called my name, and the black Archival Ink on stamps was just perfect in my opinion for great contrast.
So I practiced what I learned and loved every new thing that came out each year at CHA. I was lucky enough to make it to Ranger U and made wonderful friendships with many people that I still treasure today. Then I was honored to be asked to be a member of Tim’s first Design Team, and had several pieces in his booth at CHA shows. It’s been a wonderful journey using the vintage and distressed techniques in classes that I taught around the Midwest, and I will never forget the joy on student’s faces when they finished an Altered Art project of their own. It’s one the greatest joys of my creative adventure.

So today I designed 4 little Matchbox Treasures that can be given holding gifts or used as decoration in your home.
Vintage Journey Fig 1a
I used several dies from Tim Holtz, papers, and Idea-ology pieces, along with found objects, to create treasure boxes you can fill with presents for Christmas.
The Snowflake die is glittered and added to one box with Industrious Trim Stickers, and the Vintage Santa adorns a simple box with gold ribbon trim on the sides.
Vintage Journey Fig 2a
I loved these Skates from the minute I saw them. To make them go with the gold rickrack, I added Alcohol Ink. The gold pinecone pick and twine are hot-glued to the top. Here you can see the little drawer that slides out in which you hide your treasures.
Vintage Journey Fig 3a
I used a large gold Christmas Tree charm for this box. The relatively plain paper really lets the tree stand out. Some more coloring with pens and a plastic red ribbon fits perfectly on the tree top. Red Tinsel Trim is glued to the sides, and white pen dots along the sides make the tree pop from the dark green background.

You can make these as simple or as elaborate as your creativity allows. I'm giving hand-made earrings and perhaps some "Christmas Green" to the kids in them. Poppie always asks them, "What's a girl’s favorite color?" They learned at a very young age that the right answer was always “green”....that he then gave to them in the form of money.

Thanks so much to the people at A Vintage Journey for inviting me to play here today with you. Be well and have a wonderful holiday!

Your Friend in ART,

Linda
 
Thank you so much Linda for these four wonderful vintage gems and the lovely story about Christmas green. The matchboxes fit in perfectly this week for our ‘Let’s celebrate’ challenge and of course with it being Christmas day on Thursday when so many of us will be opening our gifts to see what’s inside.

I would like to take this opportunity to wish each and every one of you reading this, our super talented team of Creative Guides, our readers and challenge participants a very happy Christmas with much love, joy and peace at this special time of the year.
 
hugs Brenda xxx


Friday 19 December 2014

Sarah Emily’s Christmas treat and new winners


Hi Everyone, I hope you are well on your way with your festive preparations, I am just beginning to feel I am getting there and having attended my grandchildren’s school Christmas carol service at the church this week I am beginning to feel very Christmassy.

I am really pleased to welcome Sara Emily today as one of our guest winners and just take a look at the amazing project she has made to share with us all.
Untitled-1
Hello, everybody! I’m Sara Emily (aka sarascloset), and I live in Southeastern North Carolina with my husband of 19 years and 16 year old boy/girl twins.

I “retired” from my position as a Licensed Physical Therapist Assistant to become a stay at home Mom. Now that my kids are teenagers, I've gone back to work, and I now work as a gardener, personal assistant and organizer for three very interesting and wonderful women. In my free time I enjoy gardening, “junk” shopping at yard and estate sales with my daughter, and fiddling in my Closet! I’ve enjoyed drawing and painting since I was a child, but it was in the past few years I discovered card making and crafting. Tim Holtz has had a very strong influence on me in this area. I am also thrilled to announce my first ever 12 Tags of 2014 was among the chosen winners for November! (Sorry, a little proud moment for me!)

I've loved vintage things since I was a teenager. When I stumbled on A Vintage Journey about a year ago, it was love at first sight.  I had been kind of “stalking” the great works by the Creative Guides, but I knew nothing about blogging. I finally got on board and blogged my first entry to A Vintage Journey in June 2014, won my first Pinworthy mention in August, and there's been no turning back.  I am on a Vintage Journey for sure! I really have no idea how to define my style, but it is certainly NOT frilly! Vintage/ Eclectic at best! I am thrilled and honored to be asked to be a Guest Creative Guide here at A Vintage Journey today!

Well, let’s get started! For Challenge #21, Sandy says "Let's Celebrate!"   You can make something to celebrate Christmas, Hanukkah, New Years or a December birthday or anniversary. I chose to make myself something for Christmas.

When I think of Tim Holtz and Christmas, I cannot help but envision Shiny Bright vintage Christmas ornaments! I have been collecting these beautifully decorated glass globes of goodness since, at 15 years of age, I was given two boxes of these vintage ornaments by my stepfather, Earl. They were his mothers, so they are really old. I stopped decorating my tree with the oldest and dearest glass ornaments when I got my two kittens, but I take them out at each year and put them in glass bowls in the china cabinet. I’ve collected quite a few over the years, and I’m running out of space to display them!

Suffice it to say, my project was inspired by not only my and Tim’s love of vintage ornaments, but by his techniques and color palette. Specifically, Tim’s CHA Summer show 2013 was the true inspiration behind this wall hanging, made with his Configurations box.
Untitled-2
I chose to use a more neutral color palette for the box exterior hopefully mimicking an old wooden frame (and not-so-coincidentally matches a huge vintage plate rack I refinished and where I place all my tiniest vintage finds). I used one of Tim’s On the Edge dies to make the top and bottom ornate additions. A variety of Distress Paints and Crackle Paint followed by more Distress Paints make this wood grain effect. I wanted to keep it neutral instead of a Christmas-y palette, so I could use this year round. I can simply take off the top of the box and put it on another base to fit the season. I also used removable adhesive pop dots to secure my ornaments and snowflakes so I can remove them and change out with others each year. This also allows me to remove my precious ornaments and store them in their original Shiny Bright boxes for safe keeping.
Untitled-3

Untitled-4
My background paper for the larger part of the box and exterior of the tiny boxes is comprised of copies of vintage Post Cereal promotional (“Collect all 6!” Sadly, I only have 3!) pop out and assemble Christmas ornaments. The paper inside each of the tiny boxes is from Tim’s Seasonal 8 x 8 paper stash—just perfect for these little “rooms”.
Untitled-5
I hope my wall hanging inspires you to get grungy, “celebrate” all that is vintage, and join in the fun this time at A Vintage Journey! Please pop over to my blog for more details and loads more photos! Merry Christmas!
Untitled6
Thank you Sara for creating this wonderful configurations box hanging. I love the die-cut top and bottom ornate edges and how you have filled it with fabulous vintage bits and pieces. It is a beautifully festive make for our ‘Let’s Celebrate’ challenge.

………………………………..

So onto our winner’s section and Chris had the pleasure of making the final decisions of who the winner is today and the pinworthy mentions from the ‘Birds of a feather’ challenge.

Winner:
canvas_album_1
" A gorgeous canvas album with a beautiful birdie in prime place on the front.  Using Tim's techniques to decorate and embellish, this vintage styled album simply stood out to me. A fabulous example of 'clean' shabby/vintage - a great make Stephanie! "

Stephanie your lovely project will be added to our Winner's board and your badge and voucher will be on their way to you soon.

Pinworthies:
" A stunning tag featuring Tim techniques and products.  This festive tag looks good enough to eat.  Lots of interest, great colours and fab texturing.  Well done Evelyn! "

" This wonderful, distressed, metallic work of art mixes contemporary with vintage for a wonderful shabby chic look. A gorgeous original make, well done Kreatussa! "

" Monica has ventured outside of her normal crafting field into something entirely different and this is the result.  She has taken the essence of Tim with believing in yourself and expressing it and that struck me as probably one of his biggest influences on so many of us!  Great work Monica, keep it up! "
 
Well done Ladies all these amazing creations will be added to our Pinworthies board and badges will be on their way to you too.
 
Please don’t forget to take a look at our Secret Santa and Giveaway post, everyone who takes part and follows the rules will be in with a chance of winning our first Giveaway prize and if we get more people joining we add other prizes to the list.
P1190473
This is our first prize. There are some fabulous Tim dies, a small canvas and round boxes for altering, distress inks, brads, ephemera, tissue tape and a real VINTAGE Charlotte Doll actually mined in Germany from an old factory. It is made of porcelain and is similar to Tim’s fractured dolls.
Don’t forget this closes at the end of Sunday GMT time.
 
There’s one most post before the big day arrives, so we will see you on Monday with an amazing guest designer sharing another fabulous project with you.
 
Have a great weekend.
 
hugs Brenda and the team. xxx


Monday 15 December 2014

Destination Inspiration - Let there be light!

Hello all, Alison (butterfly) here with you at Destination Inspiration today.  And, as befits a staging post on the journey, it's a chance to pause and put your feet up with a cup of coffee.  But before we get started, let me just remind you about our very special Secret Santa Bonus post from yesterday.  There are some fantastic prizes to be won in our Christmas Giveaway - so don't miss it!

Back to today, and I hope you'll find my offering inspiring somewhere along the line... either from the basic simple idea at the root or from the festive experimenting that went on from there.  It's not really so much a lightbulb moment as the gentle glow of candlelight, spreading its beams on a wintry night!


I've ended up with three new additions to the candlelight fiesta we celebrate with round our way (we always have many, many candles lit at Christmas), each one with a slightly different finish and texture if you look closely.


So that's where I ended up, but I started with the simple idea of covering jam jars with Idea-ology Tissue Wrap.  I love the tissue wrap but often, when I use it at least, it ends up under layers of other things, not really getting to strut its stuff.  So I started from wanting to put it front and centre and, what's more, give it an inner glow.


I took various jars from the hoard I've collected, cut pieces of tissue wrap approximately to size, and used slightly watered down multi-medium to glue them to the jars.  (The added moisture just helped with moulding the wrap.)


At the bottom I left enough tissue wrap to spare...


... so that I could fold it inwards.  It pretty much took care of that nice neat pleated effect by itself as I pressed it down.


And at the top I left another spare centimetre (ish) so that I could fold it down into the jar rim for a nice neat finish.


I tied twine tightly around the top while the glue was drying, just to hold it all in place.


For all that my crafty creations are layered and textured, my tastes in home decor are fairly simple and minimal so - for my money - that's pretty much a done deal.


I love how the tea light candles glow, lighting up the tissue wrap, and the twine gives a rustic finish.  A really easy, decorative candle holder.

But it's nearly Christmas, and I felt I should pop a bit more inspiration into your stockings!  So I decided to experiment with zhuzhing them up a bit.

Jar 1 got a coat of Rock Candy Crackle Paint to start with, quite a thin layer in places so that the crackle would be quite subtle.  I left that to dry and set off into the next experiment.  (No picture for now, as that would quite literally be watching paint dry!)

Jar 2 got another coat of multi-medium over the top of the tissue wrap, and then I poured Rock Candy Dry Glitter all over it.


And again, as far as I'm concerned, you could stop right there if you wanted to!


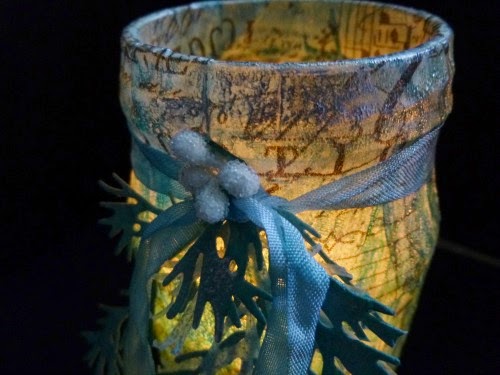
Jar 3 got the Ranger Texture Paste option, applied through the wonderful Holly Bough Layering Stencil.  I used some tissue tape just to secure the stencil while I did it, though I also held on quite firmly at the same time (oh, for a third hand...).


Since it didn't quite meet all the way round the circumference of my jar, I had to wait for that first application to dry before filling in the gap.


So far so good... now for some colour.  I grabbed some of my new Distress Spray Stains (how happy I am they exist!).  Evergreen Bough, Iced Spruce, Tumbled Glass, Broken China and the fabulous Brushed Pewter all play a part here (as well as a not-pizza box from a crafty delivery!).


Since tissue wrap has a pretty non-porous coating, you sometimes have to help it along when applying colour.

I was expecting a sort of Cracked Stains (Tim's technique) effect with the crackle paint.  After all, these are Distress Stains, just being applied differently.  And it was great fun letting the inks run and blend into and over the cracks.


Gotta love the sheen of that Brushed Pewter...


The Dry Glitter was also fine.  It takes colour well itself and, with the coat of multi-medium holding it in place, the sprays took really well.  In fact, they sank in really quickly - you don't get much drippage/blending play.


But for Jar 3, I knew I might need to give the tissue wrap a bit of extra tooth before spritzing, so I coated the whole thing - texture paste and all - with Clear Gesso before applying the colour.  I didn't try without the Clear Gesso, so I can't tell you what that would have done - but having it there certainly seemed to do the trick.


Again there was lots of drippage and blending play as I applied the layers of colour and of course the Ranger Texture Paste is specifically designed to play nicely with Distress Inks, so that was fine.


Of course with all that spritzing and dripping there was quite a lot of leftover ink going spare so I quickly grabbed a few Manila Tags and did some mopping up, as you saw in the not-pizza box photo.  So now I have some ready-to-play backgrounds awaiting more attention, though I knew I had a use for the really inky three.  With all that co-ordinating colour and beautiful silvery sheen, these had to play a part here.


I ran them through the BigShot with the fabulous Holiday Greens Thinlits - so in love with the delicate fir fronds.


I used some of the wax paper kindly sent me by Marci from the States - before they started stocking it around the place over here.  It definitely helps make it easier to get delicate die-cuts out of the dies.  But of course you also end up with really gorgeous additional die-cuts - very delicate, deliciously frosted - and so they also got pressed into service!


I tied the bunches of greenery onto my jars with Crinkle Ribbon, and did a bit of gentle additional spritzing (adding Bundled Sage into the mix this time).


I didn't want too much colour on the ribbons - a touch of white never hurts at Christmas - and the sprays also gave the greenery a bit of extra texture too.


The final touch was to add a few frosted berries, clustered around the ribbon knot, and I decided I was done.


I'm very happy with the results (even though I will definitely be making myself a few more of the very simple first versions for use throughout the year!)...

The crackle is subtle, but pretty cool I think...


The shimmer of the Dry Glitter delights me far more than I expected, not being a glittery type in the general way of things!


And I just love that Holly Bough texture - such a great stencil, and the texture really benefits from a little extra dusting of Silver Treasure Gold wax.


It's not easy to capture the effect of candlelight on camera.
You always get a really intense light from the candle flame, rather than the diffuse glow filling the whole of the jars that you get in real life, but this gets pretty close.


I've tried to share a little of the effect you get with these, whether through the crackle...


Or candlelight on glitter...


Or through the texture...


And always with the lovely text and images of the tissue wrap coming through from underneath.


They also look great lit by candlelight from the outside, so I gave a little spritz of Brushed Pewter to an already teal-green coloured nightlight holder, and added that to the collection for a really festive look.


I hope that's given you lots of ideas to play with, and that you'll have candlelight glowing in your homes this festive season.  However you celebrate, we hope you'll come and play along with Nikki's lovely Let's Celebrate challenge this fortnight.

Check out all the details, rules and lots more inspiration from my fabulous DT colleagues, and come and celebrate with us.  You could become one of our Pinworthies, or win a gift voucher from our generous sponsors Country View Crafts - and that's definitely worth celebrating!

*****And don't forget to check out our very special Secret Santa Bonus post from yesterday.  If you hop around and leave some love with each of the DT, you could be in with a chance to win some very special prizes.  Check out all the details here and get hopping!*****

Thanks so much for stopping by today, and I'll see you again soon on this Vintage Journey.

Alison xx

Ingredients available from our generous sponsors, Country View Crafts:
From my stash: jars, frosted berries