This is a unique challenge blog where we are inspired by and focus on the Vintage; shabby; mixed-media; art journaling; industrial, timeworn and steampunk genres and encompass the talent, flair, expertise and ideas of many artists that we are inspired by. We welcome all types of projects - cards, journaling, assemblage, layouts, albums, atcs, altered art in fact whatever you want to share (as long as it is in good taste).

Friday 30 December 2016

Tag Friday for the last post in December

Hi Everyone - how did your Christmas go? We hope it was full of figgy pudding, fun and laughter and great times with family and friends, but didn't it go quickly? Anyway let's get on with the treat for today and that's our fifth Friday post where we show you some tags we have made just for the fun of it, no restraints, no challenge theme, no DI bag contents, just pure unadulterated inspirational art.


I opted for a tag accordion for our tag friday post, giving me a little more space to play around with the Evolution stamp set from Tim Holtz. I have not made a masculine piece for a while and I used this opportunity to indulge myself. Pop by my BLOG for more details.


I've been being playful for this Tag Friday, inspired by a fabulous SkillShare class from Anna-Karin Evaldsson of Layers of Ink.  Instead of one tag, I have many, so do come and visit Words and Pictures to see the full set and discover some more of the details.


I decided to go the Shabby Chic route this months and created my tag mostly with leftovers from previous projects still flying around. My new year's resolution? Keep a tidy work desk....
Anyway, if you would like some more details, just hop over to my blog


Whilst attempting to tidy my Craft Room I found some bits and pieces that I wanted to use to make a tag.  It was lovely doing something just for fun and that was not related to Christmas.  If you would like to see more you can visit my blog HERE.


What better way than to finish the year with a tag using all your favourite bits and pieces! In actual fact they were all pieces lying around the desk from previous projects in line with my resolution at the start of the year to use all my leftovers (both in the craft room and the kitchen). I must have done well as my "bits" box is a lot less full than it used to be (and we've had an awful lot of soup during the year!).
  Do join me over on my blog if you would like to see some more details.


For my Tag Friday tag, I decided to dive into my ever expanding pile of leftover bits and bobs from projects I've created over the last year (and to be honest, I'm sure there are more than a few bits from previous years too!).  It's amazing what can be created when your throw all of those lefovers into one pot, think I shall have to make a New Year's resolution to do it more often.  I've a few step out photos on my blog of my 'tovers tag, hope you can stop by for a peek.  Happy New Year to one and all!
The thing I love about Tag Friday is that, there is no theme, we can make anything we want.  For my tag I made a reminder to myself to make more time for ART in 2017.  I simply reached for all the embellishments, images and colors that I love and put them all together on one large tag.
Happy New Year and make time for ART!
S@ndy

Brenda
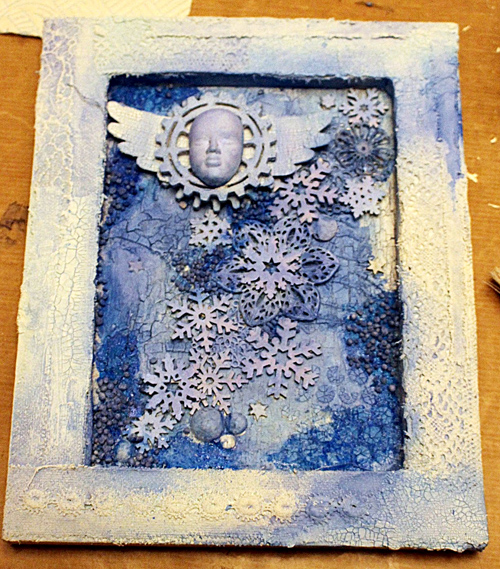
Having bought some new Seth Apter dies I thought I would have a play in his style using left over backgrounds from other projects or experiments. It was lovely to get into grungy, timeworn mode again after all the fun of the Christmas cards and build layers and dimension. More details can be found at Bumblebees and Butterflies if you have to to pop over.


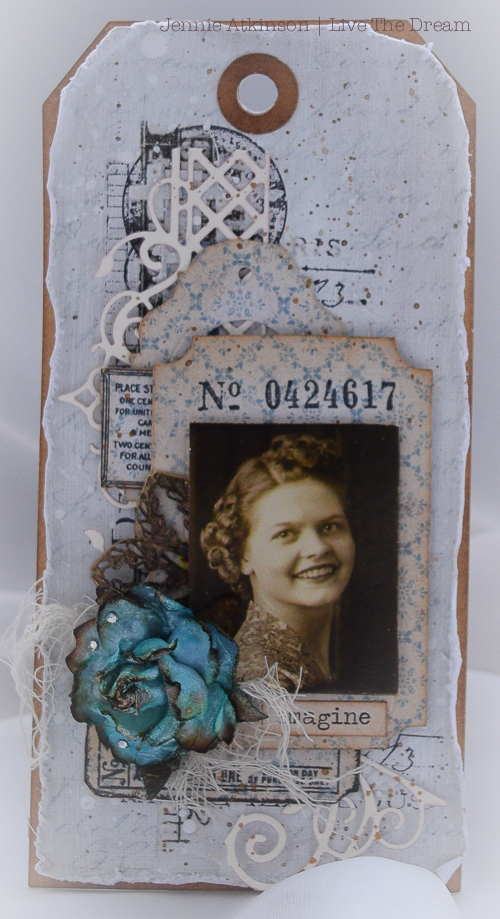
My tag was born from an alcohol inked panel created earlier this year. I'd saved it for 'later', forgot about it (along with a whole lot more) and came across it whilst 'tidying' !! There's more to see on my blog if you fancy stopping by.....


Well thank you to all the Creative Guides who have joined in and created a tag for you today, as always I marvel at the incredible range of styles and ideas that come through and the most wonderful designs on display. So it's time to be self indulgent and to take a little you time to see how these were all made and put together and it looks like many of us have been using up our leftovers and not just Christmas ones.

Before you go I would like to wish you all a very happy, healthy and peaceful new year.
May you have new hope, new aspirations, new passion, new dreams, new enthusiasm, new confidence and new understanding as the year unfolds.
May we guard, protect and keep the world from harm so that everyone can live their lives without the fear of violence, abuse and harm and let us be perceptive, receptive and responsive to the needs of individuals and ourselves.

Have a wonderful new year weekend and may 2017 bring you everything that you wish for yourself.

Huge hugs from us all at A Vintage Journey, we look forward to sharing more of our projects with you over the next 12 months and hope that you will come and share your talents with us and our challenges.
xxx

Monday 26 December 2016

Destination Inspiration - Arriving at Terminal 4

Hi vintage travelers,

It's Sandy here with you this time around.  We can all breath easier now that Christmas is behind us.  It seems that we are never ready but always manage to get it all done in time.  Our journey has continued through these hectic days and we are now arriving at Terminal 4.  Let's see what we have to work with today:
 
Product - Lace
Technique - Heat Embossing with embossing powder
Color - Silver
Substrate - Chipboard or cardboard  

I've made a tag to share with you today but it has already found it's new home with the recipient of a gift that it was attached to.


Here's how I used the items in the bag-
 
 
I wanted a sturdy tag so I began by cutting a chipboard tag using the Tim Holtz - Tag & Bookplates die.  I then cut a second tag from paper because I knew I was going to do some coloring and although the chipboard was white, it wasn't smooth enough for coloring with Copic Pens.  You can use any medium that you have for color of course.  I stamped my image on the paper using a fun stamp set by Art Impressions called Christmas to All.


Next I colored the image with Copic Pens.


I then stamped the image on some Eclipse Tape from Judikins, this tape is perfect for making masks because it is low tack and comes up very easily.   I didn't bother cutting around all the stars and the snowman's hands because I knew that I wouldn't be stamping over them.


After placing the mask on the image, I stamped some bare trees from a Stampin' Up set, sorry I don't know the name, it is an older set that I have had in my stash for awhile.  I stamped with Versamark embossing ink and then added silver embossing powder - heat set the embossing powder and then removed the mask to make it a appear that the trees are behind the snowman.


From the same stamp set I stamped and embossed some of the snowflakes seen at the top of the tag.


I wanted to add that vintage feel, that we all love so much, so did a little edging with Distress Ink - Stormy Sky.   I then added a snow bank behind the snowman and tree to ground them and added a few shadows.


Next up were some stars from the Tim Holtz idea-ology collection - Mirrored Stars.


The finishing touches were to add the lace at the top and the word "Joy" near the bottom of the tag.
For that I used the Holiday Words Script from Tim Holtz.
 
I have provided links to all products used on my blog here.

Happy New Year,
S@ndy

Friday 23 December 2016

Our lovely invited guest this week is ......

..... Toni Burrows - a very talented and lovely lady who is joining us as our Christmas guest and with a beautiful wintry reverse canvas.

-------------------------------------


I am absolutely delighted to be hopping on board as a guest here, on A Vintage Journey. It's truly an honour to be featuring alongside this very talented team. Some of you may know me from my blog, The Artistic Craft Dabbler or from the Stamps and Stencils blog, where I am part of the design team. I love working with mixed media and would describe my style as 'eclectic', in other words a bit of this with a little bit of that! This year, I have had the great fortune to have attended workshops by Kate Crane, Andy Skinner, Mark Gould, Finnabair, and AVJ's very own, and wonderfully talented, Brenda Brown. I've tried to bring a little of what I have learnt, from each of these artist's, into this piece of work. I love the theme of  'Winter Magic', and felt inspired to create a project featuring lots of frosty colours, textures and of course a touch of sparkle.


My project  is a reversed canvas, measuring 20 x 25 cm. The inside, has been worked onto a separate piece of board, as in this instance it was much easier to stencil onto a flat surface than to try and manipulate the stencils inside the frame.


I used Andy Skinner's 'mega crackle' technique as a foundation, and stenciled the frosty branches on top using crackle paste. I loved the effect this produced and felt a little hesitant about covering it up. However, as Brenda taught us, layering is all about 'covering over, in order to reveal'.


Here, I'm trialing the panel inside the canvas. You can also see the layers of fabric and lace, I used to add texture to the frame. I then gathered together a small pile of embellishments, consisting of Tando chip board snowflakes,  metal flowers and glass 'stones'. I painted these with white gesso, before attaching them with a hot glue gun.


The next part was a little scary, as it obliterated all my lovely crackling. I sprayed the surface with patches of Glimmer Mist, a la Finnabair and with Brenda's words ringing in my ears, 'cover to reveal.......cover to reveal....' I proceeded to dry brush the surface with white gesso. This has an amazing effect.....


With each layer of dry brushing, the crackles and texture started to reappear. It's important to dry the canvas between each layer of brushing. It can be a slow process but it really is worth taking that extra bit of time, as every tiny bit of texture comes to life. Once I'd achieved the shade I wanted, I added a sprinkling of glitter, a few gems and a metal, die cut, crown for my frosty angel.


A little typed label in the bottom corner, was my final addition to this project. It was great fun to put into practice some of the techniques I have learned this year. I'd like to take this opportunity to thank all of those designers, who put in a great deal of time and energy and generously share their techniques and ideas with us all. It has been an absolute pleasure to be an AVJ guest. May I thank the whole team, for another great year of fabulous challenges and inspiration. I look forward to seeing what you all come up with next year. Merry Christmas and a Happy New Year everyone! x


*******************************

This is utterly gorgeous Toni and very much a magical winter project. It is fascinating to watch how you built up the background with all those wonderful layers and did I really say 'cover to reveal'? I honestly don't remember it lol, it's funny what we pick up from different workshops!!!!

Thank you so much for joining us and being a fantastic Guest Creative Guide this week and at such a busy time of the year.  Thank you also to all our readers for popping by and leaving some love for Toni. 

We will be back Monday with another Destination Inspiration post and in between we wish you all a very Merry Christmas from each and every one of us here at A Vintage Journey. Have a wonderful festive weekend whatever you have planned and in whatever way you celebrate this special time of year. I hope that you get a visit from this special person who has his own vintage journey tomorrow night.


hugs from
 Brenda, Alison, Amanda, Anne, Annie, Astrid, 
Deb, Jennie, Jenny, Julia, Nikki, Sandy and Tracy.
Your Creative Guides.
xxx

**********************************

Monday 19 December 2016

Destination Inspiration - Arriving at Terminal 3

Hello everyone, Anne here, thanks so much for travelling along on the third leg of December's Destination Inspiration!

You may remember from last week that the contents of the travel bag this month are:
Product:  Lace
Technique:  Heat Embossing
Colour:  Silver
Substrate:  Chipboard

I love Christmas, especially wrapping all the presents, I usually add handmade tags so that was my inspiration for today's post.
First, I gathered up the elements that I wanted to use.
In addition to the above, I also used Ranger Archival Ink in Fern Green and also Wendy Vecchi's Fern Green Embossing Powder and some white card for the die cut skates (one of my all time favourite Tim Holtz die) and some silver paint.
I started by stamping the greenery from the Tim Holtz Scribble Woodlands set, using Fern Green Archival Ink onto Heat Resistant Acetate and heat embossed this with Fern Green EP.  I added some berries with Stickles in Red.  I roughly cut out the foliage - because it is acetate I did not need to be too careful as the acetate tends not to show.
The chipboard tag was covered with Tim Holtz paper and I dabbed a glue stick around the edges and added some of Ranger's Foil Sheet in silver.  It gives a nice sheen to the edges.  I die cut some foliage in white card using the Holiday Greens die set.
I gave the skates a light coat of DecoArt Crackle Paint and once dry I brushed Distress Ink in Pumice Stone around all of the edges to give them a slightly scuffed appearance. I added some red laces and a jingle bell.  The heel was painted in Black Soot Distress Paint and the blades are coloured with silver paint.  For my lace element I added some black lace to the top of the skates.
To finish off I added a big shabby bow using some wine coloured ribbon from my stash.

I hope you feel inspired to make some tags for presents, they are reasonably quick and easy to make and I think people always appreciate that hand crafted touch!

Our current challenge 'Winter Magic' is still running and we have had some wonderful entries so far.  If you have time we would love to see you join in too.

It just remains for me, and the whole of the A Vintage Journey team, to wish you all a very Happy Holiday season!  All the very best to you and yours!   Anne xx

Friday 16 December 2016

Welcome to our Pinworthy Guests

Hi everyone, Nikki here to welcome and introduce our Pinworthy guests this month. These ladies were our chosen favourites from our September challenge - Create inside a Frame. Today we welcome them to inspire us with a project on this month's theme - Winter Magic. Please welcome Jane and Ioulia.


Hi all, my name is Jane Royston from the Isle of Wight, UK and I am delighted to have been picked as a pinworthy project and invited to be a guest this month!
I have been crafting for many years but since giving up Primary teaching to look after my youngest child 5 years ago I have really had the chance to explore my creative side, and have especially loved getting into mixed media and using a wide variety of mediums and techniques.

I love the theme this month as Winter Magic conjures up so many wonderful images for me and this had to include snowflakes and ice as the whole idea of these is magical to me! I decided to create a shabby chic/mixed media piece using an IndigoBlu mannequin that I had previously decorated but wasn't happy with. So after I had removed the previous decoration I went for an icy, snowy feel...
The basis of the dress was created using Powertex and Paverpol wrappers along with art balls. Extra icy texture was created using crackle paste and gilding wax...
Finally it was finished off with snowflake die cuts and various embellishments that complemented the colour scheme.
There is more information about how I created this project over on my blog...

-----------------------------------

Ioulia - julD handmade

Hello, I am Ioulia from Greece and I am so happy to be a Guest Designer this month at A Vintage Journey. It is such an honour to be here today. Thank you so much.

I loved painting and crafting from my early years, but instead of becoming an artist I became an engineer who loves to create things in her free time. So, crafting is my hobby. My passion is clay and texture in paintings. I am impressed by new techniques and altered materials. 

This month's theme “Winter Magic” inspired me to create a mixed media snow frame. The magic of the snow, which transforms landscape and the white and blue shades of the winter are the first images that came into my mind.
I used a picture frame. The background is from cardboard which is painted, decoupaged and textured with modelling paste and stencils. The houses are made from air dry clay. 
I filled the frame with some fake snow and a sparing amount of silver glitter. 
Finally, I decorated the frame with scrapbooking and tissue papers.
E voila!!! The Snow Frame is ready. 
To activate the snow, the frame is shaken to churn up the white particles.

I hope you like it. For more details and pictures, I would be glad if you visit my blog, julD handmade.

----------------------------

Such inspiring and creative designs - thank you so much. This month's challenge - Winter Magic - continues until January 5th - do come and join us for a chance to win this month's prize or to be selected as a Pinworthy and the chance to be a guest early in 2017.

Nikki
xxx

Monday 12 December 2016

Destination Inspiration December - Arriving at Terminal 2

Hello and thank you for stopping by, it's Deb here today for the second leg of our Destination Inspiration journey for December.  If you remember from Julia's post last week, our travel bags are packed with the following contents this month.

Product: Lace
Technique: Heat Embossing
Colour:  Silver
Substrate: Chipboard or Cardboard

As soon as I saw the chipboard substrate ingredient I knew what I was going to make.  I had two circles of chipboard left over from the embroidery hoop decoration I made for our Winter Magic challenge and they became the base for my Silver and Blue Christmas Ornament.


I started out by painting the two chipboard rounds with a coat of gesso then slip slapped on some Weathered Wood Distress paint and a diluted wash of Folk Art Settler's Blue acrylic paint. Stamping came next with Tim Holtz's Tree Line stamp and Wendy Vecchi Potting Soil Archival ink, layering the stamping to create depth.


A spray of Picket Fence Distress Spray stain came next to add a touch of winter snow.

To incorporate the heat embossing and silver colour requirements included in the travel bag, I embossed a piece of 110 lb cardstock with silver embossing powder and used it to cut out some silver snowflakes with the Tim Holtz Mini Paper Snowflakes die.


Some silvery blue snow flakes were die cut with the same Mini Paper Snowflakes dies from cardstock sprayed with Chipped Sapphire and Brushed Pewter Distress Spray stains and Heidi Swapp White and Tinsel Color Shine sprays.

Lace was the next requirement, so I coloured a length of white lace from my stash with Antique Linen Distress Spray stain.


A couple of small bows were tied from the dyed lace.

And the remainder of the lace was used to form the hanger for my ornament, sandwiching it in between the two chipboard rounds and gluing them together.  The edges of the ornament were coated with Glossy Accents glue and rolled in Rock Candy Distress glitter for a little winter sparkle.


Two silver coloured sentiments were created with Tim Holtz's Metallic Sticker Labels and Holiday Talk Stickers and coloured with some Weathered Wood Distress ink.

Initially I was going to use the Snowflake Duo die as the focal point on my ornament but then I spied the Mini Retro Ornaments Movers & Shapers dies and decided to use them instead.  I die cut each ornament twice from chipboard to layer them for some dimension and then cut them again from some patterned scrapbook paper, Ranger Metal Foil tape and  silver Deco sheet.


I cut the silver and patterned paper ornaments apart and layered them on top of the chipboard ornaments.

And then my ornament was assembled; I coloured a piece of white button thread with Brushed Pewter Distress paint and used it as a hanger for the mini ornaments.  The lace bow was positioned at the top with a couple of mini paper snowflakes arranged on each side and the mini ornaments were suspended in the middle.


I added a line of silver Stickles glitter glue around the edges of each sentiment label to tie it into the background.


Hope you've enjoyed seeing how I used the contents of my travel bag and that you will stop by next Monday when Anne will be here to show us what she made from the same ingredients, it's always so much fun to see what everyone creates!  I also hope that you will join in our December challenge, Winter Magic, you have until January 5th to link up your magical creations so hope to see you there!
Deb xo

Friday 9 December 2016

Cracking Up Winner and Pinworthies, and Guest Creative Guide

Hello all, and welcome to Winners' day!  Yes, it's time to announce the Winner and Pinworthy choices from November's Cracking Up challenge.  There were so many fantastic crackled projects - you all did a cracking job!  As always, you made our selection task very difficult, but it's a good kind of difficult... it's always a joy seeing what you all come up with.

But before we reveal the winners, we are delighted to have one of our former winners joining us on the journey as our Guest Creative Guide today.

Lisa of A Mermaid's Crafts was the randomly chosen winner back in September, and she's created some stunning Winter Magic for Deb's December challenge theme - you're going to love it.  Let's hand over to Lisa so that she can introduce herself...


Hi, everyone!! I'm so excited and honored to be a guest designer here at A Vintage Journey!! My name is Lisa from A Mermaid's Crafts and I've been blogging for almost six years. I live in Indiana in the Unites States and my day job is a writer. I've dabbled in several styles but my favorites are mixed media and shabby chic. I am in crafty Heaven when I can combine the two!!


I love Deb's theme of Winter Magic!! For several years, I lived in the Adirondack Mountains in upstate New York and winters there were definitely magical (and covered in snow). I wanted to recreate that image of a wintry mountain town for my project. I started with a 6x6 canvas and covered it with Gesso. Next, I used a stencil and texture paste to add the snowflakes, covering them with a light wash of Bahama Blue.


The layers were cut in watercolor paper and covered with Gesso. I used stencils and texture paste for the mountains, village and snowdrifts. They were then covered with another coat of Gesso.


The trees were all covered with DecoArt Crackle Paste. Once they dried and the cracks appeared, I dabbed Brushed Pewter Distress Stain over the entire tree and then wiped away the excess so it remained in the cracks. The village and the moose were also dabbed with Brushed Pewter. I used DecoArt Snow Writer to create the dimensional snow, and while it was still wet, I covered it in crystal ice glitter for that freshly fallen snow look.


You can find more pictures and instructions on how I created the canvas my blog, A Mermaid's Crafts. Thank you so much to the extremely talented design team here at A Vintage Journey for allowing me to design with you today!!

_________________________________


What wonderful white-on-white crackle and texture in your dimensional canvas, Lisa.  Thank you so much for creating such a beautiful wintry project.

Now, without further ado,
let's reveal the November winner chosen by Random Generator.


That's #13, Cec of CW Card Creations with this lovely gilded canvas...


Congratulations, Cec!  Your winner's badge and prize voucher will be on their way to you shortly, and we hope you'll join us on the journey as a Guest Creative Guide in the future.

___________________________________


Now on to the Pinworthies, chosen by me and the Creative Guides here at A Vintage Journey.


#17 Sara Emily of Sara's Closet


#19 Lula of U Luli


#20 Irina of Scrap Hobby Mania


What great crackled projects, each so different, and well worth a visit to the individual blogs to see some of the close-up details.  Congratulations to all three of you!  Your Pinworthy badges will be on their way to you shortly, and we hope you will join us here as Guest Creative Guides in the future.

________________________________


Thanks again to all of you for joining us on this Vintage Journey, and for sharing your amazing creativity.  We hope you're enjoying creating some Winter Magic for Deb's December challenge, and remember to stop off at Destination Inspiration with us on Mondays.  See you soon!

Happy travels!
Alison and the Creative Guides