This is a unique challenge blog where we are inspired by and focus on the Vintage; shabby; mixed-media; art journaling; industrial, timeworn and steampunk genres and encompass the talent, flair, expertise and ideas of many artists that we are inspired by. We welcome all types of projects - cards, journaling, assemblage, layouts, albums, atcs, altered art in fact whatever you want to share (as long as it is in good taste).

Monday 31 October 2016

Destination Inspiration - Arriving at Terminal 4

Julia Aston here today - to welcome you all to the last leg of our Destination Inspiration for October!  Today we have arrived at Terminal 4 and I have something to share with you using all the supplies in our October Travel Bag.
1. Product: Crackle Paste
2. Technique: Layering colour through a stencil
3. Colour: Green & Gold
4. Substrate: Some kind of a box

Just in time for Halloween tonight I've made a weathered crackled coffin
I've got lots of photos to share of my creative process.
I had this little coffin box (5 1/2" x 3") that I had bought several of last year, post season, at half price!  I ran out of white Gesso (actually I had a big jar of it but when I went to use it, it was all dried up!) and so used some Light Modeling Paste to seal the surface and add some texture.
I wanted to use the 'layering color through a stencil' technique on the inside of the box so I traced the box on white card stock
Then I sponged with Distress Mustard Seed using Tim's leaf stencil over the tracing.
Then I layered Peeled paint over the Mustard Seed (green and gold color requirements!) using Tim's Bat Background Stencil
I cut out the pieces 1/4" smaller on all sides so they'd fit inside, sponging over the entire pieces with Distress Antique Linen and then sponging the edges with Distress Hickory Smoke.
I painted the inside of the coffin with Tarnished Brass Distress Paint (gold)
The inside was decorated with a bat, a Small Talk sticker and a die cut stem -  the inside, being protected from the harsh elements is much cleaner than the outside!  
Next I wanted to create a weathered exterior - like the coffin had been in the ground for 100 years or so!  I layered on patches of Acrylic Paint in Burnt Umber, Burnt Sienna and Paynes Gray and let it sit to dry.
I dropped some Mushroom Alcohol Ink onto a wicked tag, a bat and a spider (not shown), drying them with my heat tool.
The person buying this coffin was quite wealthy- no plain pine box for him - his was decorated with lovely floral stems cut out of black Cordinations paper using Wild Flowers Thinlits.
Both on top and on the side!
Now that the outside paint has dried and stems are affixed  - I spread on some crackle finish rather thickly, then let it sit over night to dry.
So here is the newly exhumed casket all crackled and weathered  - dug up today so the occupant could properly celebrate Halloween.

He just couldn't wait to get out - and since he was too long for his own casket  - it seems his legs had to be folded up to fit in  - it was easy for him to just push out his legs to open it up!!  
(maybe this casket wasn't made for him and he just crawled in and took it over in the grave??!)
A spider has found a home in his rib cage apparently -  his eyeballs have become glowing golden orbs, and someone labelled him 'wicked' which may give us a clue to his personality when he was alive...???!
And here he is at full stature - ready to scare and spook us on this All Hallow's Eve!!
We hope you have enjoyed our Destination Inspirations this month - here's a quick run down of the
4 Terminal Stops in October in case you missed one.

Terminal 1 - Astrid
Terminal 2 -  Tracy Evans
Terminal 3 - Annie
Terminal 4 - Julia Aston
And don't forget Anne's October AVJ challenge - Make it Spooky -  you have until Thursday, November 3rd to link up your project!
Thanks so much for stopping by at A Vintage Journey -  Next Monday we'll start out at Terminal 1 again with a whole new Travel Bag of 'tricks'!

Friday 28 October 2016

One very special guest today ......

Hi All ........   Firstly a huge apology from me that this post didn't go up at midnight, especially to our lovely guest who has done a very special project for us. My brain is getting more and more like a sieve letting things slip through but I am here now with and our very special guest Creative Guide who is the amazing Tracy Scott. Those of you who know Tracy's work will have seen her wonderful art and images, so we will get straight into her post.

****************************


Hey there everyone !! 


My name is Tracy Scott and I am a Mixed Media artist from East London. 
When I am not at the 'day job' as a Finance Officer' I love nothing better than to get inky and painty. A self confessed 'colourholic' you will always be guaranteed a little colour fix when I'm around !!!


I was absolutely thrilled when Brenda asked me to post a project for this months theme. I hope you love it as much as I do!!!......


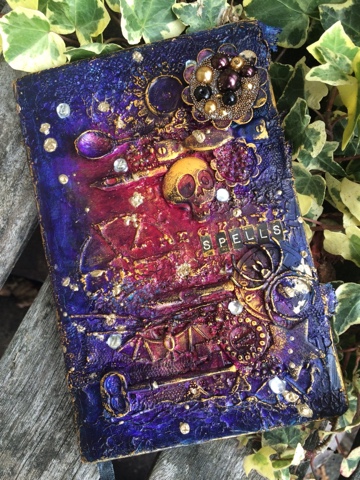
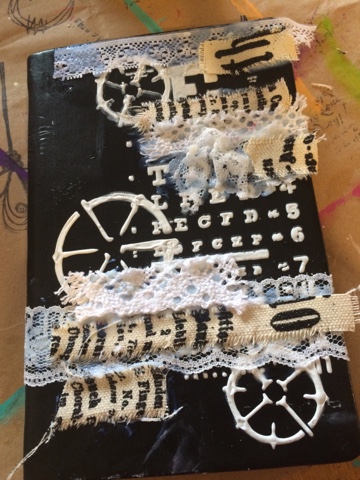
Step 1: I took an old diary that was just waiting to be altered and to start I used some modelling paste from DecoArt and various stencils and added some texture to my covers. 


Step 2: I added some extra texture to my piece using some old pieces of lace and printed canvas. Tearing layering and gluing using the Prima Art Basics 3D matte medium. 


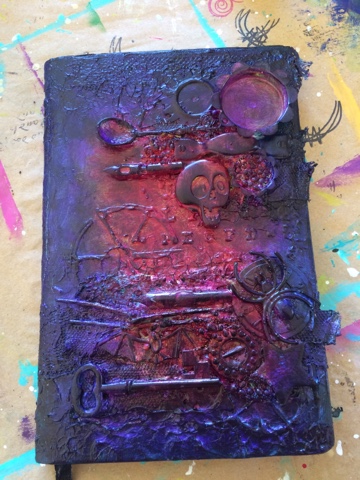
Step 3: using various metal, plastic and even some old twigs I glued these down to my cover to create even more 3D texture. The Prima 3D matte medium ensures that the pieces are not going anywhere once they are dry !!


Step 4: I decided that I needed even more texture so decided to add some crackle paste randomly over my cover with a pallet knife. 


Step 5: ok so once everything was completely dry I added a coat of white gesso all over the covers, front and back to create a good base for some paint colours. 


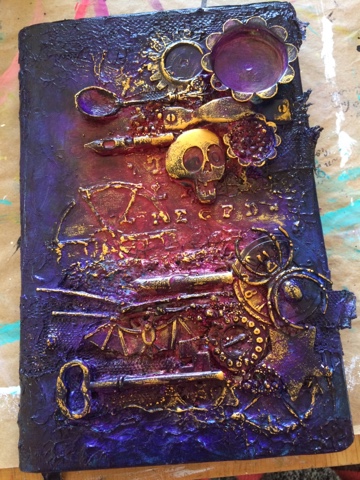
Step 6: for my covers I painted the middle first with DecoArt green gold and the outside with phalo blue. Then went over the centre with quinacradone magenta and the outside with dioxizine purple. 


Step 7: I love the metallic lustres and Orange flicker is definately one of my favourites so of course I had to grab for it !!!


Step 8: with a small amount of the orange flicker at a time I rubbed it over the top with my finger on the textured areas so that it caught the raised areas. 


Step 9: last but not least I added some of the Tim Holtz letter stickers to read the word 'spells' to the from of my book. I glued these down with gel medium to make them more secure. 


I had an absolute blast creating this cover and can't wait to start recycling the inside pages into a fabulously spooky art journal !!

Thanks for stopping by
Bright and painty hugs
Tracy
X


**********************

Wow thanks so much Tracy this is fabulous and such a wonderful cover, I know if it were mine I would be wanting to use the book often to get the pages filled with wonderful painty works of art. We really appreciate you joining us here at A Vintage Journey.

Now did you know Tracy has also launched her own range of stamps? They are gorgeous so if you click HERE you will see them for sale at Country View Crafts who is one of our regular sponsors and HERE when they were launched by Tracy on the PaperArtsy blog.

Thanks for sharing Tracy's part of our Vintage Journey and we look forward to seeing you all here again on Monday.

Have a wonderful weekend.

hugs Brenda, Tracy and the Creative Guides. xxx


Monday 24 October 2016

Destination Inspiration - Arriving at Terminal 3

Hello travellers, welcome aboard  Terminal 3. Annie here to share the third leg of our Destination Inspiration journey for the month of October. You can view  Destination Inspiration, Terminal 1 HERE and Terminal 2 HERE

So what do we have in our travel bag to inspire you this month:
Product: Crackle Paste
Technique: Layering Colour Through Stencils
Colour: Greens and Golds
Substrate: Some Kind of Box

I decided to alter a cigar box that has been kicking about  the house for  quite some time. I had promised my DH that I would create a nice vintage project and he could store some of his  golf bits 'n' bobs within it. 

I do apologise for the number of photographs....but grab a cuppa and enjoy the ride !!!

The cigar box was wooden so I gave it a coat of Gesso and also applied some PaperArtsy Grunge Paste through various stencils in my stash. (Andy Skinner & Gabrielle Pollacco, Tim Holtz Dot Fade)
I then adhered Tim Holtz Thinlits Globe Die and various other stencils.  
A few googly eyes were adhered to look like studs once painted.  I also adhered some spiders webbing, which was painted over using Decoart Chalk Paint in Rustico. 
Once dry Decoart Crackle Medium  was applied and when dry another coat of Decoart Chalk Paint was applied using the colour Whisper. 
You can see the effect of the crackle below
Close up of the crackle texture
I then applied some Pebeo gilding wax  in  Renaissance and Empire gold to highlight stencilled areas
Decoration of the top took the form of adhering Sheena Douglass  Ivy Stamp and Die cut, using  Versamark ink & Stewart Gill Midas Embossing powder, which was heat embossed, then edged with Black Soot Distress Ink/Markers, Mowed Lawn and Vintage Photo DI
Below you can view the die cut leaves in Green and Gold, with some Black Soot to create depth
Leaves were adhered over the netting as seen below
More inks in Mowed Lawn DI/Vintage Photo DI and Black Soot were applied to the front and edges of the cigar box. Gilding Wax and Black Soot created a really nice edging, which added to the overall effect. 
Above you can view a tag, which was die cut using Tim Holtz Thinlits Tag Dies and a sentiment stamp from my stash. The tartan ribbon was left over from our son's wedding invitations. Apologies that the photograph below is a bit fuzzy, but I think you can see the details. Firstly I applied Decoart Paynes Grey to the wooden letters, which were from The Range. Once dry I applied some crackle paste then Decoart Quinacrodone Red, followed by Decoart Antiquing Cream. Once the antiquing cream dried I rubbed it lightly with a  slightly damp  cloth. I love the grungy  distressed effect this gives the letters, which were then edged with Rub 'n' Buff Grecian Gold wax, using my fingers.
A better picture of the grungy/distressed letters shown below
Various Distress Inks in Greens, Browns and Blacks were again applied, increasing the depth of colour
The outside base of the cigar box was  also gesso'd and painted with Decoart Chalk Paint. Below you can see how I applied Distress inks through a stencil and then Archival Ink through a stencil layering the colours.
Similarly I used Mowed Lawn Distress Ink/Archival Sepia, Decoart Chalk Paint layering up the colours in the photograph below
Another stamp from my stash
Another side of the box, which was decorated in a similar way.  The box and particularly the crackle was then varnished with Decoart Matte Medium Varnish, ensuring it will last the test of time !!
And there we have it.........Crackle Paste, Colour through Stencils, Green & Gold and  use some kind of box

Thank You for sticking with me and I hope you will feel inspired to have a go at some of the techniques shared within all of our Destination Inspiration Posts. Another Destination Inspiration Project will be shared here next Monday so do pop back to see what it is!!
I now have to decorate the inside of the box and have a few ideas that I will share with you at a later date. For now take care and remember there is still time to take part in Anne's 'Make it Spooky Challenge'.  HERE

Take Care and Keep Crafting xxxx

Annie xx