This is a unique challenge blog where we are inspired by and focus on the Vintage; shabby; mixed-media; art journaling; industrial, timeworn and steampunk genres and encompass the talent, flair, expertise and ideas of many artists that we are inspired by. We welcome all types of projects - cards, journaling, assemblage, layouts, albums, atcs, altered art in fact whatever you want to share (as long as it is in good taste).

Friday, 30 October 2020

October Tag Friday

 Hello and welcome to another Tag Friday!

Here we are the end of another month and another with a fifth Friday. So the Creative Guides are here to share with you our usual inspirational tags. We all love the chance to create without a theme, experiment, use up scraps and generally just have fun!

So scroll on down and see what we have created.

______________________

 Alison


Ah, Tag Friday - we love it!  Autumn leaves are beautiful, but between the glorious colours of an autumnal forest, danger may lurk. Beware of vengeful women with too much knowledge of the toxic fungi they've been gathering in the woods!  Come over to Words and Pictures if you dare, to learn more about these Fungi Poisoners.

Barbara


This Friday is the perfect day to create a pair of Halloween tags! I love so much the new Tim Holtz Stamps and Stencils and I used them together with Ranger Ink Perfect Pearls to obtain a shiny effect! If you want to read how I made the tags check out my blog Yaya scrap & more.  

  
Today I'm celebrating autumn and Halloween with a double-sided tag featuring Arthur Thinlits from Tim Holtz, as you can see my ghostly owl is having fun playing Peek-a-Boo! To see how this came together, please find full details on my blog, Let's Art Journal.


Creating tags is always so much fun, so I could not resist playing along this month. If you want to see how this tag came together, just head over to my blog

 Julia


I skipped right over the USA Halloween and Thanksgiving seasons and went with a winter design for my tag, creating a Dox Spray Ink smooshed background for my winter trees and little ice skater!   You'll find more details on my blog post here. 

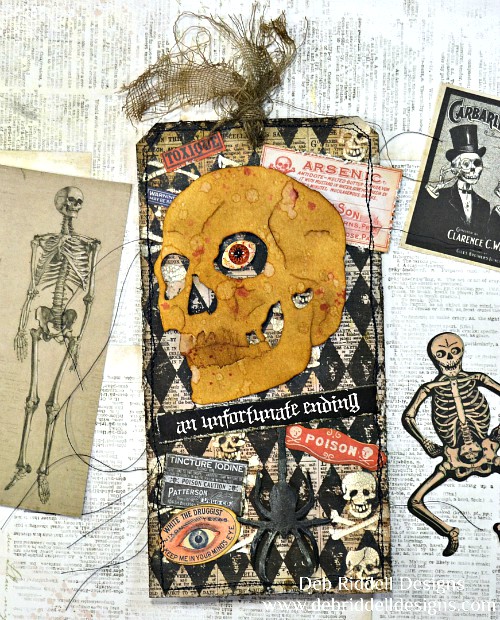
An Unfortunate Ending Halloween Tag - Deb Riddell Designs

I finally found my Halloween mojo which has been sadly lacking this year just in time for Tag Friday.  Pop on over to my blog for the spooky how to!

 S@ndy

It is indeed a time for Joy, the weather is cooler and the pumpkins are coming out.  For my tag today I am celebrating Fall in all it's glory.  For more information and to see the products I used - please join me at my blog here.


My tag for 'Tag Friday', pays homage to the Mexican tradition 'The Day of The Dead', which occurs on the 2nd of November. The festival celebrates both life and death and Sugar Skulls play an important role in the celebrations. If you'd like to see how I put this tag together, please hop over to The Artistic Craft Dabbler blog with this link


It has been a little grey here in the North, so I have cheered up the craft room with a colourful tag using the new (wonderfully warm) Crackling Campfire Distress Ink. Do join me over on my blog Live the Dream if you would like to see more.
_______________________

Our tags celebrate everything of the season whether it be Halloween or Autumn 
.... and even into Winter.

So I hope you are inspired and find something that lifts your spirit or gets 
you running to your craft desk.

There is still time to join our current challenge Numbers. You can find all the details HERE.
Join us next Friday for our new challenge hosted by the lovely Toni. 
We look forward to seeing you then!

Jennie and the Creative Guides x

Friday, 23 October 2020

Creative Cardmaking with Astrid

 Hello lovely visitors, it's Astrid here with our monthly cardmaking tutorial. Now, before I continue, it has to be said, I used to be a card maker, but in recent years probably the only time I make cards is for Christmas, so it really took me a while to decide what on earth I would do. Well, in the end, this turned into what I have called in my own mind, "A multi-layered mixed media card". The techniques I used could be used for many other projects, not just cards and indeed mine turned into the cover of a journal. So here goes:


Here first of all, is the finished card and below I will show you what steps I took to get there.

I started by taking an A 4 size piece of strong white card and covered it with random scraps of all sorts of vintage type papers from my stash, adhering them with mat medium, in order to create a kind of master board. I then covered that with a thin layer of gesso to blend it all together a bit.

I added a second layer of gesso and then in order to give it all some more depth and interest, I added some scraps of the top layer of paper serviettes, again randomly and using mat medium.

Another thin layer of gesso followed and then I roughly tore this background into several smaller pieces.

Now, which piece to choose to make a card? In the end I chose one of the pieces that were somewhat plain, in order the create some collage elements for the focal point of my card.
Here you can see the piece I chose, and below you can see what I ended up with after I added different collage elements to this background piece.

The girl with wings is from a collage sheet I created in collaboration with my blogfriend Marjie Kemper
If you are interested, you can get instructions of how to get it as a freebie by heading over to my blog. The other elements are just bits and pieces from my stash, - some washi, music paper, old book paper and a postage stamp.

Time to bring it all together into a card.

I created a backing piece by cutting a thin piece of card large enough for my focal piece to fit on, inked around the edges and added some subtle stencilling with my current favourite Tim Holtz stencil. I cut a card base from Kraft card, created some computer generated words and made a wax seal stamp as an additional embellishment, and voila, here is my finished card.
I'll finish by showing you a few close up photos still and hope you have enjoyed this little card project.


The butterfly girls, surrounded by some subtle shadows created with Distress Crayons. I always think it helps to create depth and integrate elements when adding images, when you add some shadowing like this.

Here you can see all the different paper layers, again blended together a bit with Distress Crayon. The colours I used were Tea Dye and Gathered Twigs.

And here the wax seal, mixing together different colours of to blend in with the rest of the project. The fern wax seal impression was highlighted with Treasure Gold White Fire.

Well, that's it for today, but, to be really honest, this project never really ended up as a card, but as the cover of one of my journals... if you want you can check it out on my blog, where you can also find the promised freebie with more butterfly girls.

As  October is a month with 5 Fridays, next week you can enjoy our Tag Friday projects, and of course there is also still some time left to join our Numbers challenge.

Thanks for your visit today, Astrid

Friday, 16 October 2020

Numbers Tutorial

Hi everyone, Annie here to share  the tutorial for my 'Numbers' Shadowbox, using Tim Holtz Idea-ology Vignette Trays. I really did enjoy creating this home decor piece and as there are lots of pics you may wish to grab a cuppa of your choice x

Believe it or not my first thought was to create a project using Tim's Artful Dwellings, however, as often happens, another idea  came in to my head, taking me in a very different direction.

Below you can see many of Tim's products, including his Distressable Papers that I found whilst having a  craft room clean out several months ago !! These papers, together with Tim's Distressable books ,were purchased many years ago (possibly 16 years or more !)


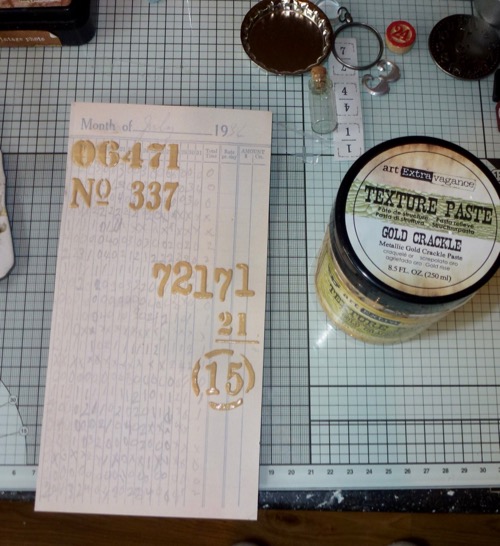
The distressable paper was cut to fit the inside of the small vignette tray then stencilled using gold texture paste as seen below.

While the texture paste was drying I applied some colour to the chipboard doll using Distress Marker's.
The butterfly below is a Tim Holtz Sizzix die and once cut it was placed in a Bingo Ticket embossing folder prior to running it through my Bigshot.
Vintage Photo and Gathered Twigs Distress Inks were applied to the butterfly and I just love the bold colour on the numbers.
Tim's Idea-ology pieces were covered with Speckled Egg paint, which I applied with my fingers
 
Crackling Campfire and Speckled Egg Distress Inks were applied to the background paper, together with  Vintage Photo. Water was spritzed on to my hand and then flicked on to the paper too.  Numbers were applied to Tim's  Idea-Ology Film Strip  and dominoes from my stash were adhered together, creating a platform for the Chipboard Doll.
Some close ups:
The die below enabled me to create  some bunting to which I applied rub ons.

The timepiece was given a wash of Speckled Egg and Picket Fence Distress Paints,  both paints applied with my fingers.
Below is the bunting and rub ons
Another pic of the finished make x

Thank You so much for dropping in and I hope that you have enjoyed the tutorial and maybe even be inspired to create something for the 'Numbers' challenge, which runs until 5th November @ 18:00 hrs. 

Would be lovely to have you hop on board with us x 


Have a great weekend and Happy Crafting

Annie xx

Friday, 9 October 2020

Cogs, Gears and Textures Pinworthies

Hi everyone, 
Ann here to announce our Pinworthy winners for September's 
Cogs, Gears and Textures challenge. As usual we had many fabulous entries and we want to thank each and every one of you for taking the time to enter our challenge. It is so hard to narrow our winners down to just three, but needs must, so after due consideration, these are the entries the creative guides have chosen in no particular order:


So once again, thank you to all of you who entered our challenge and shared your creativity and congratulations to our winners. 

I will send you your pinworthy badges shortly. Our latest challenge Numbers is in full swing at the moment, so we hope you will all join us for that one too, and all the challenge details and an inspirational gallery of projects created by some of our talented Creative Guides can be located here. Can't wait to see what you create. Of course don't forget to come back next week to see Annie's tutorial for her entry to that challenge!

Meanwhile, happy crafting and thank you for joining us here today! 
Ann and the Creative Guides 


Friday, 2 October 2020

Numbers

Hi everyone it's Annie here as host of October's challenge theme, which is "Numbers".
Here are the challenge details and I do hope you can hop on board with us:
"Numbers is our challenge theme for this month and we would like to see them being a focal point in your entries. 
You can use stencils, die cuts, fussy cuts or rub ons, rust them up, use texture paste or paint them, the decision is yours as long as the numbers are visible. Just remember to create your project in one of our preferred styles: vintage, shabby, mixed media, art journaling, industrial, timeworn or steampunk."

 Without further ado here are the challenge projects created by myself and the team.

Annie

 Jennie

 
I am so missing time spent with my two old school friends I decided to make a tag to celebrate our times together and had fun experimenting with the new Crackling Campfire Distress Ink. Do join me over at Live The Dream if you would like to see how I got these wonderful inky effects.


I reached for my square black journal this month to create a numbers themed / layered journal page. Had great fun adding lots of collage , stamping and paint to the background. More photos and details at Addicted to Art.


 Astrid

I decided to alter a little file folder and fitted accordion pockets inside. I then created a few pockets and embellishments to fit inside, featuring numbers of course. Like usual, if you want to find out more, you can visit my blog

Sandy

For the theme this month I have a card made for a good friend.  When it comes to friends it's always good to have a BINGO - I'm a winner.  The card is blank inside so I can write a personal note.

Barbara 

31 is the perfect number during Halloween time! I created a tag with one of my favorite Paper Dolls by Tim Holtz, The witches! I love so much to use this tiny mask to cover their face creating a spooky effect! If you want to see the tutorial check out my Blog Yayascrap & more!


The creative guides have provided amazing inspiration as always and you can view the step by step details on their own blogs by clicking their name or links provided and leaving some love.

This challenge runs until the 5th November @18:00. We do hope you will join in and if you are in the Top 3, chosen by the creative guides, you will receive a Pinworthy Badge for your blog and your projects will be pinned on our AVJ Pinterest Board. To enter use the Inklinkz link below.

Take care and keep safe 

Annie & the Creative Guides

xx


You are invited to the Inlinkz link party!

Click here to enter