This is a unique challenge blog where we are inspired by and focus on the Vintage; shabby; mixed-media; art journaling; industrial, timeworn and steampunk genres and encompass the talent, flair, expertise and ideas of many artists that we are inspired by. We welcome all types of projects - cards, journaling, assemblage, layouts, albums, atcs, altered art in fact whatever you want to share (as long as it is in good taste).

Monday 30 October 2017

October Destination Inspiration - Arriving at Terminal #4

Hello, everyone!  Julia here to welcome you to A Vintage Journey's Destination Inspiration for October.
Today we have arrived at Terminal #4!
The contents of our travel bags for this month are:
Product - Crackle Paint/Paste
Technique - Die Cutting
Colour - Any Fall colours you fancy
Substrate - Corrugated Card

With the supplies in my travel bag, I created a fall pumpkin patch decoration with a harvest moon overhead!
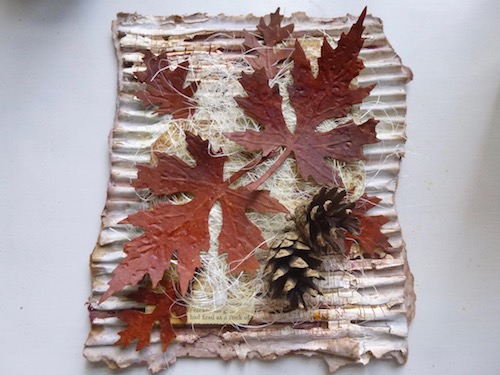
Here are a few photos of how I created this.  I took some real fall leaves that I picked up on a walk recently, they were lovely fall colors or orange, red and yellow but I knew they wouldn't last so I pressed Versamark ink onto them and embossed them with a mixture of tan, cranberry and brown embossing powders to hopefully preserve them.
For my base, I took a thin slice of an aspen branch that Kent had cut for me some time ago, and cut a piece of corrugated cardboard to fit over the top.  I ripped off most of the top to expose the corrugation.
I covered the cardboard with Finnabair White Crackle Texture Paste and let it dry overnight.  Then I sprinkled Infusions Sleight Blue and Green Man from PaperArtsy over the crackle and spritzed with water to activate the colors.  There was still a lot of white showing, so I rubbed some Forest Moss Distress Ink on my craft mat, spritzed with water, and painted the color over the base.
I wasn't exactly sure what I was trying to make it look like -  but felt at this point it rather looked like tilled soil in the pumpkin patch so I was happy with it!
I recently purchased this lovely To the Moon stamp set from Altenew and knew it would be perfect to use to create my big harvest moon over the pumpkin patch.  I die cut the circle twice and stamped both pieces with the 3 layers for the moon.  I used Soft Stone for the base color, Orange Zest for the first crater stamp and Smokey Shadow for the 3rd layer.  Then I sponged the edges with Distress Carved Pumpkin to really make it a bright fall moon.  I curled a wire over a pen and attached one end between the tree base and the corrugated piece and the other end between the two pieces of the moon and it stood up brilliantly - just as I hoped it would!

To add another die cut to my project -  I cut a fence out of  corrugated cardboard using Tim's On The Fence die.  I colored the fence with Infusions Green Man and spritzed with water. 
(Green Man seems to be mostly blue!?! maybe because I used it on the brown cardboard?)
I adhered the fence around the back edge of the base, adding some Idea-ology Small Talk/Occasions stickers to the fence and around the front of the base that I sponged with Distress Carved Pumpkin Ink.
I adhered my leaves to the base along with Idea-ology Pumpkin Pieces and Mini Pumpkins.  I added little pieces of cinnamon sticks as stems for the Mini Pumpkins.
I just love this little pumpkin patch - no matter what angle I look at it from!

In case you missed the previous October Terminal stops -
See Anne's project  at Terminal #1

See Alison's  project at Terminal #2

See Sandy's project at Terminal #3
 
I hope you have enjoyed your stop at Terminal #4 and that you will join in Jennie's wonderful A Vintage Journey challenge this month - Crazy for Autumn Colour which you can find HERE.
 
Stamps:  To the Moon - Altenew
Paper:  white - PTI, Corrugated Cardboard from a package.
Ink:  Soft Stone, Orange Zest, Smokey Shadow - Papertrey Ink, Ranger Distress Carved Pumpkin and Forest Moss, Versamark.
Accessories:  On the Fence Die - Tim Holtz/Alterations, Big World Die - Altenew, real maple leaves, slice of aspen branch,  Ranger Distress Tan and Brown Embossing Powders, Adirondack Cranberry Embossing Powder, heat tool, Idea-ology Pumpkin Pieces, Small Talk Stickers/Occasions, Mini Pumpkins, white Crackle texture Paste - Finnabair/Art Extravagance, palette knife, Tom Bow Glue, black wire, small pieces of cinnamon sticks, Infusion Colored Stains Sleight Blue and Green Man - PaperArtsy.

Friday 27 October 2017

We have a returning guest today ..........................

It's always so wonderful when incredible artists return to be a guest again for us and today we have the amazing ...........
Marjie Kemper with us.

Marjie has been creating and blogging for quite a few years and as a blogger myself it's been fabulous watching her art and designs change and see her become so active and create a business for herself in this challenging world we live in. She teaches across America and has an online workshop too, she has been published in many publications and has become very well known in the industry.
Over to Marjie to introduce herself and share her project for today.

************************

Hi, everyone. Marjie Kemper, here. It's a pleasure to be your guest today at A Vintage Journey!  I adore mixed media art and am honored to be with you.  My passions are art making, teaching classes, and running my own small business, and I'm currently working on new online courses that will address all of these topics. You can find me on my website and any of the social platforms.


When I heard Jennie's theme was "Crazy for Autumn Colors," I knew I'd be reaching immediately for my Distress Oxide inks. Our fall is coming late this year in New York, so I've created my own burst of fall color with this project.


I've used a combination of materials on this one. The base is one of Tim Holtz's shadow boxes.


After inking up all the tags with a variety of Distress Oxide inks, I added interest with stencils and an ink blending tool.


Once all the tags were dry, I cut up some of the them, diecut others, and stamped on a few as well. 


I used the same inking and stenciling on a larger piece of manila card for the base, and I tried to keep this in a light/bright color pattern.


I used several pieces of cardboard to support my tag, so it appears to be 3-D in the box.


The top and bottom accents on this tag are from a Pediments Sizzix die. I've used metal accents and chit chat stickers to jazz it up.


I've created a Distress Ink Blending Checklist that I'd love to share with you. As you know, Distress Oxides are unique in that they are a combination of dye and pigment inks. This checklist is a basic guideline on color blending, which I do the same way with both Distress Oxides and regular Distress Inks. Pop on over to my blog for a copy if you'd find that useful.

Have a wonderful day!


*************************

Oh Yes it's a wonderful day spending some time looking at these gorgeous tags Marjie and how you have cut them and designed this beautiful box. The autumnal hues fit the challenge brief perfectly and what a glorious mix of rich and golden tones you have produced. Thank you so much for making the time to share your incredible talent with us here at A Vintage Journey and making such a superb project.

I hope you, our lovely readers, will take a moment to pop over to Marjie's blog and see both this and all her other work, I shall also be looking for the Blending Checklist, I find little aide memoirs and checklist tools such great things to keep to look at time and again when I'm working with those particular products.

The 'Crazy for Autumn Colours' is still running for another week and it's such a pleasure to see and get to visit so many brilliant entries already linked up, I hope you can join in if you haven't already.

Enjoy these autumn days while we have them here in the northern hemisphere, it seems the season has started a little late but the colours are now looking stunning.

Enjoy the weekend and any creative time you have planned.

hugs Brenda and the Creative Guides. xxx


Monday 23 October 2017

Destination Inspiration - Arriving at Terminal 3

Welcome vintage travelers, it's S@ndy here waiting for you at Terminal 3 for our next Destination Inspiration.  For this month we have some wonderful things to work with in our travel bag so let's take a look.  

Crackle Paint or Paste
Die Cutting
Fall Colours
Corrugated Cardboard

We have had some great inspiration earlier this month from Anne and Alison, thank you ladies.

I love fall and all the images and colours that go along with it so I just had to use a pumpkin.


Here's how I made it so let's get started-

This is a 10" square canvas that, truthfully, I had in my stash from another project that I started but never finished.  This time it got used for a completed project.  When I found it, it looked like the photo below.


Before I added all this blue spray it started out with the corrugated cardboard, a coat of gesso and then some stenciling with modeling paste.  Another coat of gesso. I don't know the name of the large stencil but the 2 smaller ones are designed by Karen Burniston for Elizabeth Craft Designs (ECD).


The next step was to knock down the blue and turn the colours into fall colours.  That was done with a coat of Picket Fence and then some Forest Moss Distress Stain.  When the stains had dried I moved on to some Viva Rusty Paper Paint covering most of the blue.


Next I wanted some more depth so uses some DecoArt Qunacidone Gold which pushed back the blue even further.  The final paint was dry brushed on using DecoArt Diarylide Yellow.


While waiting for paint to dry - I began working on the pumpkin.  Using orange cardstock I cut 3 large ovals using the ECD Fitted Ovals.


Using a Finnabair, Prima, stencil and Prima artExtravagance Clear Crackle Paste the pumpkin parts were stenciled and set aside to dry.


When the crackle paste is dry - edge each piece with Vintage Photo Oxide Ink and put together.  I used foam tape to give more dimension.


To make the stem and top of the pumpkin I used the Tree Branch Die from Tim Holtz.  I cut it several times using chipboard, colouring and then cut the tree apart using the bottom of the tree for the stem.  For the stem and top of pumpkin I embossed using the Bark Embossing folder from ECD.   I later used the tops of the trees as branches around the finished pumpkin. 


Now for the finishing touches - wrap some wire loosely around the canvas.  You will want to tuck the garland and pumpkin under it later.


Next I used a leaf garland that I had and wrapped it through the wire.  I added a dowel rod up the center of the canvas and glued in place, if you don't have a dowel rod you can use a pencil.  Place your pumpkin over the dowel rod and glue down on the edges near the top and center so you can tuck in the rest of you leaves and branches.  Use the tops of the trees and more leaves and garland to finish. Near the top of the pumpkin I used a thin piece of cardstock that I curled around a pencil.


I hope you have enjoyed my project as much as I enjoyed making it.
Have a creative week and tune in next week for another inspiring project from Julia.

S@ndy

Friday 20 October 2017

Autumn Pinworthy Inspiration

Hello and thank you for stopping by, we have a wonderful treat to share with you today from three very talented Pinworthy artisans. These Crazy For Autumn Colour inspirations are coming to you from Julie of Art & Soul, Lucy of With Glue and Glitter and Marzena of Macarena-Creativa, enjoy!

*********************************************

Julie

Hello Everyone, I'm Julie and I'm very happy to be invited as a Pinworthy Guest to A Vintage Journey.


I've spent many years teaching both children, young people and adults alike. My training is in Art and textiles but my passion is for anything mixed media. I've found art and craft to be amazing tools to engage minds and hands, young and old, and I love sharing my techniques and ideas with others.
This is a special time of year to me so the brief ‘Autumn’ was music to my ears. I live quite high up in South Yorkshire. Driving in the early morning, I see the valley shrouded in mist and the Keats poem ‘To Autumn’ sprung to mind. As a child we were made to learn it by rote! Personally, Autumn is time for calmness and reflection, and invokes many happy childhood memories.
I planned several designs and ended up doing something completely different but the introductory line of the poem was my main inspiration - 'Season of mists and mellow fruitfulness'. Truth be told, I tend to work best when things develop naturally rather than working to a specific idea, I’m sure you know what I mean?
I have had an old board book which my son had thrown out from his first birthday. Well… it spoke to me on many levels; how could I get rid of it? I’ve had a plan for it from that day on and I felt it would be a great base to frame a verse or two from Keats and to frame an exploratory faux encaustic panel – an idea which has been buzzing around my head for a while.

Starting out with encaustics isn’t cheap so I decided to try soya wax, pastels and gelatos. I love the way pastels and wax combine to give a mellow and misty effect and felt they would work perfectly. There is a full tutorial on my blog ‘Art & Soul’ where my various experiments and their outcomes are detailed.


I also love the tactile feel of textiles and decided to create a fabric cover for the book using various mediums and techniques, vintage lace, trims and beads. Again, full instructions are on my blog here if you’d like to take a peep? Throw in a favourite set of stamps by Crafty Individuals, distress inked cardstock cut with Tim Holtz’s Fall Foliage dies plus rusty wire and a few choice accessories and here’s my completed project. I hope you like my contribution to Autumn?


Thanks for taking the time to read about my creative exploits and inviting me over to A Vintage Journey.

Have a wonderful day and keep creating.

Julie xx


Lucy

My name is Lucy and I have been honored to make another post for A Vintage Journey. I have always loved making things, but in the past 2-3 years, I have turned into a paper crafter fanatic. Mostly I make little houses, but sometimes I branch out into other projects. This is one of them. 


This photo is a selfie from the Grand Canyon in June. My first visit to the Grand Canyon - amazing. 

Nothing says fall to me more than the leaves with their astounding array of colors. I knew when I was asked to be a Pinworthy guest for Crazy for Autumn Colour it had to incorporate leaves. Lots and lots of leaves. Making an owl in a tree was the perfect design element to cover in leaves. 

This little cabinet is box framed with Crackle Texture paste. The owl in the center is transparent so that an LED candle could be placed behind it to light up. 


The tree is simply a cylinder of cardboard with the base slightly larger than the top covered with paper mache. The limbs are twisted pieces of brown packing paper. The tree itself is painted with multiple layers of paint with the goal of mimicking bark. The background is supposed to show that the day is getting late. 

I stained watercolor paper and cardstock with various colors of Distress Inks and Stains and then punched out the leaves with an oak leaf punch. 

The opening in the tree was sized to fit the owl. The owl is a Tim Holtz Ornate Owl Thinlits die which I cut out twice - once with brown inked watercolor paper, once in black and then an outline on clear acetate. I colored the acetate with various inks - yellow and then some gold and white fixative. I tried to make the owl's throat lighter because if you read about the Great Horned Owl one of its distinguishing features is the "neat white patch on the throat". 

The frame of the cabinet is just cardboard cut to outline the box. It's painted with black gesso then a generous layer of crackle texture paste. 

There's more detail on my blog. Thank you again for having me as a guest. 


Marzena

Hello everyone! I am Marzena aka Macarena and I am honored to have been chosen as a Pinworthy Mention and invited for Guest Designing today.


I live in Poland with my teenage son and a british shorthair fluffy and huge cat.

I have been crafting for about 6 years now getting each time more addicted to mixed media, textures, layers and rich projects. I love to get dirty with inks, sprays and paints watching how the project is being built and how it's in the end because I never have a vision of how it should finally look. I just let my imagination flow and spread my wings. The results are always a big surprise.

This is my CRAZY FOR AUTUMN COLORS card with a lot of embossing, inks, texture and layers. Hope you like it.


You can see more pics and products I used on my blog here.

Have a great day!

Macarena

*********************************************

Fabulous autumnal creations one and all as I am sure you will agree! Thanks so much to our talented Pinworthies for sharing their art with us and hope that you've been inspired to join in our Crazy For Autumn Colours challenge, you have until November 2nd to get your entry in and we can't wait to see what you will create! Thanks again for stopping by today,

Deb and the Creative Guides xo

Monday 16 October 2017

October Destination Inspiration - Arriving at Terminal 2

Hello all! It's Alison here from Words and Pictures, ready to share what I've created with this month's travel bag contents. In case you need a reminder, here's what we packed this month:

Substrate - Corrugated Cardboard
Colour - Any Fall Colours You Fancy
Product - Crackle Paint/Paste
Technique - Die-cutting

And here's what arrived at my Destination Inspiration...


... a rustic hanging full of texture, autumnal colour and dimensional embellishing.


I started with corrugated cardboard torn from leftover packaging, and roughly applied some DecoArt crackle paint with a palette knife, after which I brushed gesso into the ridges.


I let that dry and crackle thoroughly before applying some colour to it with Distress Sprays and Infusions powders.


While it was drying, I took a piece of A4 kraft card and spritzed it with some more Distress Sprays - Vintage Photo, Rusty Hinge and Gathered Twigs are certainly all involved, and maybe some others. I sprayed and flicked some water droplets at it as I dried it to get a nice mottled effect.


From that kraft card, I cut all my leaves - some with the Layered Leaf and some with the small Movers and Shapers Mini Tattered Leaves.


All of them then went back through the BigShot inside the embossing folder which comes as part of the Texture Fades Layered Leaf set, giving them that textured veining.


I grabbed some pinecones to add to my autumn gatherings, and started playing around with the arrangement on the corrugated cardboard panel.


As you can see, I decided it needed another layer, so I inserted some book page tags, carved from one of my altered book projects ages ago. I'm still working my way through the pile of leftover pieces.


With all these autumn leaves, it wasn't long before I reached for my Autumn Edition quote stamps (PaperArtsy EAB04).


I stamped the quote on some separate cardstock, tore it out and inked it with Distress Inks (Antique Linen and Vintage Photo mainly), and positioned it in the centre of the panel. It then became much simpler to work out the composition of the other elements around it.


Some berries add extra autumnal colour to the clusters of pinecones.


Natural fibres create extra movement and catch the light.


A good inking of the edges of the corrugated cardboard gives it an extra weathered look.


You can still just about see those book pages in the layers of falling leaves...


... and all that crackle is still tucked away underneath.


There's some rusty wire at the top to hang the panel up by...


... and plenty of white spatter gives the whole thing a dusting of extra life...


... like a frosty autumnal morning.


This was one of those projects which I really didn't think much about - it just seemed to take shape on the table in front of me, and I love the end result.


I hope you like it too. Be sure to drop by again next Monday to see who's at Terminal 3 (and check out Anne's brilliant project at Terminal 1 while you're at it).

Before that, on Friday, there are some amazing projects on display from this month's Pinworthy guests - extra inspiration for Jennie's wonderful Crazy For Autumn Colour challenge... which I suppose all our Destination Inspiration posts are this month, since we're also playing with autumn colours. Given all that inspiration, we hope you'll come and play along!

Thanks for stopping by today and have a great week.

Alison x