
Hello and thank you for stopping by, Deb here with you today for our fourth and final stop on February's Destination Inspiration journey. If you missed the first three posts from Nikki, Annie and Amanda, our travel bags this month were filled with the following supplies:
This month's contents were all old friends to me and I was excited to play with them to see what I could create. I have to admit I didn't start with a clear concept, I just pulled out my supplies and started to play and here is what I ended up with.

I have some pictures of how my Blackbird Fly tag came to be, read on for the how to.
I started with white cardstock that I cut into a #10 tag and painted the entire surface with Clear Rock Candy Distress Crackle paint. After the cracks formed I covered the entire surface with Carbon Black DecoArt Media Fluid Acrylic paint, wiping it back as it dried to reveal the crackle.

Next I stenciled Ranger Transparent Gloss Texture paste through StencilGirl Products 'Black Bird In Trees' stencil over the crackled tag.

A coat of Golden Titan Buff Fluid Acrylics paint was then added overtop the gloss texture paste stenciling and wiped back as it dried to reveal the stenciled pattern.
I wanted to add some more crackled elements so prepared two more #8 tags with a couple of different preparations. The top tag had Weathered Wood Crackling medium applied overtop some Titan Buff acrylic paint with a top coat of Carbon Black. The bottom tag was coated with Ranger Opaque Crackle Texture paste that was tinted with Black Soot Distress Reinker and then after it had dried and cracked the tag was inked with Black Soot Distress Archival ink.

In keeping with the avian theme of the stenciled background, a bird was die cut with Sizzix's Birds die from the DecoArt Crackling Medium tag and Tim Holtz's Bird Branch die was used to die cut a branch from the Ranger Crackle Paste tag.
The 'Field Notes' Quote Chips were inked with Antique Linen and Black Soot Distress ink.

And some of the wonderful lyrics from 'Blackbird' were typed out on the computer and adhered to a scrap of black cardstock for a bit more substance.
The song lyrics prompted the idea of stars in the 'dark black night' so I added dots of embossing ink with Ranger's Clear Embossing pen and then sprinkled on silver embossing powder.

And finally, I coloured a Charmed Adornments charm with Pitch Black alcohol ink, added a small Mirrored Heart to the bezel center and filled it in with Glossy Accents glue.
A few fibers from my stash were threaded through the punched hole in the tag and the heart charm attached with a jump ring and small black safety pin. The song lyrics were cut out, inked and adhered at the top of the tag.

The blackbird and branch were adhered in the center of the tag;

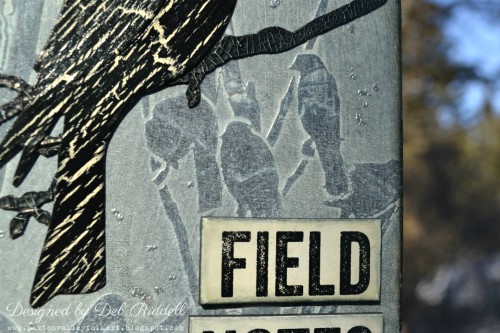
and the 'field notes' Quote Chips added to the bottom left.

You can catch a glimpse of the silver embossed 'stars' below.

Love how the crackle on the tag background is still visible through the gloss texture paste stenciling.
Hope you've enjoyed seeing how my Destination Inspiration project came together and since this is our last stop this month, here's a recap of all of the projects, I always love how we all come up with such different creations given the same ingredients!


Thanks for stopping by today and hope that you will consider entering our current 'Melt It!' challenge, you have until March 1st to get your melt on!
Deb xo
Product - Paint
Technique - Crackle
Colour - Black
Substrate - Tag
This month's contents were all old friends to me and I was excited to play with them to see what I could create. I have to admit I didn't start with a clear concept, I just pulled out my supplies and started to play and here is what I ended up with.
I have some pictures of how my Blackbird Fly tag came to be, read on for the how to.
I started with white cardstock that I cut into a #10 tag and painted the entire surface with Clear Rock Candy Distress Crackle paint. After the cracks formed I covered the entire surface with Carbon Black DecoArt Media Fluid Acrylic paint, wiping it back as it dried to reveal the crackle.
Next I stenciled Ranger Transparent Gloss Texture paste through StencilGirl Products 'Black Bird In Trees' stencil over the crackled tag.
A coat of Golden Titan Buff Fluid Acrylics paint was then added overtop the gloss texture paste stenciling and wiped back as it dried to reveal the stenciled pattern.
I wanted to add some more crackled elements so prepared two more #8 tags with a couple of different preparations. The top tag had Weathered Wood Crackling medium applied overtop some Titan Buff acrylic paint with a top coat of Carbon Black. The bottom tag was coated with Ranger Opaque Crackle Texture paste that was tinted with Black Soot Distress Reinker and then after it had dried and cracked the tag was inked with Black Soot Distress Archival ink.
In keeping with the avian theme of the stenciled background, a bird was die cut with Sizzix's Birds die from the DecoArt Crackling Medium tag and Tim Holtz's Bird Branch die was used to die cut a branch from the Ranger Crackle Paste tag.
The 'Field Notes' Quote Chips were inked with Antique Linen and Black Soot Distress ink.
And some of the wonderful lyrics from 'Blackbird' were typed out on the computer and adhered to a scrap of black cardstock for a bit more substance.
The song lyrics prompted the idea of stars in the 'dark black night' so I added dots of embossing ink with Ranger's Clear Embossing pen and then sprinkled on silver embossing powder.
And finally, I coloured a Charmed Adornments charm with Pitch Black alcohol ink, added a small Mirrored Heart to the bezel center and filled it in with Glossy Accents glue.
A few fibers from my stash were threaded through the punched hole in the tag and the heart charm attached with a jump ring and small black safety pin. The song lyrics were cut out, inked and adhered at the top of the tag.
The blackbird and branch were adhered in the center of the tag;
and the 'field notes' Quote Chips added to the bottom left.
You can catch a glimpse of the silver embossed 'stars' below.
Love how the crackle on the tag background is still visible through the gloss texture paste stenciling.
Hope you've enjoyed seeing how my Destination Inspiration project came together and since this is our last stop this month, here's a recap of all of the projects, I always love how we all come up with such different creations given the same ingredients!
Deb
Thanks for stopping by today and hope that you will consider entering our current 'Melt It!' challenge, you have until March 1st to get your melt on!
Deb xo


