This is a unique challenge blog where we are inspired by and focus on the Vintage; shabby; mixed-media; art journaling; industrial, timeworn and steampunk genres and encompass the talent, flair, expertise and ideas of many artists that we are inspired by. We welcome all types of projects - cards, journaling, assemblage, layouts, albums, atcs, altered art in fact whatever you want to share (as long as it is in good taste).

Monday 30 May 2016

Destination Inspiration - Arriving at Terminal 4

Hi friends - it's S@ndy here with you at Terminal 4.  It has been quite the creative journey this month with our three previous guides.  Astrid, Tracy and Amanda have shared so many great techniques and projects with us, so inspiring.  Thank you. 

My project today is inspired by one of my team mates on the Pop it Ups Designer Challenge Team, Shelly Hickox, who made a fantastic journal cover for a challenge.  I loved it so much that I decided to do my own take on it for a summer travel journal.  We are traveling abroad this year and I want to capture all the wonderful memories in this journal with photos and notes.

Before we get started lets have a review of the items in the travel bag - they are:

Product:  Sprays or Brushos
Technique:  Gesso Resist
Color:  Blue
Substrate: Card
 

Let's get started-


I started out with an art journal from 7 Gypsies


The journal cover was given a coat of Distress Picket Fence.  Not full coverage - rather hit and miss.


Add a length of lace across the front near the bottom edge.


I used watercolor card - 2 pieces, both torn on the bottom edge. 


Using gesso and a color blender - the gesso was dabbed through stencil.  I used two stencils from Karen Burniston, the Flowers Stage It Stencil on the bottom portion of the panels and the Partly Cloudy Stage It Stencil  near the top for a couple clouds.


Since I don't have Brushos I used these Nuance colors from Magenta which work the same way.


 It takes very little powder (shown by the arrow) to make lots of color.  I sprinkled the powder on the paper and then misted it with water - boom - it's like an explosion of color, in this case, blue.  Set aside to dry or if you don't like to wait, use your heat gun.


I used the excess color left on the non stick mat to color my ribbon.  Idea - ology Crinkle Ribbon was used here.  Simply cut your length of ribbon, wet it, drop in color, making sure all the ribbon has color on it.  Then dry with heat tool. 


After the blue color dried, Peeled Paint Distress Ink was added to bottom portion.  Next a light buffing over the gesso to reveal the white.  Then comes a little Distress Vintage Photo Ink on the edges.

I added the ribbon next and tied a bow.  Next the two panels were added with the longer one on top of the ribbon.


I die cut the Eiffel Tower from the Eiffel Tower Pop Stand Die and a hot air balloon from the Hot Air Balloon Pop Up Die both from Karen Burniston for Elizabeth Craft Designs.  Double sided foam adhesive was added to both pieces to give dimension.


Add tower and balloon to card and then add some splatters using watered down gesso and a fan brush.
 

Then came some leaves and three small flowers from Prima near the center. I then added three groups of white dots made with Crystal Drops from Nuvo (shown in the circles above)  These dry dimensional.  I also dressed up the tower with some rein stones.


Some corners from my stash were added to the top corners of both panels.  The finishing touch is a tag with a stamp from the Just a Note Clear Stamp Set that says Bonjour.

 
Thanks for joining me today for this leg of the journey, I hope you are as inspired as I was and will be making a journal for yourself.

Have a creative week,

Friday 27 May 2016

Our Invited Guest is Zoe

Welcome to our Friday guest post and it is the ever amazingly talented Zoe Hillman who has designed and created a very special project for us today whilst in the throes of moving house.
Just scroll through and see what exciting materials and layers Zoe has used to create her 'Sew Special' mini clipboard.

***************

Hello! Zoe here! I am delighted to be a guest at A Vintage Journey today.


I am British and currently living in Geneva, Switzerland with my husband Neil, (for another 4 days anyway)! I moved here 8 years ago and we are now off to Copenhagen, Denmark to start a new adventure together.

It was shortly after moving to Switzerland that I picked up Tim Holtz’s Compendium of Curiosities book and was instantly hooked! I love Tim's style, he's such a talented designer and great educator. I am utterly obsessed with distress and never happier than when I have inky fingers.

I really enjoy being part of the online craft community and love social media. I have “met” so many lovely people through a mutual love of craft, who provide such encouragement and inspiration. Crafting is definitely my happy!

Today I am sharing a project inspired by the Sew Special challenge.


I had to improvise slightly on the “sewing” and “fabric” elements to this project as half my stash was already packed away ready to move! Part of what I love about the creative process is improvising, so here’s what I did…


This tape measure ribbon covered the "stitched" part of the challenge! I then created a faux vintage pattern tissue using the new substrate material by Tim Holtz.


To make the substrate thinner and more tissue like, split the substrate by peeling the front and back layer apart. Next, stamp with sewing themed stamp sets, (both by Tim Holtz), using various archival inks, (by Wendy Vecchi). To make the substrate look distressed, screw up gently until supple.


Next, remove the clip from a Tim Holtz mini clipboard and adhere the substrate, wrapping it around the back. The linen tape measure ribbon covered the bottom of the board where the substrate didn't reach.


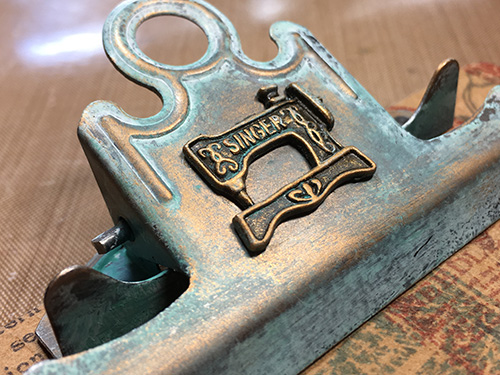
To alter the clip, cover with picket fence distress paint and rub away when almost dry. Rub evergreen bough distress ink between your thumb and forefinger until almost dry, then rub onto parts of the clip. Finally rub on some gold gilders paste to highlight. I added a singers sewing machine charm from my stash.


Collect together some sewing themed ephemera, mine was from the vellum thrift shop ephemera pack, (by Tim Holtz) and a photograph I picked up whilst junking recently. It was top of the pile and PERFECT for this project.


I created a dress shop receipt using a stamp from the Tim Holtz Curiosities set. Adding remnant rubs to give detail to the receipt and indicate a dress shop alteration. Tear and ink the edges with walnut stain distress ink to give an aged look. 


Thanks for taking a look at my project and to the team at A Vintage Journey for having me.

****************

Oh wow Zoe what a fabulously creative make for our Sew Special challenge and what an amazing vintage feel you have created with the stamp sets and your wonderful photo. Every step you took to bring this project together is brilliant but the part that excites me the most is the dress shop receipt, it's perfect. Thank you for taking time out of your very busy schedule to make this delightful and inspirational work of art and for sharing it with us at A Vintage Journey.


Thanks to you our readers for popping in today and if you haven't yet joined us in the challenge I hope you are inspired to give it a go and share your own inspiration with us. You have until next Thursday evening to link up and then midnight (UK time) on Friday morning we will be starting the next theme. We will also be back on Monday with the fourth Destination Inspiration post for May, we look forward to catching up with you then.

Have a great weekend and enjoy whatever you have planned.

hugs Brenda and the Creative Guides. xxx

Monday 23 May 2016

Destination Inspiration - Arriving at Terminal #3

Hello Everyone and Welcome
Its Amanda here hoping you'll join me on the third leg of this months Destination Inspiration. Before we set off lets just have another quick look inside the travel bag to remind ourselves of the contents :
Product: Sprays of Brushos
Technique: Gesso Resist
Colour: Blue
Substrate: Card
and now for the creativity.

I have made a card using one of my favourite Indigo Blu stamps as the focal image and creating a faux 'whitewashed' brick wall using the gesso resist technique . 


I actually made a few resist backgrounds to see how the technique worked and the results it gave and I guess it was during this creative time that I thought of the idea of trying to create a whitewash wall effect - why whitewashed walls should pop into my mind at this point when I was 'full on colour'  I have no idea?!!
So with the idea fresh in my mind here's what I did .
 I cut a piece of mixed media heavyweight paper to 6x4inches and embossed it using Tim Holtz brick wall embossing folder. Then using a dry piece of natural sponge I applied gesso onto the embossed brick wall panel
 and left to dry - doesn't take long .... 


.... when dry I then spritzed the panel with Distress Spray Stains and a touch of water to help distribute the pools of ink. At this stage you can see the gesso beginning to resist the ink as the inks are water based and one of the features of gesso is that it will resist water based products.

When dry I used a lightly water spritzed cloth and rubbed over the surface of the embossed panel to reveal the full effect of the gesso resist technique. Though I don't claim to be an expert with this technique I was happy with the result and continued to make a few more panels. 
 I chose this one to use on my card as I felt it had the closest resemblance to a whitewash brick wall due to its lighter tones and rough texture.


Now for the stamped focal image - 'Lost in Thought' by Indigo Blu. I've had this stamp for a while as it was a definite 'must have' for me when it was first released but shamefully it has remained un-inked until now.
I LOVE HER!
 She's inked onto white card stock using black Archival ink and painted using distress inks as watercolours. I even gave her some 'lippy' and painted her nails!
  I then fussy cut around her


and adhered her using dimensional glue against the wall on the finished card. For the shadow you can see around her I used pumice stone distress marker.


The quote, from Tim Holtz stamp set 'Warehouse District', is stamped onto white card stock with Black Soot distressed edges using black Archival ink  


Splatters of Stormy Sky and Black Soot distress paint on the brick wall and some gem topped hex nuts add some simple touches of detail to complete the card.


 Thank you for accompanying me today on the 3rd leg of this months Destination Inspiration. I hope both I and my fellow Creative Guides Astrid (Terminal #1) and Tracy (Terminal #2) have given you some inspiration to keep on creating. 
Be sure to stop by next Monday to see whats on offer at Terminal #4 ,the final stop for Mays Destination  Inspiration.
Our current challenge is 'Sew Special' and we welcome you to join in with us. There is still time as the challenge runs up until the beginning of June 2016.
Time now for me to go and pack the supplies back into the travel bag so I'll wish you all a great week ahead 
Take care 
Amanda
xxx


Friday 20 May 2016

Pinworthy Guest Day - what a treat!

Hi everyone, Nikki here with my monthly post where I get to introduce Guest Creative Guides who were previous pinworthies at A Vintage Journey. The ladies today were our selected winners back in February for our Industrial themed challenged. 
This month we have quite a different theme - Sew Special - but wow have they showed their versatility - we are in for a treat - here goes......
------------------------------------------

Hi! Suzz here! I live in the midwest in the United States. I have a wonderful family consisting of my hubby, three children and two dogs.
I am thrilled to be able to share again here on the Vintage Journey! The Design Team and their art is always inspiring and fabulous!
I have always loved art! The smell of fresh crayons, blank sheets of paper, and freshly sharpened pencils have always inspired me to create even in grade school. I evolved from my art in school into crafting and continue to explore and try new artistic adventures.

Today I am sharing a tag inspired by the Sew Special challenge.
I had picked up this totally awesome printers block with a stylish outfit at a local flea market. I have been wanting to use the image in one of my artsy endeavours and this challenge was the perfect opportunity to use it! 
To create my fun tag I used Distress Stain Sprays and Stencils on pieces of linen cloth. These are the remnants left after my tag was finished. 
I stamped the print block image by inking it up with Ranger Archival Ink and stamping it on a spare piece of the linen that wasn't stencilled but did get a mix of the sprays. 
Next I layered the sprayed linen pieces on top of each other. I used a glue stick to layer the fabric. I don't have a sewing machine and wanted to add a little bit of stitching. I hand stitched a few stitches along the side and sewed the buttons on the bottom.
Then I had the fun of looking through my embellishments for a variety of sewing inspired embellishments. I had plenty to choose from in my stash. Thank you to the fabulous Vintage Journey Team for letting me share with you today.

--------------

This is Vicki (aka- that crazy chick) and I am thrilled to be back as a “sew special” guest at A Vintage Journey. The only thing I like better than word play is to break bend a few rules. I can’t wait to show you what I've made with fabric and paper and paper fabric. This year has been one of great changes; pressing forward, each day, one step at a time, stronger than yesterday.
Paper fabric is an amazing material, it behaves both like paper and fabric. You can buy it by the yard as Kraft-tex, Sizzix sells it as Paper Leather and Tim has it packaged in his ideaology line as Substrate Sheets. The more you work the surface the more leathery it becomes (I cheat, a little, and let another process make the leathery look for me – you can see this in the step-by-step on my blog). And, optional stitching...is a ‘must’ in my world.


I used this challenge to try Sizzix ink sheets for the first time and on the linen textile sheet. This transfer ink worked better than I anticipated on the textured surface (Paula gave me the idea, when she used remnant rubs on linen in a vignette box awhile back).
I matted images from the Dapper Paperstash with some inked chambray (also) from the textile surfaces package. I like how this softens the edges and still feels masculine.
And lastly, created my own ribbon award using crinkle ribbon, plain tissue wrap and an old snap cap. *interesting side note, depending on where you are in the world, my blue ribbon will represent a different finish standing. Tell me, how well am I doing?

--------------------

Bonjour!
My name is Lys and I live in a village in south west of France. Ten years ago I started with scrapbooking, then I discovered Mixed Media and now every bit of paper, fabric, plastic or any material I can watch with a different eye can be part of a new creation in my hands. I love experiments and I always try to find new paths, but I also take a huge inspiration in blogland so I don’t think I have a definite style. My first idea is expressing something, telling a story… and my fingers go on!

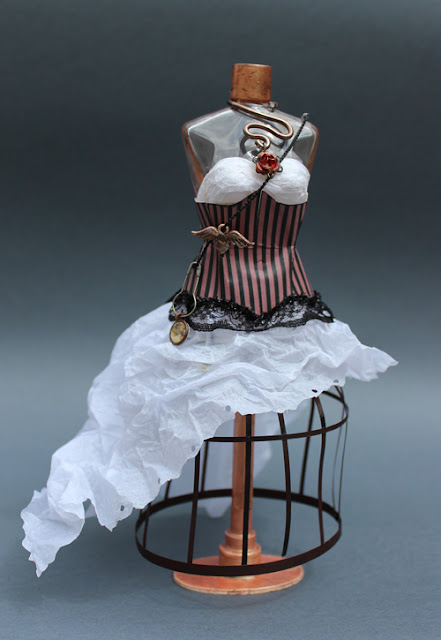
I’m very happy today to show the dress I made for this “Sew Special” challenge: I love the wide range of styles opened now at AVJ and I think I borrowed a bit of several of them here.
I wished a “Special” dress, for a celebration, with a French touch too, so it’s a strange mixture of a shabby dress with a steampunk style, colours and textures… I have “sewn” everything, you can see a step by step on my blog.
Everything came from this old small perfume bottle I altered to make a dress form. For my mysterious lady I wished a flimsy dress, so if the chest is draped, the rest is floating around the crinoline.
The stiffness of the corset and its stripes is softened by the lace, the thread and the ribbon bow, for a feminine touch.
The lady won't go out without her gems: her free heart...
her cameo which reminds the world is opened to her...
And her rose necklace.
Thanks so much Nikki and AVJ team for your invitation, I’m very honoured to be at your sides today!
Lys.
------------------------------------

Well I don't know about you - but I am in awe of these wonderful creations! Thank you Suzz, Vicki and Lys for sharing these amazing projects with us at A Vintage Journey - they really are stunning.
Feeling inspired? Our Sew Special challenge runs until June 2nd!

Until next time...
Nikki
xxx

Monday 16 May 2016

Destination Inspiration - Arriving At Terminal 2

Hello travellers, welcome aboard to Terminal 2. This is Tracy here to share the second leg of our Destination Inspiration journey for the month of May. You can view Astrid's Destination Inspiration, Terminal One HERE.

So what do we have in our bag to inspire you:
Product: Sprays or Brushos
Technique: Gesso Resist
Colour: Blue
Substrate: Card


I opted for a masculine tag accordion for this months creation using tones of blue, brown and touches of white to lift the design.
 
I began by placing the mini layering stencil onto one of the tags and then applying Gesso over the tag, remembering not to add too much Gesso so that it does not bleed under the stencil.
Dry the Gesso with a heat tool. Mine has a tint of brown to it as this was colour left on my stencil from a previous project but this does not affect the technique in any way.
I repeated this process with the Gesso on all four tags. The tags were all die cut using Tim Holtz Tag and Bookplate Die.
To add a further layer of interest to the background I also splattered the Gesso onto the background using a paintbrush and then once again dried with a heat tool.
From this picture you can see the added texture the splatters of Gesso add to the background.
I then applied a good layer of Broken China Distress Ink to the background, blending with an ink blending tool to apply. I distressed the edges of the tag to add to the vintage/aged feel of the design.
And now the magic of the technique. Spritz a piece of dry kitchen towel with a touch of water and rub over the Gesso areas, which resist the ink and now appear in white, giving a pop to the design in the background.
From this picture you can also now see the splatters, adding a further layer of interest to the background.
Take a piece of acetate or recycled plastic packaging; spritz the plastic with Gathered Twigs Distress Spray Stain.
Spritz the stain with water.
Now dab the inked plastic onto the background. This way I can place the spray exactly where I want it on the tag and then dry with a heat tool.
I repeated the same process with the spray on all four tags. I then flicked water onto the background to bleach out some of the areas and then dried with my heat tool.
As you can see the Gesso resist is still visible and so are all the other layers added to the background.
Now it was time to add some focal imagery and further layers to my design. I used Tim Holtz Sideshow stamp set to add my focal imagery to all the tags using Black Archival Ink.
I added circles of white paint to spotlight each of the images.
Jenny's challenge this month is "Sew Special" so I thought I would also add a touch of random machine stitching to my design. I also included some embossed circles using Tim Holtz Typewriter and Keyboard Texture Fade set, cutting them up to add further interest.
I added stamped numbers to the background to add a further layer to the design.
I had a piece of watercolour paper on my desk and used the perforated edge to add random pieces to my design.
Delicate splatters of white paint have also been added.
I love adding layers to a piece of work and this was so much fun to create.

Thank you for travelling along with me, I hope you enjoyed the journey! Please pop back next Monday to see the next creative step along our journey from our next Creative Guide.


Please check out our current challenge (link in the side bar) and of course there will be several Inspiration Journeys too during the rest of the month.

xxxx