This is a unique challenge blog where we are inspired by and focus on the Vintage; shabby; mixed-media; art journaling; industrial, timeworn and steampunk genres and encompass the talent, flair, expertise and ideas of many artists that we are inspired by. We welcome all types of projects - cards, journaling, assemblage, layouts, albums, atcs, altered art in fact whatever you want to share (as long as it is in good taste).

Friday 29 May 2020

May Tag Friday

Hello and welcome to one of our favourite posts of the month. We all love a Tag Friday - a chance to create with no boundaries and the perfect opportunity to have fun experimenting and playing with new ideas or techniques.

I am sure you will love the line up today and find something that inspires you.

____________________________


I love Tag Friday.  No rules other than to use a tag and follow your heart.  In this case, my heart was ahead of the game.  I created this background a whole week before the new Distress colour was revealed - I guess I was tuning in to something in the air!  Do come and visit Words and Pictures to see more.


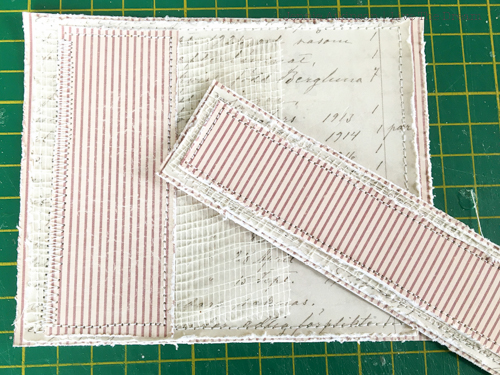
I have been experimenting with fabric and tissue paper and love the final result. If you would like to find out more about this technique and how the tag came together, then do please join me over on my blog.


A Strange And Wonderful Place Tag - Deb Riddell

For May's Tag Friday I started with a gel plate printed tag that took me on somewhat of an unexpected journey!  Pop on over to my blog for a quick tutorial, hope to see you there!


I am going through a bright phase! My tag was inspired by a recent online workshop I did with Dina Wakley and uses PaperArtsy stamps. Do pop over to Addicted to Art for more details.


For May's Tag Friday I decided to make a tag with the Infusion Color Stains from PaperArtsy and new and old stuff by Tim Holtz! You'll find all the details on my blog post here.


My tag for this month is a quick and simple one that will be part of a larger project in the future. As usual, there are a few more photos on my blog.


This month I'm really obsessed with Speckled Egg, the new Distress Color!! I love it so much so I used it for my tag! I created a super classic tag mixing old e new supplies! Check out my Blog, Yayascrap & more for the whole tutorial!


I decided to revisit some of the techniques within Tim Holtz Compendium of Curiosities
Volume 11. Please pop over to my blog HERE for more details xx
_______________________

We love it when you join in! So please do link up with us and share any tags you have made this month, or will make before the linky closes next Thursday evening. You might be chosen as a Pinworthy to be pinned to our special Pinterest Board.

 We also look forward to catching up with you all next Friday for a new challenge.

Have fun and a great "crafting" weekend!

Jennie and the Creative Guides x


You are invited to the Inlinkz link party!
Click here to enter

Friday 22 May 2020

Creative Card Making With Toni

Hi everybody! It's my turn to host our regular feature on 'Creative Card Making'. It's my first solo post as a Creative Guide and I hope you will enjoy what I have in store. For many of us, card making is the first step on our creative journey. It is often something we continue to do, not least because family and friends look forward to receiving a hand made card.  For this tutorial, I've gone back to basics, using Distress Inks, Distress Sprays, stamps, and heat embossing, to show you a simple way to make a batch of bold and beautiful cards.
To start myself off  this card making spree, I used a guillotine, to cut a collection of squares measuring 4 1/2 inches. I generally use 5 inch square card blanks, and I find that this size fits neatly with an 1/8th of an inch mount. I give the water colour paper a light spritz of water, before spraying with 2 or sometimes 3 colours of Distress Spray. I usually keep to similar colour families and work in sets. For this tutorial I've worked in groups of two......
I've used a water spray to move and blend the Distress Sprays and then dried with a heat gun. I love the intensity of the colours and the way 'new' colours appear as the inks swirl together. A quick clean up between each set ensures that the colours don't cross contaminate. Before you know it, you have a bunch of colourful backgrounds ready for stamping.......
When it comes to stamping on these backgrounds, I like to use stamps that can stand alone. I gone for  bold images with clear definition and in a size that will fit within the background. Too small and it will be lost, too big and it will look cramped. As the backgrounds have a slight texture, I've used a stamping platform to make sure the whole stamp is printed. It can then be re-inked if any bits are missing......
I have used black Archival Ink to stamp with and embossed with clear embossing powder. I've then used a Black Soot Distess Ink Pad to blend ink around the edges. This helps to frame the image. On a couple of the cards I've used a circle mask, made from a piece of acetate packaging, to create the suggestion of a full moon appearing behind the image......
 
I first saw this idea being demonstrated by Tracey Lavinia, of Lavinia Stamps. The circle is placed down and a slightly deeper colour is blended around the edges........
Before you know it, you have a nice little pile ready to be mounted and made and made into cards.......
and.......
The next step is to mount the card fronts. I've used a tape gun for all of the adhering. I find there is less chance of buckling than when using wet glue. To keep the bold theme going, I've mounted them firstly onto black card and then onto cream card blanks.........
This gives a super smart finish. I generally use a Stanley knife and my Perfect Layers ruler, to create an 1/8th inch border. When using a craft knife, always make sure the blade is sharp. Press down on the ruler but don't put too much pressure on the blade. You will find it's much easier to make a straight cut that way. Here are some of the finished cards........
  
 A quick idea I'd like to share before I go, is an easy way to make these cards with a pocket inside. Before mounting the image , I used a rectangular card measuring 5 x 7. Opened it out and cut a 2 inch slit in the middle at the bottom of the card..........
I measured 2 inches up on the right hand side and and made a score line. I then folded it up to create a pocket and adhered the side edges.  I then cut off the left hand bottom 2 inches of card.....

and Voila! a square card with a pocket suitable for adding a gift card.....
I hope you've managed to stick with me to the end of this post and if you have hopefully you'll have had a refresher on putting together a batch of  simple but effective, post box friendly cards, that are great to pull out  whenever the occasion arises. Until next time... Carry on creating ! x

Friday 15 May 2020

Beautiful Blooms Tutorial


Hello and thank you for joining me today for the Beautiful Blooms Tutorial. For our current challenge I used Eileen Hull's Stand Up Easel for the base of my project and embellished it with layered stitched papers and handmade blooms.


I shall start the tutorial with sharing how I made the blooms:


I cut three flower petals and added Distress Inks (Seedless Preserves and Victorian Velvet) lightly around the edges and using a cotton bud a circle of colour in the middle of the bloom. I have used Shabby Posies floral Spellbinders die designed by Tammy Tutterow (one of my favourites!).


Each bloom was spritzed with water and then scrunched up and left to dry. I find it easier to spritz on a muslin nappy as then the cardstock is not sitting in a puddle of water.


When the flowers are fully dried (best left to dry themselves overnight), gently ease out the petals (top), then using a bone folder smooth out each petal of the bloom keeping in some of the creases (middle) and finally using a pokey tool (or thin knitting needle) curl the edges lightly.


For the inner bud I die cut four multi leaved petals from Tim Holtz Sissix Thinlits Small Tattered Florals. Using a ball tool I have broken down the fibres of each leaf and then gradually glued each alternate leaf. It is a bit messy but if you use clear dries PVA it won't show!


This is the second layer, the first layer is the most difficult but to make it easier you could add a small bead in the first bud to give you something to layer around.


These buds can then be glued into the middle of the crimped flower. I have also added a cream cardstock stamen die cut from a Heartfelt Creations Stamp/Die Set. Once you start making flowers you collect favourite pieces from different sets!


Once you get in the way of curling the flowers you can create a nice depth which allows the flowers to be layered over each other.

To create the backing for the flowers I decorated the two parts of the Easel Stand separately.


My base card was cut to 5" x 4" for the back and 5" x 1 3/8" for the stand. I then layered complimentary papers and some scrim stitching the pieces together.


I created a bit of texture by using Tim Holtz Texture Paste through a stencil. It didn't take too well, but is enough to give a suggestion!


I then adhered the panels to the Stand before adding final layers of embellishments and muslin.


Then ribbon and leaves.

I could then play around with the placement of the flowers and final embellishments.


I hope this tutorial has inspired you to showcase your own blooms whether they be handmade, die cut, stamped, painted or pressed. You can link up your project here and the challenge will be open until the 28th May.

I hope you have a blooming lovely weekend!
Jennie x

Friday 8 May 2020

It's Gelli Time Pinworthies


Julia here today to announce the Creative Guide's Pinworthy choices for last month's challenge,   We greatly appreciate all of our AVJ friends taking the time to join in our challenges with us. 
We hope you are all safe and well during this incredible pandemic crisis.

Without further ado, here are our three Pinworthy Mentions for our It's Gelli Time Challenge.

What a delightful and colorful book Titbelsoeur created using many techniques with her Gel Plate for her cover and several of the pages!

#2  Karen

Karen created a beautiful blue Gel Plate background for her lovely silhouette stampings!

#3  Christine

We all loved Christine's sweet little robin perched on a log with her beautiful background of Gel Plate print and stampings.


I will be sending you your Pinworthy badge to display on your blogs shortly and we will be pinning your fabulous entries to the A Vintage Journey Pinworthies board on Pinterest.

There is still plenty of time to enter our current challenge which is Beautiful Blooms. You can find all the details here along with some fabulous inspiration from the Creative Guides.

As always thank you for joining us in our challenge and we look forward to seeing what you create this month!

Julia and all the Creative Guides  xx

Friday 1 May 2020

Beautiful Blooms

Hello and welcome!

Jennie (Live The Dream) here with a brand new challenge theme and what better way to celebrate the 1st of May than to share with you our Beautiful Blooms. 

Flowers are a perennial favourite for most of us, so this month we would love to see your beautiful blooms showcased on your project. You might choose to use a die cut, stamps, readymade, homemade or pressed flowers ..... a single flower or a whole bouquet. Just remember to create your project in one of our preferred styles: vintage, shabby, mixed media, art journalling, industrial, timeworn or steampunk.

 As usual the Creative Guides have some fabulous inspirational ideas to spark your floral creativity so ....... get your blooms on! and join us in our challenge.

__________________________


As you all know I LoVE making flowers so when I return later in the month (15th) I will share a tutorial with you as to how I made these blooms. I hope you will still join me over on my blog today as I have some close up photographs to whet your appetite!


I decided to go for the shabby look for this month's challenge and created a little folder that holds a concertina booklet with three little journals inside. For a tutorial and a closer look, please come and visit me


The centrepiece for my tag for Jennie's lovely challenge are some real lavender stems.  To see more close-ups and to find out how I created the meadow setting for them (and altered the stems themselves, hopefully to preserve them for longer) do come and visit me at Words and Pictures.


It is so nice to receive a lovely card for no reason at all so I am paying it forward.  I have received some very nice cards from friends during our "stay at home" time so will send this one off soon.  If you would like to see more information on my card please join me over at my blog here.


During this quarantine time, I'm obsessed to create tags! For this challenge I decided to use a fabulous floral stencil by Tim Holtz matched with Crackle and Embossing Glaze. Visit my blog Yayascrap & more if you want to see the whole tutorial!


For Jennie's fabulous challenge this month, I've returned to my beloved Tim Holtz, Tattered Florals die. It's my all time favourite die for making flowers, in almost any material! Hop over to my blog if  you'd like to see how I altered this canvas bag and embellished it with home made felt 'beautiful blooms'.
____________________

We hope you will join us at A Vintage Journey this month and share your projects showcasing your blooms. As always we will be selecting some of our favourites as Pinworthies to go on our Vintage Journey pinboards over on Pinterest.

Thank you so much for stopping by today.
Happy crafting and stay safe.

Jennie and the Creative Guides x

You are invited to the Inlinkz link party!
Click here to enter