This is a unique challenge blog where we are inspired by and focus on the Vintage; shabby; mixed-media; art journaling; industrial, timeworn and steampunk genres and encompass the talent, flair, expertise and ideas of many artists that we are inspired by. We welcome all types of projects - cards, journaling, assemblage, layouts, albums, atcs, altered art in fact whatever you want to share (as long as it is in good taste).

Monday 28 December 2015

Destination Inspiration - December - Terminal #4

Hello all, Alison here from Words and Pictures.  I hope you've all been enjoying a peaceful and prosperous festive season.  This is my favourite time, I think - the quiet period once the major work is done, and you have the 12 Days until 6th January to rest, read, recuperate and enjoy peace and candlelight.  Not too much rest though... there's always inspiration to play, and I've arrived at Terminal 4 of Destination Inspiration this week.

I've unpacked my travel bag to see what I could make with what's inside.  As usual with the final destination of the month, you can see what all the Creative Guides have done with the contents of the luggage at the end of this post, but here's a reminder of just what was in there:

Substrate - ATC
Colour - Festive Berries
Technique - Extreme Masking (Compendium of Curiosities I, p.61)
Product - Remnant Rubs

I have to confess I was panicking slightly at the notion of Festive Berries - those who know me will know that red is not a shade which appears very often round my way.  But once I'd come up with the notion that I could use the Festive Berries for actual festive berries, I felt a bit better!
So here's what arrived on the craft table.


I love working with ATCs, and I suddenly had the brainwave of trying to work with one of Tim's punches as my mask.  I figured the little bird would be the right sort of size to work with for an ATC.


I punched a couple of them, so that they could have a little conversation.  It wasn't the easiest thing in the world holding them down to ink around them, but it was do-able.  It's Ground Espresso at the bottom, and the sky shades from Stormy Sky up to Chipped Sapphire at the top.  (I was working on a plain manila tag at this point, but always thinking of the size the ATC would end up.)


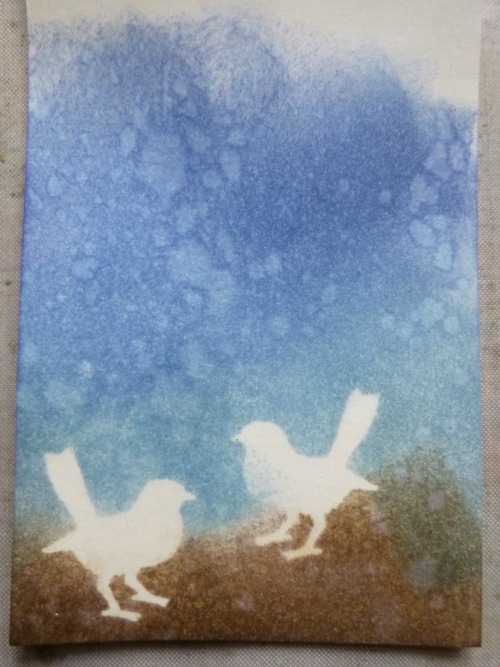
Same tricky process for the stamping - those birds are small and, because I'd punched them out of book pages (first thing to hand, not really thinking ahead), a little fragile too.  But not so fragile that I wasn't able to save the masks to use on another project (as those of you who've seen my Snowflake ATC will know!).


I stamped the starry snowflakes from Tim's Christmas Magic set in Picket Fence Distress Stain, and for the reverse masking, I thought the birds really ought to be musical, so I stamped some tiny music notation in Pumice Stone.  I love that one of the birds has ended up accidentally wearing a little starry crown!  


I then used the gorgeous pine needles from the Winter Sketchbook set to create some plant texture below and around the birds.  The pine needles are stamped in Ground Espresso, and you can see where the Distress Paint snowflakes have resisted the Distress Ink needles.


I decided that as well as berries, I could probably deal with using Festive Berries to create a couple of Robin Redbreasts too.  I applied the Distress Stain with a water brush, adding a touch of Vintage Photo for shading, and trying to get quite a loose, painterly look.  (In the long run, I decided the ink wasn't quite holding its own against the bold colour of the berries, so I added some paint over the top too.)


Ah yes, the berries... they're on one of the fabulous Calico Craft Parts - a spray of holly which I've painted with Ground Espresso Distress Paint so that it would tie in tonally.  Then it was time for the vivid berries.  Although I have the ink, I don't have Festive Berries Distress Paint, but I found that the PaperArtsy Fresco paint in Cherry is an almost dead ringer in terms of colour, so I used that, applied quite thickly to get nice rounded berries.  And that's the paint I used to brighten the robins too.


I almost forgot the final requirement - my Remnant Rubs were hidden at the bottom of the bag! - but just in time I realised I needed to add a little transfer somewhere.  The gorgeous white December text seemed perfect for my wintry little ATC.


As you may be able to see, I mounted it on one of the nice thick Calico Craft Parts ATC blanks - love how this gives it substance.

______________________________________________

So, as promised, here's the full selection of what the Creative Guides have been making on their travels this month.


Terminal #4 Alison


I hope you've enjoyed travelling as much as we have this month.  You've got just a few days left to join in with Annie's lovely Vintage Christmas challenge, and with a prize voucher from Country View Crafts and the honour of being one of our Pinworthies all at stake, we hope you'll come and play along.  But do keep celebrating your own Twelve Days of Christmas too!

Alison xx

Friday 25 December 2015

A Vintage Merry Christmas

I am so pleased that we welcome you on this very special day to say -

(photo courtesy of Carpe Diem Designs)

FROM
All the Creative Guides.

We are also here to welcome a very special guest who is well known in blogland and I will hand straight over to her to to introduce herself and show us a very lovely project, perfect for the day.

*********************************


It is so wonderful to be here at A Vintage Journey on Christmas Day!

I am so pleased to be able to join in with Annie's challenge that was a total dream to do!...I am so happy to be here, I can't wait to show you what I made for you!

....but first let me introduce myself...

My name is Laura and I have a passion for crafts. I have always been creative and I do a lot of crafts.
I love Scrapbooking, crafting with stamps and inks, I paint - watercolour, acrylic, fabric and glass. I love to draw. I do crochet, knitting, woodwork, pyrography, candle making, servietten technique, sewing, cross stitch, tapestry. I love doing patchwork, pottery and cake decorating. I love making dolls house miniatures...the list goes on and on. 

I really love the 'how to' part of crafting...Can I do this?...how would I make that?...Would that work? - That to me is the magic of crafts.


Today I would like to show you my Vintage Christmas decoration


  No inks or paints?....no stamps or stencils?....or diecuts?.....

No, this was a project that began with a printed sheet of photos, some cotton material and some Decoart Matte Medium. The tools used were a paintbrush and a brayer. Minimalist equipment for sure!

As this was being made for A Vintage Journey it had to be inspired by Tim Holtz. Like all crafters here I love the work he does and the items he uses, but for me one thing that stands out is the vintage photos and images he uses in his work. I really love to get the photobooth sets out for projects and the Found Relatives set is one of my most treasured craft items. In fact I like them so much they can be hard to use because I want to keep them!

So for this project I decided to focus on photographs - I hunted the internet for Vintage Christmas Photographs and I tried to select ones that were in the style of the photographs that Tim uses. I also found some quotes and added them....


Image transfer is a well known technique, but I will explain how I did it. You can use any image for image transfer - some work better than others. I find that laser printed images work really well.  Ink-jet prints, while the image does come out, are usually slightly blurred. The quality of the image is also affected by what you are transferring it onto...it is great to experiment and see what effects you get with different textured surfaces...as you will see later the cotton material had a fortunate/unfortunate (depending on your view) reaction to being roughly handled.

I set the photographs up to print using paintshop. I also took this time to check brightness and contrast. I wanted a variety of tones, so if some photos had a slight colour I left this as it was because I always love it when Tim Holtz tints B&W photos.  All photos with any lettering were reversed before printing so they would be the right way round on the finished transfer. I added the images and arranged them into a collage style format. To save ink waste I formed the pictures into a rough boot shape as I knew not all the paper would be used.

I applied a generous layer of Matte Medium to the cotton material. It is important that when the image is applied it should have a good contact with the glue and material. Make sure all areas have a decent covering of glue. If parts peel back too easily reapply the glue and stick down again. The sheet of paper needs to be burnished to ensure the paper is really pressed into the glue. A good way to do this is to use a brayer. Brayer it for about a minute...going over and over it in different directions...

Leave the image to dry for at least 12 hours before trying to remove the paper! It will be touch dry quite quickly, but leave it alone! Don't be tempted to remove the paper before this time otherwise this happens....


Yes, I was a bit to eager...Image transfer requires patience. As you can see the image is barely there - a little too rustic I think!

This version worked better - It was left overnight to dry and I worked slowly removing the paper. I would damp the surface down with a sponge and gently rub away the paper...then leave it to dry and re-apply the water and taking more paper off.

It may take several attempts to remove all the paper. Here you can see I thought all the paper was gone, but when the image dried you can see clouds of white paper still covering the image. It took about five goes before all the paper was removed.

Now it is all done! And the image is crystal clear...


 I cut out a template for the Christmas stocking.


I cut out another stocking shape from plain cotton


Now there are the two pieces of the stockings ready for sewing


I turned the tops of the stockings over and ironed them flat which makes it easier to sew. The stitches here don't have to be perfect as they will be hidden by the lace


I cut two strips of crochet lace and glued them to the top of the stockings


When the glue had dried I joined both stockings together (images on the inside) and hand stitched around the edge to hold them in place


Then I machine stitched around the stocking


And turned the stocking the right way round and hey presto - A photograph decorated stocking! Now just to add some final vintage decoration...


....and here it is!


Sadly, despite all my best efforts to have a pristine, clear image transfer - some of the image rubbed off slightly during the struggle to turn the stocking the right way. The matte medium doesn't leave the cotton very pliable and it isn't easy to work with - but Tim always says "Embrace imperfection"..and while the images are no longer 'perfect' they do have that lovely rustic shabby chic look...which can actually be hard to recreate....happy accidents!

It certainly was worth the effort and will be a lovely vintage element to our Christmas decorations this year!


I cut holly and embroidered leaves out of material and used a burgundy button and a twine bow as part of the stocking decoration


Here I used a strip of tartan material and lace along with more holly and twine.


Thank you so much to the Vintage Journey team for having me here....It is so lovely to be sharing Christmas Day with all of you! I have really enjoyed making this and I hope my Vintage Photograph Decoration adds some inspiration to your current challenge.

Wishing you all the very best for a very happy New Year in 2016!

Happy Crafting
Laura
xxxxxxxx


*****************************

A huge thank you to Laura for creating this perfect decoration for today and I am sure Santa filled it with lots of goodies. From all of us Laura have a very Merry Christmas and a happy New Year.

Wishing you all peace and happiness for Christmas 2015.

huge hugs Brenda and the Creative Guides.
xxx


Monday 21 December 2015

Destination Inspiration - December - Terminal 3

Hello everyone, Nikki here to share our third stop on our journey this month. I think our travel bag this month has been a challenge - certainly for me! This is what we are playing with:

1. Product - Remnant Rubs
2. Technique - Extreme Masking (Compendium of Curiosities I, page 61)
3. Colour - Festive Berries
4. Substrate - ATC

All fabulous elements, but a challenge to put them all together... here is what I came up with.
 
I started by planning what I was going to do. I cut a piece of card to ATC size and then played around with the stacked stars bigz die to get the right configuration. As I wanted to use both the positive and negative of the masking sheet I didn't want too many pieces.  
 Once I was happy I replicated my design - cutting the same format from a masking sheet - as you can see I taped down the small pieces so I didn't lose them!
I then took some card and cut my ATC. I placed the first part of the mask on the card so that I was inking the stars shapes. I used antique linen for this.
 Keeping the mask in place I added some little stars.
 I then removed my mask to reveal progress to date!
Now I added the other parts of the masking sheet - so covering the stars but revealing the rest of the card. (This wasn't easy and you can see the imperfections if you look closely!)
 I inked with Festive Berries - and then spritzed with some water.
Once dry I carefully created a halo around my stars with a little hickory smoke DI using a tiny piece of cut and dry foam.
 I removed my mask and added some remnant rubs to complete my ATC! 
As the greeting on my ATC says - may I wish you all a wonderful Christmas.
xxx

Friday 18 December 2015

Pinworthy Inspiration Day and Give-Away winner

Welcome to the monthly post where we welcome back our Pinworthies from a previous challenge as Guest Designers. Today we are pleased to have Kerstin and Sara Emily who are here to share a project on our current theme - A Vintage Christmas. Let's see their fabulous creations:

Sara Emily

Hello everybody! It's Sara Emily here, and I'm very honored to be invited to be guest designer today at A Vintage Journey. The Creative Guides have been a huge inspiration to me. I live on the south east coast of the United States with my husband, 17 year old twins, and my kitties. I have been crafting in some way or another practically all my life. I love to try different styles, but my real love is Vintage Grunge, and I love to do a bit of up cycling with my estate and yard sale finds!
I was so excited to learn Annie's theme is Vintage Christmas! When looking for Tim inspiration, I didn't have to look far...in fact I didn't find it, it found me! When reaching for something from my shelf, one of Tim's Assemblage clocks fell to the floor. Since I made one for my family last Christmas, I thought I might as well start (another) collection!
My winter theme centered around Tim's Woodlands dies, his Woodlands tree and two little deer I picked up at a yard sale. You can see the one little guy is missing an ear. I'm OK with that...we're not all perfect! Tim reminds us to "Embrace Imperfection"! Below is an in-process shot I used because I could get a good look at the interior. In addition to his Woodlands dies and tree, I used Distress Paints, and one of Tim's Merry Christmas stamps, Frantage, and sparkly flakes for my scene.
I used Tim's Tattered Poinsettia, Festive Greenery, Tattered Pinecone and Handwritten Holidays dies, his poinsettia Texture Fade, Distress and other glittery products to make this festive clock topper.
Gesso, crackle paste, Distress paints and inks, Glamour Dust, and sparkly flakes give the exterior of my Assemblage clock a snowy look. 
If you would like to see more photos and details of this clock please visit me at my blog, sarascloset. I would like to thank the amazingly talented Creative Guides for inviting me to join them today! 
Merry Christmas!

---------------------------------------------------------------------

Kerstin

Welcome everyone! It's an honour again to be invited here and I'm very happy about this.

My name is Kerstin-Inga Peters, aka Kerstin F. and I have been creating for many years now, always in search of new techniques and yet unexplored territory in craft  land. I'm a modern girl with a big vintage heart and love the things that are old and nobody wants anymore, because they have a history. My big passion are colours and textures. With Scrap-booking, Mixed Media Style and Art Journaling I have found 'my' perfect favourite genre - as it combines words and pictures, thoughts and feelings, and the application of various innovative techniques and the idea of telling stories.
This month the challenge theme is Vintage Christmas which was really perfect for me, because I love the romantic old Christmas and winter impressions.

I decided to make an ATB with nostalgic images, crackle and snow effects.
Joy to you this Christmas!

I used the beautiful crackle distress paint colors in brown and white. I must say I love this one-step crackle paint, it will truly change the way you distress your projects. It gives really magic effects!
And the wonderful distress colors, they are not pushy and too colorful, but they give your project
an amazing altered vintage look. If you'd like to see more photos and further details please have a look on my blog.
I hope you like my little inspiration for this beautiful month theme!

Thank you very much and Happy crafting!!
Kerstin

-------------------------------------------------

Thank you ladies for your wonderful creations.

Our current challenge - A Vintage Christmas - runs until the end of December, so please do join in.
Did you see our special post last Sunday? The creative guides took part in a Secret Santa gift exchange - do take a look if you missed it.

Before we finish it's Brenda here hijacking the Pinworthy day to announce the winner of our Wendy Vecchi give away ..............

Drum roll please .............

..... and the winner is -

Mamablitger aka Monica

Congratulations Monica please contact me with your address and I will get the prize out to you as soonas possible.
brenda_brown25@hotmail.com

We will be back on Monday with the next stop in December's Destination Inspiration.
Have a great weekend

Nikki, Brenda and the AVJ Creative Guides
xxx