This is a unique challenge blog where we are inspired by and focus on the Vintage; shabby; mixed-media; art journaling; industrial, timeworn and steampunk genres and encompass the talent, flair, expertise and ideas of many artists that we are inspired by. We welcome all types of projects - cards, journaling, assemblage, layouts, albums, atcs, altered art in fact whatever you want to share (as long as it is in good taste).

Monday 31 March 2014

Creative Guide Guest for challenge #2

Today we have our second guest to ‘A Vintage Journey’ and we are so pleased to welcome a lovely lady who is constantly travelling the country for her TV appearances and teaching her workshops. I am very pleased and proud to introduce -

Hels Sheridan from Ink on my Fingers
Hels Profile Pic March 14
Hels has been crafting in one form or another since she was a little girl when she used to cover herself, her Grandma and every available surface with glitter and cotton wool. She really got bitten by the paper crafting bug back in 2003 when she took up card making and scrapbooking. A chance meeting with Tim Holtz in 2007 made Hels realise that her true passion lays with anything inky and stampy. She created her blog, the aptly named Ink On My Fingers (pinkleart.blogspot.co.uk) in September 2007, where she shares snippets from her daily life along with tips, techniques, tutorials and artwork. Hels is a Train Driver by profession but sadly had to retire due to ill health in 2009. She candidly says that the only things that kept her sane during those first dark months are her husband Graham, her cat Alfie and her love of crafting. Since then she has been published in several craft magazines and is currently on the Craft Stamper Design Team. Hels is a Certified Ranger Educator and travels the country teaching workshops and in-shop demo days and she is also a member of the 2014 Darkroom Door Design Team. You can also see Hels demonstrating for Creative Expressions on Create & Craft TV. Hels has brought her art and passion for crafting to Create & Craft with her favourite products: Tim Holtz Signature lines, Ranger Ink, the wonderful Studio 490 range and paint and the Ranger Melting Pot.
 
Vintage Journey - Shadow Box 01
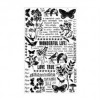
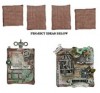
I am so honoured to be invited to be a Guest Designer for A Vintage Journey. I have been having so much fun making my contribution that what started out as a 6” x 6” card soon metamorphosed into an 8” Shadow Box! It is so easy to just let the ideas flow when I am working with my favourite products: Distress Inks feature in the majority of the creations I make and this one is no different. I already had in mind the words I wanted to focus on for my design, so with those in mind, I designed around those.
Vintage Journey - Shadow Box 02
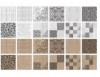
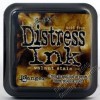
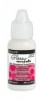
Starting out with a piece of 6” square paper from Tim’s Crowded Attic collection, I used the Wrinkle Free Distress technique to add a little colour over the top of the neutral paper, using Broken China and Frayed Burlap for the inks. Once I had dried this, I added some Remnant Rubs to the paper and then inked around the edges with Broken China and Walnut Stain Distress Ink and also over the Rubs so they give a slight resist effect.
Vintage Journey - Shadow Box 03
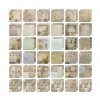
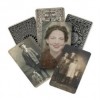
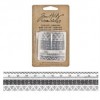
Next I took a couple of the new Found Relatives cards and used my sewing machine to roughly stitch detail around the edges, using an Edge Trimmer to scruff the edges and then inking these with Walnut Stain. It was at this point I realised that my idea was a lot bigger than the size I had intended so I grabbed a plain wooden shadow box and painted it with Pitch Black Dabber, once dried I used my sanding block and took a lot of the paint off. This gives a perfect surface to add Walnut Stain Distress Ink to, so it looks a bit old and battered. Adding to the shabby look, I used my Texture Hammer and bashed the edges of the box to grunge them up a bit.
Vintage Journey - Shadow Box 04
I die cut Tattered Florals from some plain cream card and inked them with Broken China and Frayed Burlap Distress Ink, over stamping with Frayed Burlap and a large background from Papillon, making the flowers into shabby roses. The die cut leaves are from the new Garden Greens die – again cream card, this time inked with Forest Moss Distress Ink and then I shaped the leaves to add a little dimension.
Vintage Journey - Shadow Box 05
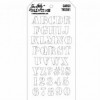
A folded Journal Ticket with a few more Remnant Rubs and Distress Inks was added to the side of the photo layers for a little more detail – and I also wanted somewhere to put my first word which is Destination. My next word was added to a little paper ruler I made up, of course, I had to use Art... is it what my whole life seems to be about! The final word is Journey and this is provided on a Philosophy Tag. I added various bits and bobs of Idea-ology to the shadow box and decided to stop! That is half my problem, I never know when to stop with the embellies!
Vintage Journey - Shadow Box 06
I hope you like my creation – thank you ever so much to the lovely folks here at Vintage Journey for inviting me to be a guest on your amazingly talented team.
TTFN
Hels x

To find out more details about Hel’s wonderful project please pop over to her blog.

Thanks Hels this is a fabulous vintage creation which perfectly shows your amazing style. I hope you will join us again sometime in the future and share more of your gorgeous work.


There are still five more days for you to enter our second challenge ‘Say it with Words’ which is hosted by Alison (Butterfly). We already have the most amazing collection of projects entered and look forward to seeing yours. Remember you don’t have to use Tim’s products to be able to enter but we do want to see how your entry has been inspired by him, that might be  a technique he has taught us, a project he has done which you are using for inspiration or a colour palette he has used. Do tell us in your post what it is that has inspired you.

I am making another plea to ask that you please turn off comment verification if you would like one of us to leave a comment on your project. Writing in numbers/words takes time and can often be keyed in incorrectly preventing us from moving quickly through the projects so that we can get round everyone. Lets face it we would like to be creating and making too rather than filling in little boxes. On my own blog I have Comment Location set to ‘Pop Up window’, Who Can Comment is set to Registered Users and I do not have word verification on; I have set comment moderation to ‘sometimes’ – For posts older than 5 days. With these settings I rarely get any spam. Hope this helps you to re-set yours if you need to.

Have a great week ahead.

hugs Brenda xx


Friday 28 March 2014

Our latest Challenge Winner

 
In fact our first ever challenge winner at A Vintage Journey.
 
The second Friday in our fortnightly calendar is when we announce the Creative Guides’ chosen winner of the previous challenge and today it is with great pleasure to announce that this is …..


Nicola

This entry had us all feeling well prepared for the journey with these amazing suitcases in which to pack our goodies.
Strapped and tagged we are ready to go. 
What an inspirational idea let alone a fantastic project.These are the epitome of a stack of old cases you can see on the station of any train museum and have been cleverly altered both inside and out. If you haven’t had the chance to see Nicola’s post then I do urge you to go and check it out as there are loads more photos and a great process step by step for you to read.

Thanks Nicola for creating and sharing these wonderful cases with us for our first challenge and congratulations on being the first Traveller to gain the Winner’s badge. You will soon receive notification of your prize which is a £10 voucher to spend in-store at Country View Crafts.
 
Thank you also to everyone else who joined us on this first stage of our Vintage Journey, we so loved looking through all your amazing projects and I have to say you made it so very difficult for us to whittle down all of them to just one, but we got there in the end.
 
Don’t forget we are already half way through the second challenge where the lovely Alison is challenging you all to use words in your projects, but please read the Travelling Instructions as we found several people had eliminated themselves from the chance to win the prize as they hadn’t read the instructions and followed them. We will check they have been followed to ensure fairness to all those who have read them and do comply.
 
Have a wonderful weekend and we look forward to catching up with you again on Monday.
 
hugs Brenda and the AVJ team
xxxxx
 
A winner is someone who recognizes his God-given talents, works his tail off to develop them into skills, and uses these skills to accomplish his goals.
Larry Bird


Monday 24 March 2014

Destination Inspiration – Gelli Distress

Hi everyone and welcome to our Destination Inspiration post where we provide you with a variety of ‘articles’ to inspire, motivate, provoke your thinking and enrich your creative experiences or, as in my case today, show you experiments to see what can be created with just a short ‘play time’ (well I think it was about two and a half hours). 

A few weeks ago I taught a beginners class making mono prints by using the gelli plate. We had great fun using acrylic paints and using a variety of tools and mark making supplies to see what we could create. The morning ended with us trying out what we had learned with distress inks. So this gave me the idea to have another session at home and show you my experiments.

Here’s my starting point.

P1160580

P1160578

I collected together everything I thought I would need (but still had to pop off and get other bits during the session – but I guess that’s because our brains will go off in different directions).

P1160581

Trying to keep things fairly simple I thought I would keep to a routine of media on gelli plate and here we have got weathered wood, rusty hinge and dried marigold distress inks (DI), dabbed on directly using the ink pads and then rollered over.

P1160583

Press in something to create texture (and remember don’t use anything sharp as it will leave a lasting impression on your plate that you won’t be able to get rid of).

Place paper/substrate over (I used cheap copy paper for these experiments) and I rubbed with my hands to take the first generation mono print.

P1160584

I always roller off the inks/paints etc. onto another piece of paper and used these in the printing process.
So we have achieved a simple print.

P1160586

Next I added textured ribbons, DIY dry wall tape and punchinella on the inked plate and placed a sheet of paper over all of it and rubbed …..

P1160587

…. but what it produced was far to regimented for me and not what I was looking for.

P1160590

However for the next print (when I had removed all the ribbons etc.) I used the previous mono print to add another layer to it and I began to see possibilities.

P1160592

I played with other things to create texture like crumpled paper …….

P1160594

……. and bottle tops with peacock feathers and shabby shutters distress inks. You can see the potential for great journal pages here.

P1160618

I started to play with masks pulling a print over the top of the mask (using one of the new ones that has not long been released)  ….

P1160619

…… then the mono print after the mask had revealed what was underneath and I began to envisage these with DIs blended through other masks over the top.

P1160621

This is the latticework mask used with tumbled glass and pumice stone – again the print taken over the mask ….

P1160622

…. and mask removed.

P1160623

I learned a lesson here, I kept the mask up the right way only to find the numbers ended up the wrong way when I had finished.

P1160624

So I had to do it again and flipped the mask over  (I am lucky to have two of the ruler masks, I had bought one last year and then got given one on the Tim Holtz retailer training I did last year – so lucky).

P1160625

This was printed over a rollered piece of paper.

P1160628

P1160629

I also dallied awhile playing with distress stains, but they proved to be too watery really.
Back to distress inks -

P1160611

I rollered the background with distress inks, placed the mask over and then added some walnut stain distress stain through the honeycomb and pulled a print.

P1160612

Before I removed the mask I dabbed walnut stain DI pad over the honeycomb and took another print, this time I used walnut stain and rusty hinge together.

P1160613

Now I removed the mask and laid over the rollered off paper …..

P1160614

…. and finally I placed the inky mask over a previous experiment so you have two layers of masks showing.

I decided to have a play with distress paints too, I had been playing for a while, not wiping the paint off between prints and decided to just roller antique linen over the plate which still had lots of bits of colour on (sorry no photo, got carried away with what I was doing) -

P1160607

Here the print was pulled through the mask and the greeny colours have been pulled from previous layers ….

P1160608

and here the mask was removed and the mono print taken which pulled some greens and rusty hinge DPs.

P1160610

One last painty print where I had been playing with the splatter mask and used rusty hinge DP, I just rollered the back of the inky mask onto paper and for the second layered print I used broken china and evergreen bough DPs with the cargo, honeycomb and bubble masks imprinted into it.

When I thought I had finished for the day I found I had three rollered backgrounds I could use so I grabbed the latticework mask -

P1160605

Here the background is evergreen bough and antique linen rollered off then mowed lawn and pine needles distress ink pads pressed over the mask -

P1160602

There was still enough ink left on the gelli plate so I laid another piece of paper over and got a much lighter second generation print over an iced spruce background.

P1160604

Lastly I pressed the same green pads over once again and laid a piece of spare paper that had been rollered off and had stamping over it too. You see I just can’t stop can I?????


Some of these pieces I like just as they are but others I can see being used with blended inks and masks. Next time I am going to go directly onto card so I can die cut my tags and create immediate backgrounds.
I am still something of a beginner myself to the gelli plate but I had great fun, I hope I have inspired you to play with the distress products and see what you can create too.

Thanks for reading right through to the end.

hugs {brenda} x0x

Friday 21 March 2014

Challenge 2 - Say It With Words

Hi everyone, Alison (butterfly) from Words and Pictures here, and I'm thrilled to be hosting the second challenge on this Vintage Journey.

No surprises with the theme I've chosen...
I'd like you to let the words take centre stage.

Tim Holtz makes it so easy to "say it with words".
You could use one of the many fantastic sentiment stamps, or ChitChat stickers, AlphaParts, Grungeboard lettering (either pre-cut, or using the fabulous WordPlay die), or any of the other word/alphabet stamps, papers or dies you can think of, or all of them together!
Whatever you pick, let the words be at the heart of your project.

And here's what the team have come up with to inspire you...


Alison


Words have always been central to my life (work and play).  I love them for their meanings, their sounds and also for how decorative they can be.  So there's decorative script stamping here, a sentiment which means a great deal to me, and the three large AlphaParts words on the tags which are there for their meanings, but also want to be said out loud!


I was so inspired by Alison's "Words" theme.  Words are so powerful and I particularly love so many of Tim's positive and encouraging sentiments from his stamp sets.  I have created this inspirational mini book from three manila folders.  Every page has been transformed by various papers, distress inks and paints, stamps, die cuts, tissue tapes, alpha parts, stickers and lots of techniques to encourage you to try something new and different. Vintage through and through, this mini album is made with love from me to you!


Chris


 'Words' is such a fab theme for a challenge and we all know that between Tim's stamps, Paperie, Idea-olgy etc we have a wealth of products and options to draw from!  For my triptych I decided to focus primarily on using his word stamps, dies and paints with some script backgrounds and 'zipper pull' wordy accoutrements!  There's lots of blending and distressing on his journey.


Astrid


I loved the theme of "Words" and as there is nothing that I like better than making little books I decided to make one to have lots of space for quotes and sayings. I followed Tim's tutorial on making a W book and used some of the wonderful new papers, and of course I used stamps, inks and lots of ideaology bits and pieces and collaged to my heart's content. There are even some little pockets for tags.


Jennie


I also love making little books and I thought this would be the perfect theme for showcasing the many stamp quotes and sayings I seem to have collected lately.  I made this little book from a single sheet of 12 x 12 paper following Tim's tutorial for his Valentine's book.  I used up a lot of scraps and inked tags to decorate it - inside and out and finished the front with Tattered Pinecone Flower.  The link to Tim's tutorial is on my blog along with lots more pictures.


Brenda


I have made a card today and used the wonderful Wallflower Stash as my main background, I have added the sentiment stamped onto kraft which has been inked, masked and stamped before given a coat of gloss matte medium. Can you spot an additional little feather? Guess where that came from? There are so many of Tim's 'words' that you can use for this challenge, I hope you will travel this stage of the journey with us.


Terry


I decided my word would be "Love" as there can never be enough of that to go around! The sentiment is from my new "Nature Walk" stamps and I also had an inky play with my new "Lattice" stencil and some new embellishments. The arch frame is painted with Distress Metallic paint and distress and a light sanding, don't want to remove all that metallic.


Anne


For Alison's wonderful 'Say it with words' challenge I wanted to make an extended tag to incorporate my enjoy the journey die and my umbrella man die, both of which are new.  I used Distress Stains for the background  and then used Tim's new Speckles stencil and some stamping to create some interest. 


Well I decided to choose lots of words that mean something to me on my journey. I couldn't resist making a matchbox using my new die and created a little mini book of words to fit inside.I used lots of the ephemera packs and lots of chit chat stickers for my little words book. It may be small but it is packed of Tim inspired goodness!


Hi Everyone.  I am sharing a 10" by 12" canvas board, which incorporates many Tim Holtz products.
I was inspired by Alison's 'Words' theme and my newly purchased Idea-ology 'Found Relatives' to create a nostalgic piece.  As usual I had no particular idea/layout in mind, but had great fun making it.  The background was created using Tissue Tape, Distress Paints, Distress Inks and texture paste through some TH stencils.
The letters are mainly from some TH 12" by 12" papers that I have had in my stash for a long long time, you can also see some of Tim's Alpha tiles, which give that variation in size. 

__________________________


I think you'll agree they're amazing projects, and I hope they'll inspire you to play along this fortnight.  Please read the Travelling Instructions to check you will be eligible to win the £10 voucher from Country View Crafts.  You have until 6pm UK time on Thursday 3rd April.  

Can't wait to see what you create!

Alison xx


Monday 17 March 2014

Creative Guide Guest for challenge #1

Today we have our very first guest to ‘A Vintage Journey’ and we are so pleased to welcome someone who not only loves the vintage style but also all things Tim. I am very pleased and proud to introduce -

photo (113)

From a very early age I have always been creative, "growing up with  little money I was always looking to create something out of nothing" I can remember spending a lot of time with my grandma who taught me how to sew on her old singer sewing machine.....this was where my love of all things vintage started! (I still use the very same  sewing machine today in my work) I am a self confessed hoarder of things, stuff, junk... I have a passion for all things vintage and love to incorporate my vintage finds with my love of distress products into my work.

          I am incredibly proud to be a Certified Ranger Educator and have created projects for Ranger ink, Tim Holtz and Dyan Reaveley. My work has been published in Somerset Gallery, Craft stamper and most recently I contributed projects for Tim's new book The Compendium of Curiosities 3.  I design and create from my" Little Shabby Shed" which is my special creative place in my garden.


Kaz’s project today depicts her very vintage style and has introduced a pop of colour too.
006

008

010

I am sure you will agree that this is a fabulous project, rich in vintage style and images and beautifully designed. All of us at A Vintage Journey would like to congratulate Kaz on having some of her work published in the new Compendium of Curiosities III by Tim Holtz, what a huge achievement and one she is very proud of.

To find out more details about Kaz’s project please pop over to her blog and visit her at her little shabby shed.

Thanks Kaz I hope you will join us again sometime to share your wonderful vintage talent.


There are still five more days for you to enter our first challenge ‘Anything Tim’.
I would really recommend you read the Travelling Instructions so that you do not make your entry non-compliant and please turn off comment moderation if you would like a comment left on your project.

Have a great week everyone.

hugs Brenda xx