This is a unique challenge blog where we are inspired by and focus on the Vintage; shabby; mixed-media; art journaling; industrial, timeworn and steampunk genres and encompass the talent, flair, expertise and ideas of many artists that we are inspired by. We welcome all types of projects - cards, journaling, assemblage, layouts, albums, atcs, altered art in fact whatever you want to share (as long as it is in good taste).

Friday, 15 July 2016

Pinworthy Guest Designers

Hi everyone and welcome to our monthly guest designer post featuring designers who were our pinworthies from a previous challenge. Today we welcome Branka, Sara Emily and Maura who were chosen by the Vintage Journey team for their wonderful creations for our Spring is in the Air Challenge.
Today they have created their designs for our current theme - Monochromatic.

Welcome everyone!
Hi, I am Branka (aka Vintage Handmade) and I come from Croatia.  I am a mother of two amazing children and a wife of a wonderful husband. 
I have been crafting  since my childhood and after a lot of experimenting I fell into mixed media art and art journaling. My style is rather eclectic, trying to express myself in different styles, playing with different mediums, techniques and materials.  

I am delighted to be invited to guest design on the AVJ blog for their current challenge hosted by amazing and lovely Tracy and this is what I came up with, inspired by her awesome Monochromatic theme!
I decided to go with a vintage style and to use brown tones.  Since I adore rust I added a vintage tin baking mold rusted by using Decoart chalk finish paints in brown tones. I sprinkled some cinnamon in a few spots to achieve a more realistic rusted look.
Here is a close up of the rusted mold. Also, I stamped an image using one of my LaBlanche stamps on a piece of an old book paper, applied a coat of Tim Holtz's Distress Vintage medium and used my bees wax on top. I cut the image and glued down in the center of my rusted mold.
I like to create rich textures so I used a piece of lace on my background, some of my Distress spray stains in brown tones and then I used my Golden crackle paste and one of the Tim Holtz's stencils on top.
I also added some burlap, a piece of gauze, some lace trims and some cotton and burlap twines to create more textures. Then I used my Distress spray stains again on top of it.
That Prima metal trinket with the word Inspired is a gift from my lovely blog friend and a wonderful teamie.

I like to wave lately so I decided to create a monochromatic woven piece in brown tones. I used some small nails to attach the piece to my canvas. I like how this turned out.
I hope I have inspired you to create your monochromatic mixed media piece and to join in AVJ's wonderful challenge this month.
If you would like to see how I created my piece you can visit my blog.
Thank you AVJ for such an amazing opportunity to share my monochromatic creation here today! I am truly honored!
Happy crafting!

Maura
Hi, I'm Maura Hibbitts and I am delighted to be a guest designer here at AVJ! I recently retired from teaching science (left brain) and have jumped into the deep end of my right brain with mixed media and crafting. I have been a crafter since I was a little kid: drawing, making sculptures out of natural finds, holiday ornaments...and have been playing and creating ever since.  I love learning new techniques and playing with new materials. One of my favorite genres to work in is steampunk, which is where I headed with my project. I would love for you to stop by my blog for a visit!

Ok, now on to my project inspired by the lovely and talented Tracy and her monochromatic theme! 
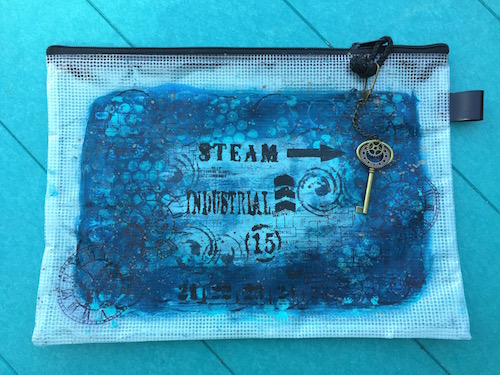
Working in one color is a personal challenge, as I love colors! How do you decide on just one? Well, I looked through my stash and found a lot of paint in the blue hues, so blue it is. It all started with a mesh art bag, and I wondered if I could personalize it in my own style?  I laid down a layer of gesso and got to work.
I have quite a collection of ordinary objects that I love to use for mark making, like bubble wrap, bottle caps, straws, corks...once you start doing this, believe me, you don't look at those little throwaways the same anymore! I spread some paint out, dipped them in and started making marks.
Usually when I start layering, I build some areas up vertically, but with a bag, I had to treat this differently in order to keep it useable. So, instead I created layers with different colors of paints, stencils, marks and stamps. I really liked how this abstract pattern turned out!
But, I have to keep this monochromatic which is easy enough with just a few more layers of blue hues, and some bubble wrap stamping. Then I went in and smudged some areas to create a more muted background for some of my steampunk stamping and stenciling and to create a focal area on the bag.
I had to add a fun charm to open my bag, and the key and gears add the right touch. If you look closely, you'll see I couldn't resist adding a bit of metallic splatters to the bag, after all in my mind steampunk needs to have some metal.
Now I have an industrial steampunk art bag in beautiful blue hues to use. 
I hope you have enjoyed my project and if you would like to see the step by step details and products I used, you can find that here
Thank you AVJ for this wonderful opportunity to share one of my creations, I am truly honored!

Hello! My name is Sara Emily, and I live on the middle eastern coast of the United States. I am married and have twins, and by the time this goes to post they will have celebrated their 18th birthday! (yikes!) I have been a crafter for a very long time.  I can't say I have a particular style, but I will try anything once! Lately, I have been bouncing back and forth between vintage grunge and shabby chic, so for today's project I chose to make a shabby monochromatic canvas. I chose shades of turquoise because it makes me feel cool on these hot summer days!
I chose a stretched 6 x 6 canvas, and began by adding my newest Tim Holtz Thinlits Mixed Media #2 die at the bottom and used the corresponding stencil with Golden Crackle paste at the top. I've been having a bit of a time with this particular (new) jar not crackling, but when I added paint and hit it with the heat gun, voila! Cracks! I think it must be the air conditioning, or perhaps I'm not holding my mouth just right! 
Many steps later, I finally got the background to look like this. Unfortunately, due to having to add gesso back on top of my paint layer, the cracks got lost!  I used Distress paint, water, alcohol and guache to achieve my end result--oh--and some gesso scraped over the Distress paint, because at first it was too bold for my liking.
I got to use my new Tammy Tutterow Shabby Posies die to make my flowers, and also some old Tim Holtz standby's--Tattered Florals and Tattered Flower Garland--for good measure. I chose a few embellishments from my stash--some of them very old--perhaps you recognize a few from your own stash if you're a hoarder like me!
If you would like to see close ups and a few step by step photos, please drop by my blog. I hope you will be inspired to link up with Tracy's awesome "Monochromatic" challenge this month.  I would like to thank Nikki and all of the Creative Guides for inviting me to join them as Guest Designer today! You ladies rock!
Hugs and Blessings! Sara Emily

--------------------------------------------------

What a stunning set of projects! Thank you all so much for creating these for us. I hope this inspires you to try a little monochromatic crafting too - do join us for our current challenge which runs until August 4th.

Nikki and the AVJ Creative Guides
xxx


Monday, 11 July 2016

Destination Inspiration July : Arriving at Terminal 2

Hello Everyone! Jennie here as your host welcoming you at Terminal 2.  We have some great products and techniques in our travel bag this month and just to remind you here they are:

Product : Ephemera Collage Elements
Technique : Use a Brayer
Colour : Teal or Turquoise
Substrate : Card

What a delightful collection in the bag this month! 


And this is what I was inspired to do with them.


I started with a piece of cardstock on which I brayered PaperArtsy Fresco Finish Paints : Space Cadet, Captain Peacock and Snowflake. I then used a little Peacock Feathers Distress Ink to create a little texture here and there with stencils (although this doesn't really show up very well) and then used these two little stamps which are fast becoming my favourites!


I love these Tim Holtz Pocket Cards and love cutting out little bits and pieces for collage.


And these were the elements I chose to use.


These were then layered on top of my brayered card.


At this stage I would normally get the sewing machine out but to my dismay I found it was buried behind all manners of hellary so I had to resort to some faux stitching!  I also added a sentiment with some label letters.


My travel bag card!

Thank you so much for joining me today here at Terminal 2 and make sure you call along next Monday where another Creative Guide will be ready to greet you at Terminal 3.

And in the meantime I hope you have time to join in with Tracy's Monochromatic Challenge, details of which can be found on the side bar.

Jennie x


Friday, 8 July 2016

Winner and Pinworthies for Texture and Embossing Pastes

Hello everyone and thank you for joining us today for our winner and pinworthies' post for the Texture and Embossing Pastes challenge last month. So many of you rose to the challenge and thank you so much also for all the amazing projects you shared with us, there is just so much talent among our followers. But, before we reveal our winners, let's first introduce you to our amazing guest who has created a stunning project for Tracey's Monochromatic challenge.  Please welcome the lovely Laura of Vive La Vi.
__________________________


Hello, dear friends! My name is Laura, LauraVi in virtual world (VI are the first two letters of my surname), I am a Primary School teacher, I live in Milan with my husband. I am so thrilled and honoured to be here as July Guest!
I have been loving with scrapbooking and Tim Holtz art since 2011. I like the ancient look of ordinary things, the objects that tell us a story, the perfect imperfection of human creativity.


Today I am sharing an Artistic Trading Block (ATB) made for a friend of mine who moved and who likes white colour, so this month "Monochromatic" theme, chosen by Tracy, seemed perfect to my project.


On each face of the bigger block there is one letter of the word HOME. It is difficult to show the sparkling background in the photos, but clear perfect pearls did a very good job!


The little block is wrapped in thin white wire. Tim Holtz Heirloom roses are on canvas flowers on top of both blocks.


I spread gesso on each letter, then I used a large layer of Distress crackle paint clear rock candy.


I love old pictures and I think this little frame with black and white photo was right for the heart that is the O of the word HOME.


Idea-ology tissue wrap covered both blocks, then they are coated with a thin layer of gesso and, when it dried, with stencil and embossing paste or with a piece of lace and mixed media thinlits dies.


Each letter has a little embellishment coloured with gesso and picket fence paint and a sparkling gem.

Thanks for taking a look at my project and to the team of A Vintage Journey for this great opportunity.

Thank you so much, Laura - what a lovely, delicate creation, and with such great texture too.

_______________________________


Next it's time for the Random Generator to select our winner, so without further ado...

That's Autumn from SewPaperPaint with her beautiful nature themed tag.  Congratulations, Autumn!  Your badge and prize will be on the way soon, and we hope you'll join us as a Guest Designer here in the coming months.

And now to our wonderful pinworthies chosen by the creative guides. I assure you it was quite a task and I wished we could have chosen you all! But here they are, in no particular order:


#50 Suman

Great work all round ladies and congratulations. Your badges will be on their way to you shortly, along with an invitation to join us as guests here at A Vintage Journey soon.

Well that is it and thank you again to all who played along. We hope you're enjoying Tracy's Monochromatic theme this month - there are already some amazing entries, and we're looking forward to seeing lots more.
Have a super and creative month!
Astrid and the whole creative team.

Monday, 4 July 2016

Destination Inspiration - Arriving at Terminal 1

All aboard at Terminal 1!  Julia Aston here for the first stop on our July Destination Inspiration Journey!  This month we have been given the following supplies in our travel bag:
#1. Product - Ephemera/collage elements
#2.  Technique - Use a brayer
#3.  Color - Teal or turquoise
#4.  Substrate - Card
I've been a little short on time the past few weeks - so I worked on my project during many stolen minutes forgetting to have my camera available in my craft room to record my fits and starts of creation. 
I also am definitely NOT best friends with my brayer, and I didn't even try to get full coverage on any surface I used it on.
Here's what I did:
I made a puddle of Cracked Pistachio Distress Paint on my craft mat, spritzed it with water, rolled my brayer through it and then brayered over:
1. the city map background which is a piece cut from Dapper/Paperstash
3.  a photo booth photo
4.  a palm tree cut from Tims's new Village Surf Shack Sizzix Die.
5.  Trimmings Lace

I colored some Mirrored Stars and an Heirloom Rose with Aqua Adirondack Alcohol Ink.
 I added a little color to the Photo Booth photo using  Spun Sugar and Cracked Pistachio Distress Markers.  You can see the brayered paint wash on the photo.
I made the best sand ever using Tim's recipe from his July 2014 tag - mixing Clear UTEE, Antique Linen and Black Soot Embossing Powders, Antique Linen Distress Glitter and Glossy Accents.  LOVE, LOVE, LOVE this realistic looking sand! 
After you mix the ingredients - you put Glossy Accents on the surface where you want the sand - then spread the sand over it and let dry!  I also added some White Art Stones from Prima for added visual interest and dimension with the sand.
 I die cut Paradise and found using Thinlits Handwritten Vacation dies and added a Small Talk sticker that I cut in half putting half at the top of the card and half at the bottom.  I stapled a piece of Trimmings Lace onto the card base - giving the suggestion of the ocean's edge.
All the pieces are popped up on foam dots.
I hope you have enjoyed your stop at Terminal 1 today and invite you to stop by the station again next Monday to see who will be creating with the contents of our travel bag at Terminal 2!
In the meantime -  please join us in our July Challenge - Monochromatic.
There's a $25 gift certificate from Funkie Junkie Boutique to be won by a random entry!
  I'm actually going to link up this card since I just realized it fits the challenge!!
 
Paper:  Black, Kraft - Papertrey Ink, White Little Sizzles Matboard - Sizzix,  Tim Holtz Paperstash/Dapper.
Accessories:  Ranger Distress Paint Cracked Pistachio, Breyer, water spritzer, Idea-ology Small Talk, Trimmings Lace, Photo Booth, Pocket Cards, Mirrored Hearts, Heirloom Rose, Fine Tip Glue Pen - SU, Adirondack Alcohol Ink Aqua, Ranger Distress Markers Spun Sugar, Cracked Pistachio, White Art Stones - Prima, Clear UTEE,  Antique Linen and Black Soot Embossing Powders - Ranger, Antique Linen Distress Glitter - Ranger, Mini Attacher - Ranger, foam dots, Thinlits Handwritten Vacation Dies, Sizzix Village Surf Shack Die.

Friday, 1 July 2016

A Vintage Journey - July Challenge - Monochromatic

Welcome to a our new challenge for July 2016. Our challenge this month is :
MONOCHROMATIC

"I love monochromatic themes in artwork; I love the balanced look it gives to a design. If you ever struggle with knowing what colours to use this should be right up your street, one colour alone or hues of one colour (plus black and/or white) - simple!"

Please just check that your entry is vintage, shabby, mixed-media, art journaling, industrial or steampunk to be in with a chance of being a winner or Pinworthy mention.

The Creative Guides have created a wide array of monochromatic projects to inspire you on your journey.

-----------------------------------------------

Addicted to Art - Monochromatic Distress tags
It has been a while since I did a bit of 'Distress'! So for this challenge I went to a craft day with friends armed only with my blue distress inks, paints, sprays and stains and created a set of tags. There are lots of different techniques which I am showing today over at Addicted to Art.
Like Tracy, I love to work in Monochrome or in limited shades, and that most often happens when I turn to the neutrals.  So here's my monochromatic handmade nature journal in shades of brown.  It's ready for all my notes and observations on the natural world, and it's full of my favourite wildflowers and grasses.  Do come over to Words and Pictures for a proper look inside.
 
I love the neutral palettes and so I played with raw umber with some titan buff and white to create my mixed media background and there's contrast and interest with black stamping and stitching. I also played a bit with the ombre technique but after lots of layers and dipping it's not quite so evident. As always the process steps and more photos are at Bumblebees and Butterflies if you can spare a moment to pop over and take a look and I hope you have a great month of July. xx
For my Monochromatic project I have drawn inspiration from a couple of paintings by the Belgian Surrealist artist Rene Magritte and created a piece of wall art using some of Tim Holtz 2016 CHA products. I have remained true to my love of the classic monochrome palette of black, white and grey /silver . Admittedly my work is more 'real' than 'surreal' but hope you will be able to stop by my blog for more details .

Monochromatic is not something I do very often, as I usually love to use lots of colour. I have been wanting to ink up my Tim Holtz Sideshow set of stamps, so I created a trio of simple black and white cards with just a touch of red on each.  If you would like to see more please visit my blog!


As Summer has now officially arrived, I decided to create an ATB in multiple shades of green to house some tag journals I made so I can journal about our holidays and adventures this summer.  I have some step by step photos on my blog, hope you can stop by to see how I made it!

 I love this theme! It's so much fun to take a colour and use it in varying shades and levels of intensity. I was slightly worried about the pop of yellow/orange on her face but hopefully there's enough orange there to qualify! If you'd like to see how I made this altered notebook, please pop over to my blog by clicking here.

 Tracy Evans
I decided to create a canvas that developed over several days. I love adding layers to my design and I adore tactile pieces which resulted in me adding many layers and an old embroidery hoop for a quirky touch. Pop by my blog to see how to create your own monochromatic hoop garden!


-----------------------------------------------

Thank you to all who joined us for our June challenge, we have all enjoyed visiting your blogs. We look forward to seeing how you are inspired with our July Monochromatic Challenge. 

Our challenge is a monthly one and a randomly chosen winner will receive a $25 gift voucher from our generous sponsor, The Funkie Junkie Boutique. We also award our Pinworthy badges to the Top 3, chosen by the Creative Guides who are subsequently invited to join us on the blog as a guest designer.

You have until Thursday 4th August 2016 to enter and we will then select our random winner who will win a $25 voucher at The Funkie Junkie Boutique and our Pinworthies who we look forward to welcoming as guest designers. You can find all the Creative Guide projects, guest designers, pinworthies and winners on our Pinterest boards.

GOOD LUCK!
Tracy Evans xx