This is a unique challenge blog where we are inspired by and focus on the Vintage; shabby; mixed-media; art journaling; industrial, timeworn and steampunk genres and encompass the talent, flair, expertise and ideas of many artists that we are inspired by. We welcome all types of projects - cards, journaling, assemblage, layouts, albums, atcs, altered art in fact whatever you want to share (as long as it is in good taste).

Friday, 8 January 2016

Vintage Christmas Winner, Pinworthies and Secret Santa Give-Away Winner

Hi everyone and welcome to our first Winner and Pinworthies post of 2016, and just to make it extra special we've got our Secret Santa Give-Away winner to announce too.

It's so nice to be able to celebrate the Winner and Pinworthies of our Vintage Christmas Challenge theme, but as always we thank all of you who joined us on the journey last month.

We had so many fabulous entries to the Vintage Christmas Challenge, incorporating some wonderful details using Tim's products and techniques to create the most amazing projects. Visiting your blog posts was a real delight for us and it really has been hard to choose our favourites.

___________________________________


So on to the Vintage Christmas Challenge Winner and Pinworthies. First of all here is our randomly chosen winner, who will receive the prize voucher from our sponsor, Country View Crafts.

  Congratulations Sara!
Such a beautiful Vintage make with those stunning colours and that Santa is one of my favourite of Tim's Christmas Stamp Sets. Gorgeous poinsettias too. We hope you will be Guest Creative Guide with us here in the future and your voucher and winner's badge will be with you very soon.

___________________________________


Now on to the Pinworthies...........which was such a hard decision for the Creative Guides to make. With so many fabulous entries it was difficult to pick our favourite three.  Here they are, in no particular order other than their # number.


#4 - Alicia of Golden Goddess Designs
We were all blown away by this wonderful project, Alicia. The details are so amazing..right down to those stunning transparencies. Thank you for sharing with us here at A Vintage Journey and Congratulations on being chosen as a Pinworthy. Your blog badge will be with you shortly.


Nicola's Vintage Christmas Decor piece is stunning with such wonderful details. I am sure you will agree her creations are amazing and its so worth visiting her blog.


The details on Autumn's Triptych card are fabulous and we loved the inside too.

______________________________________


Congratulations to our fabulous four. Badges and Invitations will be on their way to you soon.

Huge thanks to everyone who entered, your creations were amazing and inspiring to all of us here at A Vintage Journey Challenge Blog.

Great to have you on board today and I do hope you will stop by here again on Monday 11th January when one of our Creative Guides will be sharing a Destination Inspiration Travel Bag post full of inspiration and details using various products and techniques. 

There's also a new challenge theme, which kicked off on the 1st January, so I hope you will enter Brenda's fabulous Vintage Travel challenge, it's always great to have you hop on board with us.  And don't hop off just yet... 

Brenda has also drawn the Secret Santa give-away and the winner of the prize is ....

Rupa if you please email Brenda on brenda_brown25@hotmail.com with your address she will get the goodies in the post to you as soon as possible.


Have a great weekend.


Huge Hugs
Annie and the Creative Guides xxxx

Monday, 4 January 2016

Destination Inspiration - January - Terminal #1

Hi everyone and welcome aboard! It's Jenny (Pushing The Right Buttons) here to kick off the first in the Destination Inspiration series for 2016.

Hop aboard, on the first leg of the journey for January, here at Terminal 1, with a brand new line-up of essential items in our travel bags this month!

1. Product - Archival Inks
2. Technique - Stamping
3. Colour - Dusty Concord
4. Substrate - Acetate

Now that's a line up that could get you quaking in your boots eh?!!! Undeterred, I took heart from Tim Holtz' chosen theme for his 2016 12 Tags Challenge - Technique Remix. To be honest we've been revisiting his techniques since day one here at A Vintage Journey; there's no point investing in all those products and working through one tag tutorial only to abandon it completely right? So my Remix is a blend of Alcohol Ink Resist (Compendium of Curiosities Vol II, page 59) and one section of Tim's 12 Tags of 2014 - April

Bearing in mind recent celebrations, this one has a real Hogmanay feel to it! Let's get started...


First up, the tartan background. Apply a mix of Denim, Cranberry and Stonewashed (or similar) alcohol inks onto a panel of acetate (about A5 size) using a blending tool and allow them to dry.


The next bit is explained in Tim's book; I used the Plaid background with Jet Black Archival.


Trim to size and adhere to a square of plain white card using Glossy Accents (ink side down). I added lines of it along the stamped lines so it didn't matter when any showed through.


On the clean side of the acetate stamp the smaller of the Ledger Script backgrounds, again with Jet Black Archival Ink.


Now for some lucky heather. Here's where the Dusty Concord comes in... dab a generous amount of Distress Paint over black card, allowing bubbles to form/pop and leave some of the black exposed. We are going for the look of stylised 'heather' here so it needs to look a little mottled! Either allow to air dry or blast with your heat gun.


When dry, use a Spiky Floral punch to cut out five flowers, edging them with Walnut Stain Distress Ink using a blending tool.


Cut one of the flowers in half, then shape the edges of three with your Remnant Rub tool. Layer the shaped ones over the flat ones, gluing together with Glossy Accents. Set aside to dry.


Cut a couple of spiky stems from Coredinations Kraft Core card using the Holiday Greens Thinlits. Having spent many an hour die cutting this stuff I always sand mine back before die cutting to prevent tearing any leaves. When cut, edge with the Walnut Stain Distress Ink.


Now on to the 2014 April Tag element - cover a strip of Grungepaper with Broken China and Salty Ocean Distress Paints, spritz with water (to allow the paints to blend) and dry.


Sand back roughly over the dry Grungepaper to reveal the surface, then blend Vintage Photo Distress Ink over the top.


Use the Trellis Frameworks die to cut a trellis shape and glue onto the dry acetate background. I added an extra bit from a previous project. Keep all spare bits together as you can piece them together to create gorgeous collage/mosaic looks.


Now to signify the passing of time. Colour a small piece of card with Tarnished Brass Distress Stain, dry, and blend Walnut Stain Distress Ink over the top. Stamp the clock with Jet Black Archival Ink using the stamp from the Possibilities Framelits set.


Layering all these elements on with clock hands and fasteners, you'll see I've also added an Enamel Tag with Remnant Rubs over some inked Linen Ribbon. Add a coordinating colour card background border, glue onto your card blank, and hey presto you're done!


Thank you for joining me on my travels today. I hope you will come back next week to see what's on offer at Terminal #2!

Meantime a quick reminder that our current challenge 'Vintage Travel and Luggage', hosted by the one and only Brenda Brown, is up and running to the end of the month. It would be fantastic to see your creations! And if you haven't done so already, make sure you check out what my talented teamies have created to inspire you.

For now, take care of yourselves! Jenny xxx

Friday, 1 January 2016

A Vintage Happy New Year and new challenge

Here we are at the start of 2016 and wishing you all
A HAPPY NEW YEAR
which we hope will be full of love, peace and happiness plus a touch of creativity of course.

The lovely Julie originally chose this theme but it is my turn to host and to start 2016 with -

VINTAGE TRAVEL AND LUGGAGE

 " Let your imagination carry you back to the bygone eras setting off on an exciting journey for the New Year. Keeping it in Tim's style, we would love to see what item of luggage or mode of transport you would use on your journey, eg - think hand luggage, travel trunks, hat boxes, hot air balloons, ships and trains". 

The Creative Guides have had great fun with this one and are showing how diverse you can be in interpeting the theme. So without further ado let's see what they have for your inspiration.


I loved creating this easel card for Brenda's "Vintage Travel and Luggage" theme.
You can see that I have used several of Tim Holtz stamp sets and a die by Marianne........the card was for a 60th birthday celebration and after photographing was personalised. I look forward to viewing your entries x

Happy New Year............. xx


I would love to have lived in a bygone era and perhaps traveled on the original Orient Express but since the Tim Holtz stamp I used features a North American steam engine, I will have to settle for a trip I did a few years back, up the western seaboard of Canada, on one of these beautiful trains.  You can see more here on my blog.


I have had this little paper mache trunk for absolutely ages and decided that now was the time to alter it for our fabulous vintage travel challenge. I've used a lot of different techniques to create the vintage crackled look on the trunk and the grungeboard embellishments, so if you would like to know more then please join me over on my blog.


For this theme I have created a shadow box with an Andy Warhol influence - repeating imagery with varying colours. Purely an aesthetic influence however, I have lost all his cultural references. I have distressed my imagery and frame to add to the vintage feel. There is more detail today over at Addicted to Art.


For Brenda's challenge - I made a travel satchel for the lady traveling on her own to keep those special items she might need with her at all times apart from her stored trunks - to hold perhaps some change for tipping the luggage handlers, some blush for her cheeks, her ever present embroidered handkerchief and a journal to record the details of her trip!  I used two prints of Tim's Eclectic Element fabrics for my satchel and added a luggage tag decorated with Remnant Rubs, Chit Chat Stickers and a Pocket Card.  My satchel is reversible with 6 pockets on one of the sides.
If  you would like to see the details of my travel satchel including the reversible side with pockets, please stop by my blog!


Christmas cards completed for another year, and now it's already time to start on creating another year's worth of birthday cards for family and friends. Travel is always a great theme for male cards and for this one I was inspired by the adventures of UK astronaut Tim Peake, now circling above us in the International Space Station. It took a bit of messing around with Distress Paints and other stuff to get a real vintage look into space; find out more about it on my blog.


What a perfect theme for this challenge as we are planning a big trip later this year.  I made this travel notebook, using lots if Tim goodies, for keeping all those important things such as tickets, photos and small keepsakes. It is filled with pockets to keep everything in one place while traveling and once we return home.  Hope you will stop by my blog My "Crafty" Life on the Internet to see all the details.


Brenda


For me one of the essential items that this lovely lady would pack for her journey would be a diary in which to note down where she visits and to collect small items and photos to stick in as a memento of her trip. I used the folded note book technique using one 12 x 12 sheet of Tim's paper to make the mini book and added some stamped items and small tags in pockets so there is plenty of room on which to write and stick.


Thank you to everyone who joined us for the previous challenge it was lovely to see so many entries and to spend some time visiting your blogs. We hope you will join us for our new challenge theme and we look forward to your comments and projects to come.

Once more have a wonderful new year ahead.

hugs Brenda and the Creative Guides. xxxx


Monday, 28 December 2015

Destination Inspiration - December - Terminal #4

Hello all, Alison here from Words and Pictures.  I hope you've all been enjoying a peaceful and prosperous festive season.  This is my favourite time, I think - the quiet period once the major work is done, and you have the 12 Days until 6th January to rest, read, recuperate and enjoy peace and candlelight.  Not too much rest though... there's always inspiration to play, and I've arrived at Terminal 4 of Destination Inspiration this week.

I've unpacked my travel bag to see what I could make with what's inside.  As usual with the final destination of the month, you can see what all the Creative Guides have done with the contents of the luggage at the end of this post, but here's a reminder of just what was in there:

Substrate - ATC
Colour - Festive Berries
Technique - Extreme Masking (Compendium of Curiosities I, p.61)
Product - Remnant Rubs

I have to confess I was panicking slightly at the notion of Festive Berries - those who know me will know that red is not a shade which appears very often round my way.  But once I'd come up with the notion that I could use the Festive Berries for actual festive berries, I felt a bit better!
So here's what arrived on the craft table.


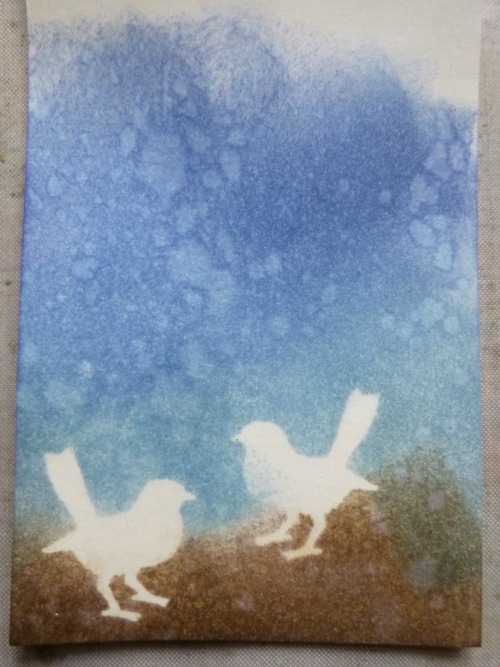
I love working with ATCs, and I suddenly had the brainwave of trying to work with one of Tim's punches as my mask.  I figured the little bird would be the right sort of size to work with for an ATC.


I punched a couple of them, so that they could have a little conversation.  It wasn't the easiest thing in the world holding them down to ink around them, but it was do-able.  It's Ground Espresso at the bottom, and the sky shades from Stormy Sky up to Chipped Sapphire at the top.  (I was working on a plain manila tag at this point, but always thinking of the size the ATC would end up.)


Same tricky process for the stamping - those birds are small and, because I'd punched them out of book pages (first thing to hand, not really thinking ahead), a little fragile too.  But not so fragile that I wasn't able to save the masks to use on another project (as those of you who've seen my Snowflake ATC will know!).


I stamped the starry snowflakes from Tim's Christmas Magic set in Picket Fence Distress Stain, and for the reverse masking, I thought the birds really ought to be musical, so I stamped some tiny music notation in Pumice Stone.  I love that one of the birds has ended up accidentally wearing a little starry crown!  


I then used the gorgeous pine needles from the Winter Sketchbook set to create some plant texture below and around the birds.  The pine needles are stamped in Ground Espresso, and you can see where the Distress Paint snowflakes have resisted the Distress Ink needles.


I decided that as well as berries, I could probably deal with using Festive Berries to create a couple of Robin Redbreasts too.  I applied the Distress Stain with a water brush, adding a touch of Vintage Photo for shading, and trying to get quite a loose, painterly look.  (In the long run, I decided the ink wasn't quite holding its own against the bold colour of the berries, so I added some paint over the top too.)


Ah yes, the berries... they're on one of the fabulous Calico Craft Parts - a spray of holly which I've painted with Ground Espresso Distress Paint so that it would tie in tonally.  Then it was time for the vivid berries.  Although I have the ink, I don't have Festive Berries Distress Paint, but I found that the PaperArtsy Fresco paint in Cherry is an almost dead ringer in terms of colour, so I used that, applied quite thickly to get nice rounded berries.  And that's the paint I used to brighten the robins too.


I almost forgot the final requirement - my Remnant Rubs were hidden at the bottom of the bag! - but just in time I realised I needed to add a little transfer somewhere.  The gorgeous white December text seemed perfect for my wintry little ATC.


As you may be able to see, I mounted it on one of the nice thick Calico Craft Parts ATC blanks - love how this gives it substance.

______________________________________________

So, as promised, here's the full selection of what the Creative Guides have been making on their travels this month.


Terminal #4 Alison


I hope you've enjoyed travelling as much as we have this month.  You've got just a few days left to join in with Annie's lovely Vintage Christmas challenge, and with a prize voucher from Country View Crafts and the honour of being one of our Pinworthies all at stake, we hope you'll come and play along.  But do keep celebrating your own Twelve Days of Christmas too!

Alison xx

Friday, 25 December 2015

A Vintage Merry Christmas

I am so pleased that we welcome you on this very special day to say -

(photo courtesy of Carpe Diem Designs)

FROM
All the Creative Guides.

We are also here to welcome a very special guest who is well known in blogland and I will hand straight over to her to to introduce herself and show us a very lovely project, perfect for the day.

*********************************


It is so wonderful to be here at A Vintage Journey on Christmas Day!

I am so pleased to be able to join in with Annie's challenge that was a total dream to do!...I am so happy to be here, I can't wait to show you what I made for you!

....but first let me introduce myself...

My name is Laura and I have a passion for crafts. I have always been creative and I do a lot of crafts.
I love Scrapbooking, crafting with stamps and inks, I paint - watercolour, acrylic, fabric and glass. I love to draw. I do crochet, knitting, woodwork, pyrography, candle making, servietten technique, sewing, cross stitch, tapestry. I love doing patchwork, pottery and cake decorating. I love making dolls house miniatures...the list goes on and on. 

I really love the 'how to' part of crafting...Can I do this?...how would I make that?...Would that work? - That to me is the magic of crafts.


Today I would like to show you my Vintage Christmas decoration


  No inks or paints?....no stamps or stencils?....or diecuts?.....

No, this was a project that began with a printed sheet of photos, some cotton material and some Decoart Matte Medium. The tools used were a paintbrush and a brayer. Minimalist equipment for sure!

As this was being made for A Vintage Journey it had to be inspired by Tim Holtz. Like all crafters here I love the work he does and the items he uses, but for me one thing that stands out is the vintage photos and images he uses in his work. I really love to get the photobooth sets out for projects and the Found Relatives set is one of my most treasured craft items. In fact I like them so much they can be hard to use because I want to keep them!

So for this project I decided to focus on photographs - I hunted the internet for Vintage Christmas Photographs and I tried to select ones that were in the style of the photographs that Tim uses. I also found some quotes and added them....


Image transfer is a well known technique, but I will explain how I did it. You can use any image for image transfer - some work better than others. I find that laser printed images work really well.  Ink-jet prints, while the image does come out, are usually slightly blurred. The quality of the image is also affected by what you are transferring it onto...it is great to experiment and see what effects you get with different textured surfaces...as you will see later the cotton material had a fortunate/unfortunate (depending on your view) reaction to being roughly handled.

I set the photographs up to print using paintshop. I also took this time to check brightness and contrast. I wanted a variety of tones, so if some photos had a slight colour I left this as it was because I always love it when Tim Holtz tints B&W photos.  All photos with any lettering were reversed before printing so they would be the right way round on the finished transfer. I added the images and arranged them into a collage style format. To save ink waste I formed the pictures into a rough boot shape as I knew not all the paper would be used.

I applied a generous layer of Matte Medium to the cotton material. It is important that when the image is applied it should have a good contact with the glue and material. Make sure all areas have a decent covering of glue. If parts peel back too easily reapply the glue and stick down again. The sheet of paper needs to be burnished to ensure the paper is really pressed into the glue. A good way to do this is to use a brayer. Brayer it for about a minute...going over and over it in different directions...

Leave the image to dry for at least 12 hours before trying to remove the paper! It will be touch dry quite quickly, but leave it alone! Don't be tempted to remove the paper before this time otherwise this happens....


Yes, I was a bit to eager...Image transfer requires patience. As you can see the image is barely there - a little too rustic I think!

This version worked better - It was left overnight to dry and I worked slowly removing the paper. I would damp the surface down with a sponge and gently rub away the paper...then leave it to dry and re-apply the water and taking more paper off.

It may take several attempts to remove all the paper. Here you can see I thought all the paper was gone, but when the image dried you can see clouds of white paper still covering the image. It took about five goes before all the paper was removed.

Now it is all done! And the image is crystal clear...


 I cut out a template for the Christmas stocking.


I cut out another stocking shape from plain cotton


Now there are the two pieces of the stockings ready for sewing


I turned the tops of the stockings over and ironed them flat which makes it easier to sew. The stitches here don't have to be perfect as they will be hidden by the lace


I cut two strips of crochet lace and glued them to the top of the stockings


When the glue had dried I joined both stockings together (images on the inside) and hand stitched around the edge to hold them in place


Then I machine stitched around the stocking


And turned the stocking the right way round and hey presto - A photograph decorated stocking! Now just to add some final vintage decoration...


....and here it is!


Sadly, despite all my best efforts to have a pristine, clear image transfer - some of the image rubbed off slightly during the struggle to turn the stocking the right way. The matte medium doesn't leave the cotton very pliable and it isn't easy to work with - but Tim always says "Embrace imperfection"..and while the images are no longer 'perfect' they do have that lovely rustic shabby chic look...which can actually be hard to recreate....happy accidents!

It certainly was worth the effort and will be a lovely vintage element to our Christmas decorations this year!


I cut holly and embroidered leaves out of material and used a burgundy button and a twine bow as part of the stocking decoration


Here I used a strip of tartan material and lace along with more holly and twine.


Thank you so much to the Vintage Journey team for having me here....It is so lovely to be sharing Christmas Day with all of you! I have really enjoyed making this and I hope my Vintage Photograph Decoration adds some inspiration to your current challenge.

Wishing you all the very best for a very happy New Year in 2016!

Happy Crafting
Laura
xxxxxxxx


*****************************

A huge thank you to Laura for creating this perfect decoration for today and I am sure Santa filled it with lots of goodies. From all of us Laura have a very Merry Christmas and a happy New Year.

Wishing you all peace and happiness for Christmas 2015.

huge hugs Brenda and the Creative Guides.
xxx