This is a unique challenge blog where we are inspired by and focus on the Vintage; shabby; mixed-media; art journaling; industrial, timeworn and steampunk genres and encompass the talent, flair, expertise and ideas of many artists that we are inspired by. We welcome all types of projects - cards, journaling, assemblage, layouts, albums, atcs, altered art in fact whatever you want to share (as long as it is in good taste).

Friday, 10 June 2016

Winner and Pinworthies for Sew Special

Hi everyone and welcome! Well you really did rise to the challenge of adding fabric and stitching to your projects last month! Before we reveal our 'Sew Special' Winner and Pinworthies we are delighted to welcome our Guest Designer today who has created something rather special for this month's 'Texture or Embossing Paste' challenge hosted by the lovely Astrid.  So without more ado, let's hand you over to the lovely Christine a.k.a. Craftyfield of Crafty Endeavours...

Craftyfield (Christine)

I live in the South of England with my partner and son, who, whilst making fun of my crafty ways, are thankful for keeping them supplied in customised cards and are even fuelling my habit by buying me magazines and other crafting items!
I started making my own cards some 15 years ago and my passion grew with the increasing availability of craft tools, supplies and inspiration!
I fell into scrapbooking to showcase my son’s photographs and have since dabbled in jewellery and altered art. Stamps are my favourite crafting items as they are so versatile, and I am a confirmed stamp-a-holic. I also love making my own embellishments and tools, such as stencils, embossing textures etc...

Style wise… I love and try everything from CAS to grungy and I am particularly attracted to vintage images.

*****************************

I’m delighted to be invited to guest design on the AVJ blog for their latest challenge, hosted by Astrid who is looking for Embossing Pastes/Textures. What a great theme!
Hoping for warmer weather, I selected bright colours and let go the Vintage tones entirely, taking inspiration from beach colours for a holiday scrapbook page. The photo I have included is not the actual photo but a place holder I had great fun to design.


First I used green and blue sprays through the Garden Gate 12x12 stencil (The Crafters Workshop) on my watercolour paper base.
With grunge paste I stencilled through another TCW stencil, the "Stencil specimen" and a Prima doily stencil.
At that point I decided I needed to darken the borders and used a dark spray, and had to sand back my stencilled paste so it would not get lost!


But texture pastes can do so much more than stencilling... here I created my sandy beach with heavy gel medium, a touch of yellow acrylic paint and sand of course!
To make my fake photo I stamped the lady in Versafine on glossy paper (from the Take the plunge set by Rubber Dance) and coloured her with Distress inks.


Finally I used some paste as a 3D glue to give my shells a more realistic shape.
To make them I first stamped them (all shells, starfish and seahorse are from the Rubber Dance Retro Beach set ), then fussy cut. I applied a bit of colour with Distress inks and shaped them with a ball tool on a foam mat, giving them a curve. The gel medium helps in supporting the curve as well as keeping the shells stuck!
I added a few sea creatures confetti (painted with gesso to dampen the garish colours), muslin, and micro beads.
Under this angle the sun catches the mica for maximum shine!


I hope I have inspired you to play with textures and to enter the AVJ challenge.
Many thanks to AVJ for having me on the blog today!

***********************************

Thank you Christine - what a gorgeously textured piece, and the lovely shimmer captures the look of sunshine on water perfectly. 

And now it's time to see who our talented May winners are.


The winner of this fabulous prize package from our generous sponsors last month, Calico Craft Parts, as selected by Random Generator is...


That's Kerstin of Scrapbook Dreams with her wonderful vintage layout.


Congratulations, Kerstin! Your winner's badge and prize package will be on their way to you soon, and we hope you'll join us as a Guest Designer here at A Vintage Journey in the months to come.

*********************************

Now onto our selected Pinworthies chosen by the Creative Guides. This is always difficult with so many wonderful creations but these three are the ones we felt really captured the challenge with their submissions.

Congratulations to our Winner and Pinworthies. We will be in contact shortly with your badges and invitations to be a guest designer here at A Vintage Journey.

Thanks again to everyone who entered, and we hope to see you again this month for the 'Texture and Embossing Paste' challenge. Remember, one of our Creative Guides will be back on Monday to share the next Destination Inspiration. You'll have to drop in to find out who it is and what they've done with the contents of this month's travel bag, so we'll see you again soon!

Jenny, Alison and the AVJ Creative Guides

Monday, 6 June 2016

Destination Inspiration : All Aboard for June Terminal 1

Hello Everyone, Jennie here welcoming you to a new month where you travel with four of the Creative Guides with a whole new set of wonderful products in the travel bag.  As we are at Terminal 1 it falls to me to share with you the first project made from this months travel bag.

So what do we have for you this month:

Product : Lace
Technique : Texture Paste through Stencils
Colour : Bubblegum Pink
Substrate : Canvas

Well ....... what a fun and eclectic range of products! I really did have fun with this and got very messy too, although it nearly ended up in the bin at one stage!


So here is the canvas I made using the Travel Bag Products.


I started with a primed 5 x 7 canvas and added Crackle Paste through the Tim Holtz Gothic Layering Sencil (one of my favourites!) and then layered two lace flowers in the general area of where I thought I might add a cluster. So three of the four products used!


I added a little frame, flowers, paper clay embellishments and pearl buttons to create a raised cluster which as you can see are all different colours. Everything then got two coats of gesso to tone it all down before .............


........ it all got sprayed with Dylusions Bubblegum Pink Spray.

At this stage I thought I would start adding some white gesso here but then while I was clearing my table and waiting for everything to dry I managed to drop some blue spray ink over various parts of the canvas. No photographs of that bit I am afraid!

I then really did have to go in with the white gesso and I really thought the piece was destined for the bin, especially after I added some gold too, but I kept going and so these final photographs are from the finished piece.


You can see how the white gesso has reacted in places with the sprays and the gold paint.


Bits of the blue spray are still evident !


 And once the Bubblegum pink spray is there it is very difficult to get it off!


So a fun, experimental, pink and sometimes traumatic piece for you all here at Terminal 1 !

Do join us next Monday for the second leg of the June journey and another inspiring  project with these four amazing products!

And of course don't forget our current challenge - Embossing Pastes and Textures - which you will find on the sidebar at the top of the page.

Thank you for joining me today and whatever you do, have fun!

Jennie x


Friday, 3 June 2016

Texture or embossing paste

Hello everyone and welcome to A Vintage Journey! It's Astrid here, being your host for our June challenge.  This month it is all about the ever popular texture or embossing pastes.

 Use any kind of texture paste (home made, crackle, coloured or plain) on your projects. There is an endless variety available, so play, have fun and apply it to your heart's content. Use it through stencils, randomly or in whatever way you want, but remember it should be in one of the vintage; shabby; mixed media; art journalling; industrial or steampunk styles that we favour. Put on your mixed media hat and create some magic!

We have some wonderful projects to share to inspire you hopefully and can't wait to see what you will make.
We are sponsored this month by the lovely Susan at Country View Crafts and the winner will receive a £20 Voucher to spend in their shop.
A Vintage Journey is Proudly Sponsored by:
I decided to use a wooden box canvas as my substrate, with many layers of different pastes, there is no danger of warping. Nothing like making time to enjoy the simple things...


I do love playing with embossing and texture pastes! I have used them in two differing ways on this reverse canvas - do join me at Addicted to Art to see the details today.


For Astrid's challenge this month - I made a textured 3D mug gift box - using Eileen Hull Sizzix Dies and Wendy Vecchi Crackled Texture Paste that I colored with drops of reinker and spread through a Tim Holtz Stencil! You'll see just how I put this together (and how I stamped the pattern on my silver spoon!) over at my blog post here.

I decided to use this months challenge to alter a (very cheap!) wooden frame for our newly decorated bedroom. This Found Relatives Photograph reminds me of the young children who I imagine used to live here in the house many years ago. For more details (and a few close up photographs showing the crackle paste!) please do visit my blog.


It seems ages since I've had time to offer an inspiration piece here but I'm delighted to be around for Astrid's fabulous Texture Pastes theme. I had a wonderful time with this 12 x 12 canvas, layering, collaging and crackling... and all the while stories were bubbling up within the textures. If you'd like to see and hear more, do come and visit me at Words and Pictures.

For Astrid's challenge I decorated this wooden box for my daughter, with lots of different textures and pastes turning it into a keepsake Vintage Book Box. Love for you to stop by my blog Juliz Design Post to see all the photographs and the inside decor. 

I decided to go all shabby for this challenge as I love adding texture to 5 x 7 canvas boards and making them into stand up cards. I used gesso for background texture and crackle paste through a stencil and I also used the media paints and made a mixing swatch to show you how I got to the colours I wanted to use.


I didn't really have an idea for this challenge when I first started, not until I found this snowman mdf shape and I thought it maybe a little early, but why not! Finding this piece and combining with some Andy Skinner paint techniques seemed the perfect combination. Pop by my blog for step by steps.

When coming up with a 'plan of attack' for this theme I was inspired by two wonderfully creative people. Wendy Vecchi recently shared a brilliant idea for mixing embossing powders to create a faux rusted effect on different inky backgrounds. And back in 2013 Vivian Keh (Contadina K) posted a fabulous video using embossing powders with embossing pastes to create fabulous textures. That little voice in my head that often says 'I wonder what would happen if... ' kicked in and here is the resultant canvas. Find out how it came together on my blog HERE.

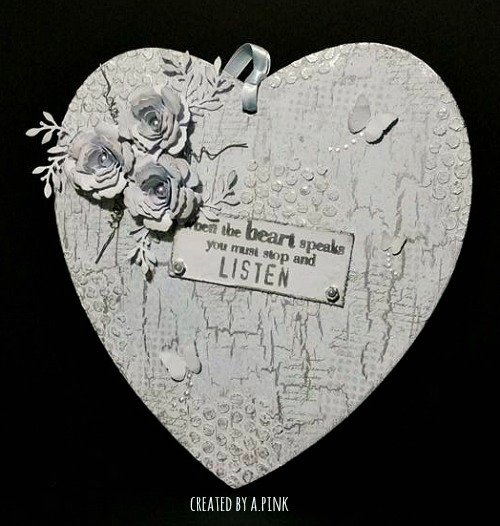
As I have been blogging now for just over a year I thought I would look back to my very first post and recreate the wooden hanging heart I made then using a different colour palette but retaining all the crackle and texture. You are very welcome to pop by my blog to see more details

Well as you can see, there are no end of possibilities, so we hope you will feel inspired to play along and cannot wait to see what you will create!

You have until Thursday the 30th to enter.


Monday, 30 May 2016

Destination Inspiration - Arriving at Terminal 4

Hi friends - it's S@ndy here with you at Terminal 4.  It has been quite the creative journey this month with our three previous guides.  Astrid, Tracy and Amanda have shared so many great techniques and projects with us, so inspiring.  Thank you. 

My project today is inspired by one of my team mates on the Pop it Ups Designer Challenge Team, Shelly Hickox, who made a fantastic journal cover for a challenge.  I loved it so much that I decided to do my own take on it for a summer travel journal.  We are traveling abroad this year and I want to capture all the wonderful memories in this journal with photos and notes.

Before we get started lets have a review of the items in the travel bag - they are:

Product:  Sprays or Brushos
Technique:  Gesso Resist
Color:  Blue
Substrate: Card
 

Let's get started-


I started out with an art journal from 7 Gypsies


The journal cover was given a coat of Distress Picket Fence.  Not full coverage - rather hit and miss.


Add a length of lace across the front near the bottom edge.


I used watercolor card - 2 pieces, both torn on the bottom edge. 


Using gesso and a color blender - the gesso was dabbed through stencil.  I used two stencils from Karen Burniston, the Flowers Stage It Stencil on the bottom portion of the panels and the Partly Cloudy Stage It Stencil  near the top for a couple clouds.


Since I don't have Brushos I used these Nuance colors from Magenta which work the same way.


 It takes very little powder (shown by the arrow) to make lots of color.  I sprinkled the powder on the paper and then misted it with water - boom - it's like an explosion of color, in this case, blue.  Set aside to dry or if you don't like to wait, use your heat gun.


I used the excess color left on the non stick mat to color my ribbon.  Idea - ology Crinkle Ribbon was used here.  Simply cut your length of ribbon, wet it, drop in color, making sure all the ribbon has color on it.  Then dry with heat tool. 


After the blue color dried, Peeled Paint Distress Ink was added to bottom portion.  Next a light buffing over the gesso to reveal the white.  Then comes a little Distress Vintage Photo Ink on the edges.

I added the ribbon next and tied a bow.  Next the two panels were added with the longer one on top of the ribbon.


I die cut the Eiffel Tower from the Eiffel Tower Pop Stand Die and a hot air balloon from the Hot Air Balloon Pop Up Die both from Karen Burniston for Elizabeth Craft Designs.  Double sided foam adhesive was added to both pieces to give dimension.


Add tower and balloon to card and then add some splatters using watered down gesso and a fan brush.
 

Then came some leaves and three small flowers from Prima near the center. I then added three groups of white dots made with Crystal Drops from Nuvo (shown in the circles above)  These dry dimensional.  I also dressed up the tower with some rein stones.


Some corners from my stash were added to the top corners of both panels.  The finishing touch is a tag with a stamp from the Just a Note Clear Stamp Set that says Bonjour.

 
Thanks for joining me today for this leg of the journey, I hope you are as inspired as I was and will be making a journal for yourself.

Have a creative week,

Friday, 27 May 2016

Our Invited Guest is Zoe

Welcome to our Friday guest post and it is the ever amazingly talented Zoe Hillman who has designed and created a very special project for us today whilst in the throes of moving house.
Just scroll through and see what exciting materials and layers Zoe has used to create her 'Sew Special' mini clipboard.

***************

Hello! Zoe here! I am delighted to be a guest at A Vintage Journey today.


I am British and currently living in Geneva, Switzerland with my husband Neil, (for another 4 days anyway)! I moved here 8 years ago and we are now off to Copenhagen, Denmark to start a new adventure together.

It was shortly after moving to Switzerland that I picked up Tim Holtz’s Compendium of Curiosities book and was instantly hooked! I love Tim's style, he's such a talented designer and great educator. I am utterly obsessed with distress and never happier than when I have inky fingers.

I really enjoy being part of the online craft community and love social media. I have “met” so many lovely people through a mutual love of craft, who provide such encouragement and inspiration. Crafting is definitely my happy!

Today I am sharing a project inspired by the Sew Special challenge.


I had to improvise slightly on the “sewing” and “fabric” elements to this project as half my stash was already packed away ready to move! Part of what I love about the creative process is improvising, so here’s what I did…


This tape measure ribbon covered the "stitched" part of the challenge! I then created a faux vintage pattern tissue using the new substrate material by Tim Holtz.


To make the substrate thinner and more tissue like, split the substrate by peeling the front and back layer apart. Next, stamp with sewing themed stamp sets, (both by Tim Holtz), using various archival inks, (by Wendy Vecchi). To make the substrate look distressed, screw up gently until supple.


Next, remove the clip from a Tim Holtz mini clipboard and adhere the substrate, wrapping it around the back. The linen tape measure ribbon covered the bottom of the board where the substrate didn't reach.


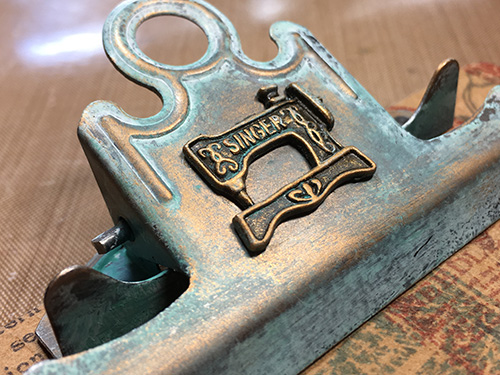
To alter the clip, cover with picket fence distress paint and rub away when almost dry. Rub evergreen bough distress ink between your thumb and forefinger until almost dry, then rub onto parts of the clip. Finally rub on some gold gilders paste to highlight. I added a singers sewing machine charm from my stash.


Collect together some sewing themed ephemera, mine was from the vellum thrift shop ephemera pack, (by Tim Holtz) and a photograph I picked up whilst junking recently. It was top of the pile and PERFECT for this project.


I created a dress shop receipt using a stamp from the Tim Holtz Curiosities set. Adding remnant rubs to give detail to the receipt and indicate a dress shop alteration. Tear and ink the edges with walnut stain distress ink to give an aged look. 


Thanks for taking a look at my project and to the team at A Vintage Journey for having me.

****************

Oh wow Zoe what a fabulously creative make for our Sew Special challenge and what an amazing vintage feel you have created with the stamp sets and your wonderful photo. Every step you took to bring this project together is brilliant but the part that excites me the most is the dress shop receipt, it's perfect. Thank you for taking time out of your very busy schedule to make this delightful and inspirational work of art and for sharing it with us at A Vintage Journey.


Thanks to you our readers for popping in today and if you haven't yet joined us in the challenge I hope you are inspired to give it a go and share your own inspiration with us. You have until next Thursday evening to link up and then midnight (UK time) on Friday morning we will be starting the next theme. We will also be back on Monday with the fourth Destination Inspiration post for May, we look forward to catching up with you then.

Have a great weekend and enjoy whatever you have planned.

hugs Brenda and the Creative Guides. xxx