This is a unique challenge blog where we are inspired by and focus on the Vintage; shabby; mixed-media; art journaling; industrial, timeworn and steampunk genres and encompass the talent, flair, expertise and ideas of many artists that we are inspired by. We welcome all types of projects - cards, journaling, assemblage, layouts, albums, atcs, altered art in fact whatever you want to share (as long as it is in good taste).

Friday, 2 March 2018

It's our 4th Birthday - come celebrate.

Welcome to you all, let's celebrate our 4th birthday with a fabulous theme for March.

'TREASURE'

Treasure can be described as wealth or riches we store or accumulate, a collection of valuable, interesting or useful things, bits and pieces we highly value, articles that we hang onto that we’ve bought or found and might never be able to purchase again. 

What is in your crafty or artsy treasure trove - those items we squirrel away to keep for something special? Maybe some elegant embellishments, that hoard of ephemera or memorabilia found in a junk shop, a tin of old buttons, rusty keys or diamanté jewels, a paper pad you get out and stroke then put away again, some beautiful fabric or lace you can’t bear to part with. 

We invite you in this challenge to share a project that includes a part of your treasure trove, just let us know what it is so we can see it and comment on it and remember our focus styles and genres to work in (which can be seen under out blog banner) if you would like to be considered for being chosen as one of our top 3 Pinworthy mentions.

How have our very talented Creative Guides interpreted this theme and guidance? 
Let's take a look at their inspirational projects.

Brenda
I have a growing collection of treasured vintage cabinet cards and old photos and although I've scanned some into the PC and printed them off to use on projects I have never had the courage to use an original - till now. More details can be found at Bumblebees and Butterflies.


My piece of treasure is this little rose painted on silk by my mother over 20 years ago just before she died.  I had a job extricating it from the card and it is a bit messy! but ...... the project is of course very special and I have used lots of treasured bits and pieces from my own stash which I think she would have loved. If you would like to see how this all came together then please do join me over at Live The Dream.


There is no doubt about it, - my greatest treasures can all be found in my craftroom. I am a hoarder of stash and especially of beautiful papers which I love to stroke...
For this challenge I dug into my paper stash and used some of my most treasured collections to create a vintage folio from scratch. If you want to find out how I went about that, come visit me on my blog.


Happy 4th birthday AVJ!  For my 'Treasure' birthday project I decided it was high time that I actually used some of my dearly treasured Tim Holtz Vignette Boxes, Paper Stashes and Idea-ology bits and bobs.  Come on over to my blog to see how my Destination Innovation vignette box came together.


 I am so thrilled to be part of AVJ's 4th Birthday Celebrations and to be taking part in Brenda's "Treasure" challenge theme. I have lots of treasures in my stash and decided to create a wall hanging using laces/fabrics/buttons and LP stamps. For more details/photos  on my blog click HERE 


Well what beautiful projects from the team with some treasured craft supplies being used on the amazing Creative Guides' projects. I hope you saw our post last Friday where we explained some changes we are making to the challenge posts for the coming AVJ new year. If you missed it you can be transported over if you click Here.

Thank you for being on this amazing vintage and creative journey with us and we hope you will continue to enjoy our challenges and inspiration.

Take care and have a wonderful weekend hopefully snuggled up warm and safe in your craft rooms especially if you have been hit by snow this week.

hugs Brenda and the Creative Guides. xxx

Monday, 26 February 2018

February Destination Inspiration - Pulling Into Terminal 4

Hello and thank you for stopping by, Deb here with you today for our fourth and final stop on February's Destination Inspiration journey.  If you missed the first three posts from Nikki, Annie and Amanda, our travel bags this month were filled with the following supplies:

Product - Paint
Technique - Crackle
Colour - Black
Substrate - Tag

This month's contents were all old friends to me and I was excited to play with them to see what I could create.  I have to admit I didn't start with a clear concept, I just pulled out my supplies and started to play and here is what I ended up with.


I have some pictures of how my Blackbird Fly tag came to be, read on for the how to.

I started with white cardstock that I cut into a #10 tag and painted the entire surface with Clear Rock Candy Distress Crackle paint.  After the cracks formed I covered the entire surface with Carbon Black DecoArt Media Fluid Acrylic paint, wiping it back as it dried to reveal the crackle.


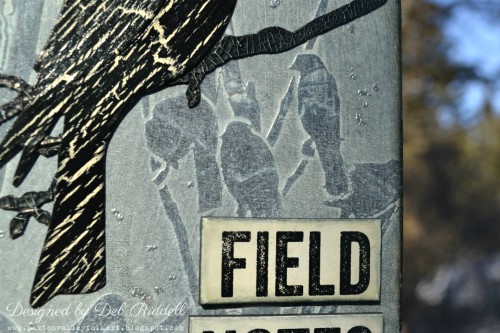
Next I stenciled Ranger Transparent Gloss Texture paste through StencilGirl Products 'Black Bird In Trees' stencil over the crackled tag.


A coat of Golden Titan Buff Fluid Acrylics paint was then added overtop the gloss texture paste stenciling and wiped back as it dried to reveal the stenciled pattern.

I wanted to add some more crackled elements so prepared two more #8 tags with a couple of different preparations.  The top tag had Weathered Wood Crackling medium applied overtop some Titan Buff acrylic paint with a top coat of Carbon Black.  The bottom tag was coated with Ranger Opaque Crackle Texture paste that was tinted with Black Soot Distress Reinker and then after it had dried and cracked the tag was inked with Black Soot Distress Archival ink.


In keeping with the avian theme of the stenciled background, a bird was die cut with Sizzix's Birds die from the DecoArt Crackling Medium tag and Tim Holtz's Bird Branch die was used to die cut a branch from the Ranger Crackle Paste tag.

The 'Field Notes' Quote Chips were inked with Antique Linen and Black Soot Distress ink.


And some of the wonderful lyrics from 'Blackbird' were typed out on the computer and adhered to a scrap of black cardstock for a bit more substance.

The song lyrics prompted the idea of stars in the 'dark black night' so I added dots of embossing ink with Ranger's Clear Embossing pen and then sprinkled on silver embossing powder.


And finally, I coloured a Charmed Adornments charm with Pitch Black alcohol ink, added a small Mirrored Heart to the bezel center and filled it in with Glossy Accents glue.

A few fibers from my stash were threaded through the punched hole in the tag and the heart charm attached with a jump ring and small black safety pin.  The song lyrics were cut out, inked and adhered at the top of the tag.


The blackbird and branch were adhered in the center of the tag;


and the 'field notes' Quote Chips added to the bottom left.


You can catch a glimpse of the silver embossed 'stars' below.


Love how the crackle on the tag background is still visible through the gloss texture paste stenciling.


Hope you've enjoyed seeing how my Destination Inspiration project came together and since this is our last stop this month, here's a recap of all of the projects, I always love how we all come up with such different creations given the same ingredients!


Deb


Thanks for stopping by today and hope that you will consider entering our current 'Melt It!' challenge, you have until March 1st to get your melt on!

Deb xo

Friday, 23 February 2018

A Vintage Journey continues into Year 5

Welcome everyone.

Today I want to give you a 'Heads Up' on our Birthday Challenge that will posted next week, we do hope you will come and join us for the celebrations. 
Can you believe we have been setting challenges and sharing inspiration posts since the beginning of March 2014? Over those four years we have stayed true to our initial focus of creating and promoting projects associated with the quality of aging and along the way we have widened that somewhat to include not only vintage but shabby; mixed-media; art journaling; industrial, timeworn and steampunk genres as well. We don't stand still and always are looking to mix things up and keep our challenges and posts fresh and inspiring. The talented team of Creative Guides work together extremely closely to challenge themselves and each other to stimulate, influence and motivate us all to create incredibly exciting and impressive projects week by week and month on month.

So to celebrate four years and move into our fifth year we have looked to weave and fuse some new ideas into our monthly structure to build a renewed and original framework for us to continue to bring you great themes, ideas, tutorials and inspiration. For the next 12 months we will be posting only on Fridays - but we will still bring our expertise, talents and creativity in its widest sense.

The timetable will now be -
The first Friday in the month - Week 1 - the new challenge will be introduced by the host Creative Guide for the month. Other team members will join in by sharing their interpretation of that theme and provide the inspiration for you to work with that focus and enter the challenges as you have always done.

The second Friday in the month - Week 2 - will be the 'Winner's' post. There will not be a prizewinner any more so we are working with a 'Just For Fun' challenge but we will continue to choose our Top 3 Pinworthy Mention projects from the previous months entries and pin them to our own Pinterest Pinworthy Board and Pinworthies will also receive an AVJ Pinworthy badge.

The third Friday in the month - Week 3 - the host Creative Guide for the month will share a tutorial post and provide the process steps to a project linked to the challenge theme. It might be the project they shared in week 1 or something completely new.

The fourth Friday of the month - Week 4 - will see a 'Creative Cardmaking' theme where another Creative Guide will share their ideas for putting together a card focusing on our preferred genres - vintage; shabby; mixed-media; art journaling; industrial, timeworn or steampunk style.

Where there is a fifth Friday in the month - Week 5 - we will continue to share our Tag Friday inspirations for you. This is a favourite of us all where we design and make and just go where our muse takes us, no focus, no constraints and no preset ideas. It's a wonderful opportunity to 'play' to our hearts content.

So there we have it, a new structure, new ideas and there will be 12 completely new challenges for you.

We all look forward to another happy and creative year of you and us sharing ideas and projects together and challenging each other in the best ways possible.

See you next week for a new beginning and another step on this amazing voyage of discovery. As we said at the beginning of year 1 there is no map just lots of tours, excursions and adventures of exploration, stretching the mind and imagination.

hugs to you all.
 Brenda and all the Creative Guides. xxx


Monday, 19 February 2018

February Destination Inspiration - Arriving at Terminal #3

Hello Everyone and Welcome

Amanda (ink-a-pink) here today, greeting you at Terminal #3 of this months Destination Inspiration journey.
Lets begin with a quick recap of what's in our travel bag to create with:
Product: Paint
Technique: Crackle
Colour: Black
Substrate: Tag

That's what I would call a 'happy' bag of goodies!
It's time to get messy and create my textural, crackled tag.


The tag is covered with plaster moulding to create all that fabulous deep texture.
Warning: Though effective it is quite messy!!

The Tag
I roughly sketched out a circular area in the centre of the tag that would remain free of plaster as this would be the flat space in which I would position my focal feature later. I then applied the plaster moulding to the tag.

Here's how:
Prep a bowl of warm water and cut lengths off the plaster roll. Alternately you can cut as you go, like I did and just 'embrace the 'messy'.


Working with one length of plaster at a time place into the warm water for a few seconds and remove. Don't drench or soak or the plaster will just become a 'gungy' mess that's hard to work. You will see and feel the plaster sheet 'soften' and become more pliable.


See the difference: dry (to the left), wet (to the right)


Apply the wet plaster sheet to your substrate either by keeping it flat for an even texture or by laying it down unevenly with lots of lumps and bumps to create deeper texture - as I did with my tag . Repeat the process until you are happy with the depth of texture you have achieved.
The plaster will set hard almost immediately but will need to dry thoroughly as it will still hold moisture from the water.
I actually altered my tag with plaster mould and stained it up some time at the end of last year for another project I had in mind at that time so I was at all ready to re paint my tag and get crackling.
I re-painted with a couple of coats of black Acrylic paint. Once dry I applied a layer of matte medium to give added adhesion for the crackle paint that was coming next.


 Though the instructions say to apply the Crackle paint with a soft brush I applied it with both a spatula and my fingers as I find both easier to use with this type of medium. As with most crackle mediums crackle paint is no different - the size of the cracks varies based on the thickness of application .
I always leave crackle mediums to air dry as personally I think allowing the process to happen naturally creates better results .


Once the cracks formed they seemed to take on a creamy yellow hue- I guess some of the colours of the stain (oranges and yellows) I had used when I initially coloured the plastered tag last year had permeated through!


Not really a problem as after applying another coat of matte medium to seal the crackle I applied another coat of Black Acrylic paint to cover and then used silver gilding wax to enhance the cracks and texture.
Lets get you up close to see


all the peaks and troughs


and all those crevices and cracks!


The Focal Feature
I die cut a large circle, painted it with black Acrylic paint and stamped onto it using an Andy Skinner crackle stamp.


I die cut a few smaller circles adhered them together to give sturdiness and painted them black.
I used the same crackle technique as I had for the tag:
coat with matte medium,
apply crackle paint quite thickly with spatula, leave to dry,
seal crackle with matte medium.


I adhered the cracked circles on top of each other and topped with an Tim Holtz Ideology Ornate plate that I altered with black alcohol ink touched up with silver gilding wax.
 An Ideology Quote chip sits atop with silver brads to fasten.


This was then adhered into the centre of the tag with foam pads and 2 screw eyes were nestled into the top and bottom to finish off.


As for the tag tie, well, nothing I had in my stash seemed to look right (and it has to be right) so until I find that certain something it will remain as is.
I do hope you like my textural crackled tag -I had a great time creating it!


Thank you for accompanying me on the 3rd leg of this months Destination Inspiration. I hope I and my fellow Creative Guides, Nikki (Terminal 1) and Annie (Terminal 2) have offered you some creative inspiration. Be sure to pop back next Monday when a fellow Creative Guide will be ready to greet you at Terminal 4, the final stop of this months journey.  

Our latest challenge 'Melt It' is currently underway and we hope you will be able to join us . 
We  always look forward to seeing all your entries. 
Details and inspirational projects can be found here .
Wishing you all a great week 
Happy Crafting 
Amanda
x  

Friday, 16 February 2018

Melt It! Pinworthy Inspirations

Hello everyone and thank you for stopping by, it's Deb with you today to share some amazing inspirational creations from our November Pinworthies, Jo of Let's Art Journal and Lys of Impression Scrap. They both made beautiful projects for our current Melt It! challenge, enjoy!

**************************************************


Hello everyone, I’m so excited to be here at A Vintage Journey as a Pinworthy Guest.


A little about me:
My name is Jo and I blog at Let’s Art Journal. I live by the sea in the North West of England with my hubby and I started Art Journaling just over 2 years ago as a way of expressing my life through words and pictures. I love using mixed media for all sorts of projects and I’m captivated by the variety of techniques and materials that can be used to create so many different styles of art. I’ve always been a creative person, and this has now become a passion of mine which I like to share with others.

I’m so glad that I found out about blog challenges like A Vintage Journey as I always have fun taking part, they provide me with so much inspiration and it’s a wonderful way to meet like-minded arty people too.


As I love using mixed media I chose to use the Mixed Media Style to create a heart decoration for each of the four seasons which are inspired by the Melt It! challenge. I had so much fun melting embossing powder for the backgrounds and also melting embossing enamels for the birds on my Spring, Summer, Autumn and Winter decorations (grin!)


The front and back of each heart tag is stamped with a different design for each season using various stamp sets, embossing ink and white embossing powder which I melted with a heat gun. The hearts are coloured using inks and decorated with paper flowers, die cut foliage using Garden Greens Sizzix Thinlets by Tim Holtz and some maple leaves; they are coloured using Aqua markers.


The birds are covered with embossing ink and either Aged Hunter, Aged Silver, Aged Marine or Aged Scarlet embossing enamels which I melted using my heat gun. Embellishments include bead flowers, Ranger Stickles, some stamped wording, paper twine, threaded beads and some ribbons.

If you would like to see how they all came together, the full process is detailed on my blog here, along with a list of the materials that I used.  Thanks so much, I really enjoyed joining you today to Melt It! I hope you are inspired by this month’s challenge too and are able to join in the fun!

Thank you, Jo x


Bonjour! What a pleasure to be once more invited on AVJ, among this fabulous team, thanks so much!

I’m Lys and I live in a village in south west of France. After crafting had been here all my life, I discovered scrapbooking and built pages to cherish my family memories, then I jumped into Mixed Media some years ago. I found in my daily life many sources of inspiration, but most of them come from my sensations and feelings. My full time job – psychologist- makes me explore creative resources of people I meet and who need help, but I also need to express myself through creations to keep my mind balanced!

This time it’s my youngest son who gave me the idea: he wished a phone charger stand. It’s not a creation, as I followed rather well a video tutorial, but when my son told me how the throne (of the Game of Thrones series) had been created, I thought it would perfectly fit the “Melt it!” theme Julia chose: the dragon Balerion forged it melting with his fire the swords of defeated enemies.


Hundreds of swords (they actually are cocktail pics) are glued on a base made with foamboard coated with a black plastic sheet.


Many of them are melted with my heat tool, to fit the shape of the throne.


Then all is painted in black, and metallic wax is brushed on the surface.


Please come see the details on my blog

Thanks so much to the team for the invitation, and have fun melting it!  A bientôt!
Lys

**************************************************


All I can say is WOW! Thank you so much Jo and Lys for sharing your beautiful projects with us all and I hope that they have inspired you to join in our Melt It! challenge, you have until March 1st to link up your projects so get melting!

Deb and the Creative Guides