Hello everyone and thank you for visiting here. This is
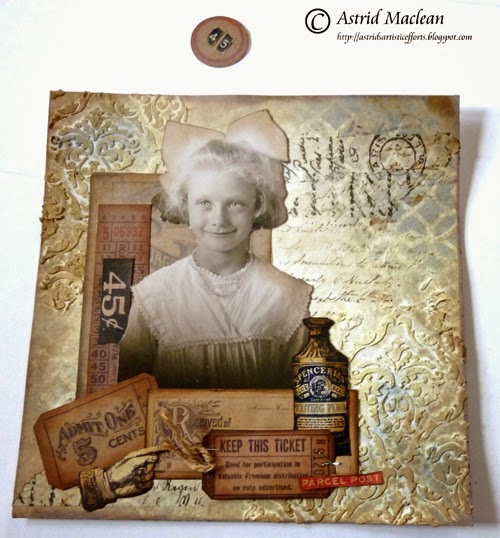
Astrid sharing a project with you that will hopefully give you some inspiration to work with multiple layers and collage. The finished project is a large (8 x 8) pocket card and tag.
What I am hoping to show you is how to build up a layered collage step by step, but to be honest, I am feeling quite nervous about it, because the truth is, I normally do my artwork like my cooking, - I never follow a recipe and just go with the flow. But as several of my blog friends have specifically asked me, to do a step by step on how I create my layered pieces, I'll try my best and hope I can take you along on the journey.
The base layer is a folded piece of Kraft card with a small spine to give room for the pocket. I am lucky enough to have some A3 Kraftcard which was just the right size, but you could easily create a spine with a separate piece of card. However, for this post I will concentrate on how I built up the main part.
I started with a piece of square Manila card stock and inked all around the edges with a mix of Vintage Photo and Walnut Stain Distress Inks.
As the centre is going to be covered with the next layer, there is no need to do the inner part, but to add a bit more interest to this layer I did some water stamping with a little background stamp, below is a close up:
The next layer started with a piece of smooth white card stock, cut slightly smaller than the first bit. I added texture with Wendy Vecchi Embossing Paste through my favourite layering stencil of the moment, the new Gothic Stencil by Tim Holtz of course.
When building up a design it is important to keep the eventual balance of the piece in mind, so in fact I turned the paper the other way round when I built up the next layers, as it usually works better to have darker and heavier elements towards the bottom of your finished piece.
When the texture paste had dried, I added some colour with three different colours of Distress Paint: Antique Linen, Weather Wood and Frayed Burlap. I used a brush, my fingers and most importantly a baby wipe and a water spritzer to blend the colours until I was happy with the effect.
To echo the textures of the paste I used the baby wipe, pouncing it in the wet paint to add some further textures.
Doing something like that, helps to tie the different parts of the piece together, - I just love the subtle effect of this process.
Time to slowly start to build up further layers:
First I added some more stenciling, this time using just Distress Inks in the same colours, Weathered Wood and Frayed Burlap, using the Lattice work Stencil this time, another favourite. I also added some tissue tape and background stamping, again, trying to keep a balance in the overall effect.
So far so good on the background, - now to the collage:
Most importantly, a vocal image, this could be a stamp, a photo or whatever you choose. For the front of my piece I decided to use the sweet girl from the Found Relatives and then I collected various bits and pieces, some tickets, stamped and fussy cut images, some bits of various paper stashes etc. I inked and coloured them to fit in with my overall colour theme:
Here you can see them but at this point I am not sure yet whether I will use them all or not, or will add additional pieces still.
Before committing to anything definite, it is always a good idea to play around a bit and see how things might work out, below is a picture where I am just playing like that, as you will see, there will be various changes still along the way...
Nothing is glued down yet, so all is possible still, just play around with your pieces until you feel the design looks good and balanced. Some things to keep in mind are:
- vertical and horizontal lines
- arranging elements so the eye can move easily around the page
- balance between darker and lighter elements etc.
Right, time to start gluing down, I always like to have my vocal image with some layers behind and some on top, so this is what I landed up with first of all:
I have put the ticket at an angle to break up the stark vertical and horizontal lines. The dark 45c piece definitely needs to be balanced out as does the heavy Received ticket:
Getting a bit better already, but there are still a few funny gaps, the whole piece is also a bit bottom heavy, so what next?
I have this round piece left, useful to break up the blockiness, but where to put it? Top right? Bottom right? where? So many possibilities....
Which one is better, - the left or the right? Neither quite does it for me, or am I starting to over think?
I know, - no collage Tim Holtz style is quite complete without some Ideaology, so in the end I land up with this:
A stencilled Number, this time in Black to balance out the heavier elements in the bottom left corner, a type-charm and rusted pen-nib to help the eye move around the page and finally (though I am not totally sure about this) the bit of measuring tape ribbon, to balance out the vertical lines on the left. It looks a bit forlorn there, but I have just thought of a solution for that, but you will see that in a moment.
Are you still with me? Onto the inside of the card, I'll go a bit quicker this time round as this post is pretty endless already.
A basic sideways pocket created with bits from the French Industrial paper stash. As you can see, I stitched both the front and the back to the base card with some messy stitching.
A central panel done in the same way as the front, but this time without the texture paste.
Some stencilling, done just with inks and then the collage, going through the same process, playing around with elements until some balance is achieved, - this time the vocal image is a freebie from the net, it can be found
here. This wonderful lady posts freebies every Friday.
On this photo the design is still a bit bottom heavy, but that will be balanced with the clip and heart that will be showing on both the front and the back, all rusted up with rusting powder for the vintage look:
Now all that is left to do is the tag:
However, as this post is so long already, I will do a separate post on that on my blog in a few days time.
So here you can see the tag in the pocket:
And here you can see the full inside:
If you are still with me, congratulations on being so patient. I hope you have enjoyed this project and that I have given you some inspiration to have a go at multiple layers and collage yourself. One final bit I have not mentioned is that it makes all the difference if you add some shadow to your vocal image. You can use a Distress marker, a coloured pencil or some charcoal, the possibilities are endless.
All the principles of this tutorial can be followed on both large and small projects, so why not join in our ATC challenge and give it a go?.
Almost all of the products used in this project are available from
Countryview Crafts our wonderful sponsors. I hope you have enjoyed my destination inspiration.
Thank you so much for visiting today and have a great creative week ahead!
xxx


WOW! love it!
ReplyDeleteASTRID!!!!! Your work is like magic... so I guess you have a very happy and healthy Husband too... (cooking is also appreciated in this household!!!) magic happens when you are a happy and enjoying life.. and it shows 100% here... love it all... your hands are very gifted to create like this... and share what you do... love it all girl... this is FANTASTIC.... Creation at its finest... Love, Light and Peace...Bonnie p.s. a posting like this ... it is NEVER too long... loved it all.
ReplyDeleteAstrid you have made my day! I have always admired your work and wondered how you make it look so amazing. This post is like the ultimate art class and what a gorgeous piece you have created. I THANKYOU so much for sharing your techniques with us all. I will certainly be giving his a go. Karen.x
ReplyDeleteSuch a lovely creation! Thank you so much for the step by step...it was enjoyable going thru the entire thing and seeing the final product come alive!
ReplyDeleteI love your post! They are so informative. NICE work, too...Thanks for all the INSPIRATION!
ReplyDeleteAmazing post, I enjoyed following along the entire way. Definitely loved seeing your process, thank you so much! True Inspiration and thank you soooo much for sharing!~kim
ReplyDeleteTutorial posts are posts that I gravitate to and learn so much from. It isn't too long because of the information you are sharing. Very easy to follow along with and so very helpful. Thank you for taking the time to put this together for all that are learning. xx
ReplyDeleteWow, your techniques are quite amazing. Looks fab. Xxx
ReplyDeletebeautiful project Astri...thanks for the fabulous walk through hugs xxx
ReplyDeleteA fabulous step by step Astrid and the end result is so beautiful.
ReplyDeleteVery inspirational too. TFS and hugs Annie x
WOW....Astrid what a fantastic tutorial...Brilliant step by step...so much inspiration we all get from you...the finished piece is outstanding as always... Thank you so much for taking the time to share this wonderful creation... Hugs May x xx
ReplyDeleteFabulous step by step Astrid! Great to see your thought process and of course your gorgeous project. Sue C x
ReplyDeleteHow gorgeous is this....love it in total Astrid...great crafting in so many ways!
ReplyDeletegreetings, Alie :-)
Now that's an awesome tutorial Astrid!!! It is so helpful to see how your creative brain tackles layering and balancing the design. With a ton of colouring/texture tips and techniques in here too this is a post that NEEDS to be bookmarked and revisited a lot! Thank you so much for sharing. Jenny x
ReplyDeleteFabulous tutorial, I thoroughly enjoyed reading it right through, thanks so much for all your effort and labour of love in this post. So many wonderful techniques used and I'm sure this won't be my last visit to this post.
ReplyDeleteJulie x
Awesome tutorial, lovely to see your creative process, thanks so much for sharing Astrid, and the finished results are of course....perfect!
ReplyDeleteI agree with all that Jenny had to say. I appreciate learning how you go about balancing your pieces as this is an area I need lots of work. Having no formal training and no innate talent for balance and color, tutorials are so helpful to me. Yours was very well done, and easy to follow along with. And I also will bookmark this for reference on all the background techniques. Your finished project is amazing, too! I'm looking forward to the tag tutorial. Thank you for sharing your talents with us.
ReplyDeleteAstrid, I thoroughly enjoyed the process from start to finish and love the way you built up the subtle and gorgeous layers of colors. The collaged images are of course so perfectly arranged. Thank you for sharing so much information and knowledge with all of us and your beautiful collaged card. Love this!
ReplyDeleteAbsolutely fabulous tutorial, and such a wonderful look into your creative mind, Astrid. TFS your wonderful tips on how you go about making your amazing artwork! You are an inspiration to us all!
ReplyDeleteA wonderful tutorial, Astrid, and wonderful creations
ReplyDeleteHi that is really helpful, it is inspiring to see your thought process. I am always stuck beyond the base layers. X
ReplyDeleteGreat tutorial, very well explained and the result is beautiful !
ReplyDeleteCorrie x
Astrid, your work is just stunning!! Love this project also. Great instructions!!
ReplyDeleteA very beautiful piece Astrid, made all the more precious by your sharing your 'how-to' process, ideas and techniques. I'm weak in collage stakes so this really appeals to me. Thanku for fab details and stunning result. Nicola x
ReplyDeleteYour work is AMAZING! Big fan!
ReplyDeleteIvette
A fantastic step by step taking us through your gorgeous layering process, Astrid. So lovely to see one of your beautiful creations from start to finish like this... thank you so much for sharing it all in such detail.
ReplyDeleteAlison xx
Oh ... I loved following your thought proces on your collage. Wow!! Really nice how you talked about finding balance in your piece. Often I can't figure out how to balance things out. You've given me some great ideas here. Thanks for taking the time and inspiring us with this gorgeous piece. Love it -- Mary Elizabeth
ReplyDeleteThank you Astrid for this fabulous tutorial. LOVE and ADORE the result. Oh gosh... You are so clever and talented !!!
ReplyDeleteLove all your work, love your style, the wau you add texture and many different embellishment articles !!!! Wow !!
Thanks a lot for sharing.
Hugs from SPAIN
Thank you mamablitger for this and your lovely comment on my blog. If you check underneath your comment on my blog, there, I have answered your question. I don't know how else to contact you. I don't have the reply feature on my blog....
DeleteHugs from Scotland :o)
Your work is amazing! Thank for tutorial.
ReplyDeleteThis is totally gorgeous and I love it x :) hugs x
ReplyDeleteDear Astrid, you truly takes my breath away with this stunning project.
ReplyDeleteTHANK YOU for showing so many steps, of doing and thinking.... it is totally beautiful, all.
Hugs,Dorthe
Astrid, this is such a phenomenal project! I always love your layers, done so seamlessly. Thanks for the tutorial, I can't wait to see the rest of the tut soon:). I don't mind reading through 15 pages of your steps and then re-read them again to digest all the intricate layers you build. More details the better for my novice brain. Thanks again for your generosity in sharing the techniques,
ReplyDeleteGorgeous......
ReplyDeleteLove this the way you built up the layers and brought it all together. I have already commented on the amazing tag! over at your blog. Dee x
ReplyDeleteAstrid, never ever be nervous YOU ARE A FABULOUS TEACHER! I really learned a lot! It is the most beautiful card I've seen in ages. Can't wait to get started and put what I learned into practice. Thank you!
ReplyDeleteWow!! This is jawdroppingly gorgeous Astrid!! The tutorial is just fabulous ... loved seeing each of the steps taken. Absolutely amazing work!! ox
ReplyDelete