
Hello Everyone
Amanda here and I'd like to welcome you to travel with me today on the penultimate leg of this months Destination Inspiration
Amanda here and I'd like to welcome you to travel with me today on the penultimate leg of this months Destination Inspiration
Here's a quick reminder of the contents of the travel bag
Product- Gesso
Technique- Crackle
Colour- Spring Green
Substrate - Kraft card
Technique- Crackle
Colour- Spring Green
Substrate - Kraft card
Yes, as always there's only a few supplies but I love to travel light so lets hop on board and continue the journey.
I have chosen to make a card as its something I haven't made in a while but I can also see this card working as a piece of wall art.

I began with the background and after adhering some torn tissue tape to a piece of cream card cut to size I added colour using Tim Holtz Wrinkle Free distress technique and a few distress inks in 'Spring Green' colours - Shabby Shutters, Peeled Paint, Twisted Citron and Brushed Corduroy.
Once happy , I then blended in more colour using the blending tool and Twisted Citron distress ink
Once happy , I then blended in more colour using the blending tool and Twisted Citron distress ink

Next came the stamping and stencilling. I used a selection of stamps and stencils, stamping in both Fern Green and Coffee Archival Ink and stencilling in Brushed Corduroy, Peeled Paint and Shabby Shutters distress ink .
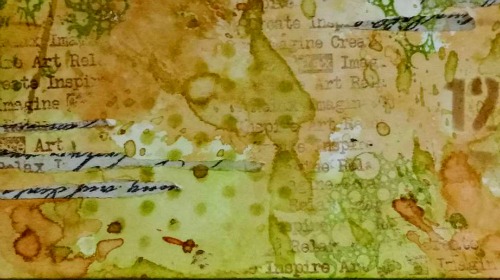
I also applied Paper Artsy Grunge paste through Tim Holtz Harlequin stencil to the top left and bottom right of the background . Once the paste was dry I repositioned the stencil and using a dry brush painted the stenciling using Walnut stain distress paint .

Now it was time to introduce the Gesso. Using my finger picking up a little white Gesso I caught the surface of the background in quite a 'free and 'loose' way ensuring I caught the textured harlequin stencilling as I worked. I do like the effect and appearance Gesso creates when applied like this.
With my much loved splatter brush I added some Gesso splats and a few Gesso circles created with bottle tops.
I used Tim Holtz Distress Crayons to darken the edges of the background panel and enhance the textured stencilling, smudging as and where needed. Love the shadow the smudging created around the harlequins!


I adhered the finished panel to a white and brown card stock mount before adhering to a Kraft card base. With the background finished and mounted I moved onto the elements and this is where I introduced the crackle. I die cut a circle, primed it with Gesso, painted it with Walnut Stain distress Paint snd crackled it using Finnabair's Platinum Crackle paste . Once air dried (overnight) I smudged distress crayons over the surface with my finger to enhance the cracks and give it a more grungy look .

I adhered a book plate to the cracked disc placing a word sticker in the window and adhering two green gem dots as faux fasteners. (photo to follow) .
The wood grain embossed strip is one I found in my stash that I'd coloured using distress crayons and the narrow corrugated strip again was found among my off- cuts and distress crayons used to add a touch of 'Spring Green'.

Now it was just a matter of playing around with all the elements until I was happy with the composition and adhered them in place.


and my card is complete.

Thank you for accompanying me on the 4th leg of Aprils Destination Inspiration. I hope I and my fellow creative guides, Debs ( terminal 1), Anne ( terminal 2) and Astrid (terminal 3) have inspired you to go and have fun creating. Don't forget to stop by again next Monday to see the final Destination Inspiration post this month
and our current Challenge 'Spring is in the Air' can be found here
Hope you all have a great week
Happy Crafting
Amanda x
What a brilliant card Amanda!! The background is spectacular, love the stencilling and what you did with it, the addition of paint, gesso and shadows, really enhances the original stencilling, so clever! the crackled centre piece with its additional elements looks super too, a fabulous card!!!
ReplyDeleteThank so much! Astrid xx
DeleteI totally love it Amanda, the texture is pure bliss! TFS ❤
DeleteWow Amanda, what a fabulous card!! Like Astrid, I think the background is spectacular and I just love the depth of crackle you achieved on the central circle piece. This is definitely a 'unique' piece and it is also very beautiful - love it! Hugs, Anne xx
ReplyDeleteThankyou so much! Anne. xx
DeleteThis is stunning Amanda. As usual you surpass yourself. Love it. Hugs Jo xx
ReplyDeleteThank you so much Jo for your kind words and for popping by today x
DeleteSo as ever you've knocked this challenge out the park again! LOVE the variety of yummy textures and the way your clever highlights and shading bring the 3D elements to life. Awesome Amanda xx
ReplyDeleteThank you so much! Jenny xx
DeleteWonderful Amanda :)
ReplyDeleteThanks ever so! Sam for your kind comment and for stopping by today . xx
DeleteWhat a lovely composition on your card design Amanda! what a marvelous background with the colors, traces of gesso and shadowing - a beautiful project using the limited supplies in your travel bag! Julia xx
ReplyDeleteThank you so much! Julia xx
DeleteGreat job, Girl!!!
ReplyDeletethank you so much Linda for your lovely words and for taking the time to stop by today xx
DeleteWonderful Amanda - the gesso over the dry brushed grunge paste is great adding to what was already an amazing background. xx
ReplyDeletethank you so much Nikki xx
DeletePink💓💓💓what an awesome project, love, love that background!!! Great layout my art sister 🖐
ReplyDeleteHey thanks Teri Thank you for your kind words and for stopping by today xx
DeleteDefinitely an art piece more than a card. Terrific design and composition Amanda. Its looks wonderful. Nicola x
ReplyDeleteThanks ever so! Nicola for your kind comment and for stopping by today xx
DeleteGorgeous textures, love it! Xx
ReplyDeleteThanks ever so! Wendy for your kind comment and for stopping by today
DeleteLovely Amanda. Love the layers you have added to the backdrop with the stencilling and stamping. The harlequin design us a lovely touch and I love your crackle on the focal piece. Tracy x
ReplyDeleteThank you Tracy x
DeleteAbsolutely gorgeous piece of art Amanda, made me happy. Thanks for sharing!!
ReplyDeleteThankyou! Shilpa xx
DeleteA fabulous make Amanda and a wonderful step by step too x your background is fabulous especially that texture.
ReplyDeleteLove the crackle and corrugated element too......TFS and hugs
Annie x
Thank you Annie xx
DeleteThis is unbelievably cool, Amanda! WOW! I'm floored. The colors and awesome texture are a feast for the eyes!!!
ReplyDeleteThank you Autumn xx
DeleteGorgeousness!!
ReplyDeleteThank you Jackie x
DeleteWhat a gorgeous card Amanda, your background is fabulous and love the book plate overtop that amazing crackled circle, a wonderful composition of textures and colours. You have used the contents of your travel bag superbly, thank you for sharing it with us! Deb xo
ReplyDeleteThank you Deb xx
DeleteLove it Amanda, my favorite colors and the rest is so wonderful. Sandy xx
ReplyDeleteThank you Sandy x
DeleteA job well done, and that's all that should be said really. Warm greetings!
ReplyDeleteThis comment has been removed by the author.
DeleteHi Amanda and everyone at a Vintage Journey! Sorry to not visit very often despite there are so many amazing creations shared here I know... But it's very hard to visit all inspiring blogs, and also friends' ones...
ReplyDeleteWell Amanda, what a great card, wonderfully done and detailed, very beautiful at the end... I love it to bits! Coco xx
Thank you Coco - no apology needed my friend xx
DeleteWowzer - I just love the layers in that zingy background, and the ornate plate works so well as a focal point, especially framed by that fabulous crackled disc - brilliant!
ReplyDeleteAlison x
Thank you! Alison xx
DeleteBeautifully created, just love this Amanda xxx
ReplyDeleteThank you! Brenda x
DeleteNice work Amanda...Loving that!
ReplyDeleteThanks Stewart xx
DeleteVery well done, and fabulous and creative use of the contents of the travel bag. This is one of my favorite features at AVJ, and I always come away so inspired. Your work here is simply stunning and I love how you created your gorgeous background! Suitable for framing? Well, heck yeah! Hugs!
ReplyDeleteThank you! Sara x
DeleteI love this project fabulous and thank you for the tutorial and inspiration, the layer technique is much clearer and I now want to play! x
ReplyDeleteThank you! Jenny Have fun playing x
Delete