
Yes today sees us sharing a project with you from the ever amazing Trish Latimer and we are so lucky to have her show how she uses her own range of stamps, giving us great ideas and techniques to use. I for one want to have a go at this as it's not my general style and is way out of my comfort zone but she makes it look so easy.

Trish is a full time mixed media artist, currently Editor of the best magazine in the world (!!) for stampers and mixed media addicts: Craft Stamper Magazine.
She describes her style as messy, painty, colourful and more than a little weird at times....
Trish also has her own range of WhimsyGirl Rubber Art Stamps.
So it's over to Trish to show us what she made for us .......
***
Hi there!
I'm thrilled to be a guest on the blog today, and with a theme very close to my heart!
I use words such a lot in my day job, and this spills over into my art work too. I just can't create a project without giving it a title or label of some sort, even if it is a very obvious 'home' sticker on a house for example!
One of my favourite words to use is 'star'.... it is in my email addresses, my business name and I may even have a few star tattoos dotted about my person :) Anything with a star motif is very welcome in my home!
So, for today's project I have incorporated one of my new stamp releases (with a star!) along with some star stamping, and even some 3D stars.....

I have created a step by step tutorial for you to see how I created it... so grab a cuppa (there are just a *few* pictures!) and I'll take you through it....
The background is a typical Trish painty-stamped mess. I drew a rough guide on a sheet of card, just to give me an idea of how big the background needed to be, then got busy with the paint. Simply smear on some gesso (or white paint), and start adding your first colour..

I've used just 4 colours for this, the first three are my main background tones. I've used yellow, baby blue and lime. Smear on lots of layers, adding in more white as well. Don't forget to keep drying so you don't end up with mud!

Once the first three colours have been used, go back in and do a spot of stencilling! I use sequin waste as my go-to stencils, although of course there are thousands of commercial stencil designs too. To keep everything cohesive, I just use the three background colours plus white to stencil with at this point....

The fourth colour is my 'pop' colour. This is the bright 'in your face' shade that stops the piece being subtle! I've used fucshia pink, and smeared it just as I did with the other shades..

To bring the bright tone into the background, and stop it looking like it's just sitting on the top, I add more stencilling over it...

Now to add the stamping! I use many different background stamps, all unmounted. I only stamp small parts of the design, building up a layered, collaged effect...

I love to add splatters, and this can be done in a couple of ways. Flicking with wet paint is one technique, but for this I used embossing powder. UTEE splatters can be controlled better, and are smaller than plaint splats. As all the products I used are permanent, I simply sprayed the surface lightly with water, then carefully sprinkled the powder where I want the splatters to be. The water 'sticks' the powder to the surface so it doesn't get blown away when you heat. When you heat the powder to melt it, all the water just evaporates away! Be warned though, don't try that if you've used water based inks or sprays, unless you don't mind your backgrounds bleeding!

I've used white UTEE powder, it's easier to see the effect in close up!

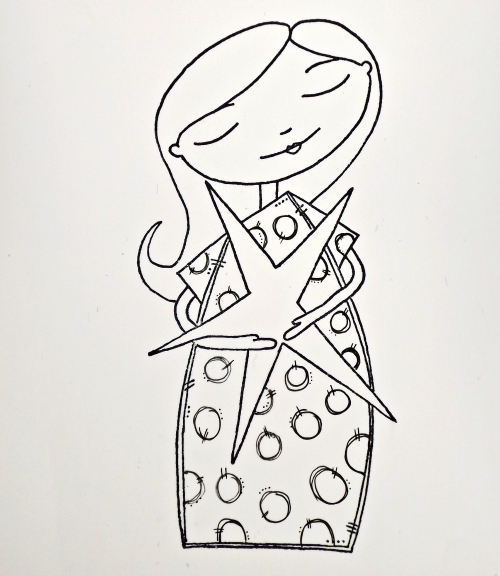
That is the background done, so we can move onto the figure. I've used WhimsyGirl Seven from my range of stamps.

I wanted a dotty dress, so doodled some on!
I coloured her face with Inktense pencils and a waterbrush..

Her hair and dress are coloured using Ecoline drawing inks. I put these into a waterbrush for ease of use! Blue for her dress....
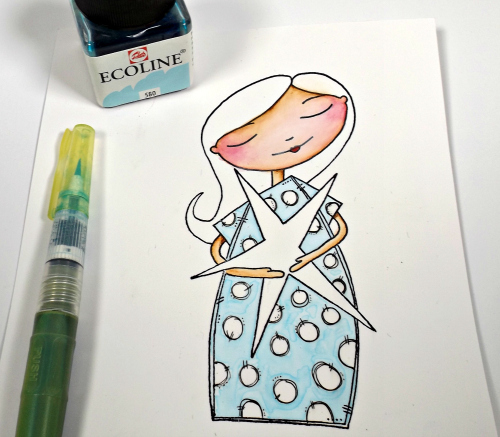
and pink for her hair....

I coloured the star yellow and added glitter..

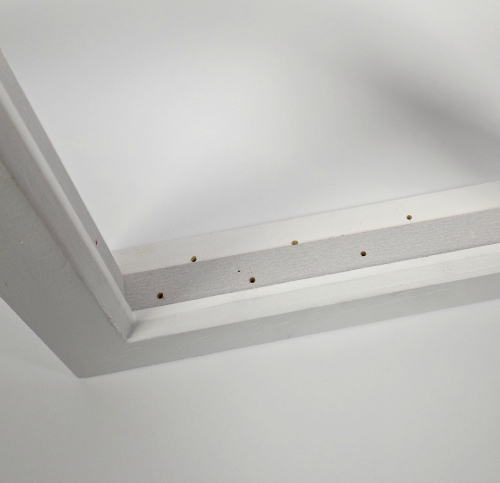
Now we have the background and figure, we can start to assemble the frame. I've used a cheap, deep box frame, and removed the glass and back piece..

I drilled holes in the bottom edge (I drilled 6 but decided to only use 5 in the end. The other hole was simply covered up with gesso!)
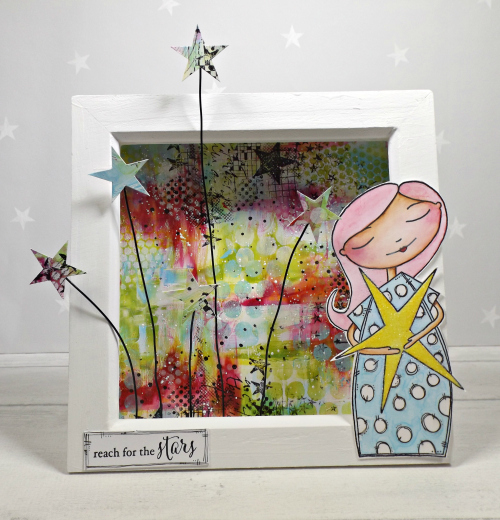
I cut stars from scrap card, then glued them to black wires...

These were then glued into the holes in the frame...

All that remains is to cut the background to size and glue it to the back, add the figure to the frame and glue on the finishing touch... the words, of course!

I hope you like it!
Full video tutorials on creating smeared paint backgrounds, and also how I colour faces can be found on my blog: www.inkpaintbeads.blogspot.co.uk
Take care, Trish xx
***********************************
Wow Trish I just adore your journalling style and how you have used it to create this beautiful shadow box. Your stamps are gorgeous and I am sure there will be many of our readers who already have them and will so pleased to see how you incorporate them into your work.
Thank you so much for taking time out of your very busy schedule to make and share this with us today.
****
Our current challenge 'Words that are Special' is still open for you to join in, we have lots of fabulous entries already, but there's always room for more. Do pop over to take a look at the amazing inspiration from the Creative Guides and see if you have a piece or can make something to join in the fun.
Have a great weekend everyone
hugs Brenda, Trish and the Team xxx
What an awesome 3D project!!! I love the colourful background and the lovely Whimsy Girl! Thank you for sharing the ideas and the link where I can find the Whimsy Girl :-)
ReplyDeleteWhat a gorgeous project from Trish..it gets a gold star in my books ;0) What a sweet star stamp....how cool that she has her own range of stamps..I wasn't aware of that. Great work xxx
ReplyDeleteA super project by Trish on her own characteristic style! Fabulous design and super tutorial! Love the idea of the splatters with Utee! Thanks for taking the time to create such a wonderful project for us!!
ReplyDeleteLove your project Trish and great to read your step by step and your stamps are gorgeous. It's great to have you on board as Guest Creative Guide
ReplyDeleteHugs Annie x
Wow Trish, your project is fabulous, from your beautiful trademark painty background to the gorgeous little 'star' girl. I just love her pink hair! Thanks for sharing that great tip about creating spatters with embossing powder - who would have thought!! So lovely to have you here as our Guest! Hugs, Anne xx
ReplyDeleteLove those layers in the background - pure Trish! - and the fabulous stars on stems. A real treat of a project - great to have you on board this month.
ReplyDeleteAlison x
What a great project for someone like me that is just learning. Thank you Trish for doing such a good tutorial. Your finished project looks amazing. Hugs Rita xxxx
ReplyDeleteFabulous project Trish, love the image and design.
ReplyDeleteHugs
Linda xxx
Such a clever way to use a shadow box! Great design and wonderful colour. Thanks for being a guest here Trish xx
ReplyDeleteWhat a great little shadow box Trish! LOVE the stars shooting out from the bottom and you sweet little girl! Beautiful coloring on her! and thanks for sharing just how you made that wonderful background! Thank you so must for guesting here at AVJ! Julia xx
ReplyDeleteBrilliant project! The coloring on your little girl is amazing and the bold background works so well to set her off! I've used embossing powder with water to make splatter before but I'm going to give UTEE a try! Thank you for the great tutorial!
ReplyDeleteWelcome Trish. Fabulous project . Really uplifting . Just love those shooting stars that your adorable 'star' girl is no doubt wishing on. Great step by step. Thanks for being our Gd month .
ReplyDeletex
OMGOSH OMGOSH OMGOSH!! That Whimsy Girl IS ADORABLE!!!! I think I need her......
ReplyDeleteI love how you apply colour Trish, so eye catching and the colours are gorgeous . Delightful way to showcase your whimsy girl and I adore the stars . Tracy x
ReplyDeleteThis is such fun Trish! Great background! X
ReplyDeleteThis is amazing Trish, adore your painty, stenciled, spattered background (love the UTEE spatters!) and your Whimsy girl is adorable and beautifully coloured. The stars radiating from the bottom of the frame were a genius touch, what a wonderful creation. Thanks so much for joining us at A Vintage Journey as our special guest and sharing this wonderful project, you are a star! Deb xo
ReplyDeleteWelcome Trish! I too love the way you've added these awesome stars. The whole artsy yet modern look really works well! This is just gorgeous! Hugs, Autumn
ReplyDelete