
Hello vintage travelers! You have safely arrived at Terminal 5! I'm so happy you joined us for the final leg of our June inspiration journey. It's Sara Emily here with my project using the items in our traveling bags for the month of June. To refresh your memory, here's a list of what's in our travel bag:
Product - Paint
Technique - Any Resist Technique
Color - Shades of Orange
Substrate - Beer Mat or Coaster
Here's a recap of all four of our previous stops on this month's journey: Terminal #1 with Annie, Terminal #2 with Deb, Terminal #3 with Julia, and Terminal #4 with Amanda. You can click on the Terminal number and be magically transported to see the details of their creative journeys.
This is what I made with these items--a set of functional coasters.

Substrate:

I picked up a mixed set of 5 coasters for just 25 cents at a yard sale just days after finding out I would be creating for this month's Destination Inspiration. Here's one of the coasters before I altered them.


I sanded the coasters first, although I had a change of plans, and this step proved unnecessary. I found this fun soda cap design (it's got orange in it, after all!) in one of Tim's old paper stashes and cut some to fit my coasters. I had a little fun with this, trying to pick out areas of the paper that had the 'best' bottle caps.
I adhered the paper with Distress Collage medium and smoothed out the bubbles with a brayer. I sanded around the edges to remove any excess paper and to give a nice round edge.

I blended Vintage Photo Distress ink around edges and over the top and gave it a coat of the collage medium. I guess I could have used my Vintage Distress Collage medium here and saved a step. But if you don't have the vintage medium, it's nice to know you can make your own using this method. I love the matte finish.
Technique, product and color:

Dry the coated coaster thoroughly and apply petroleum jelly (I used my finger) in areas you want the paint to be resisted.
While it's still wet, brush on paint color. Dry with a heat tool (I burnt mine out on this project!) just until the paint is no longer shiny. You want it to be a little tacky. I wiped vertically, then horizontally with a clean paper towel. This leaves behind just some of the paint.

Repeat these steps with the petroleum jelly and different paints. Apply some jelly over areas where there is already paint so that color will show through. Make sure to use a clean paper towel to wipe away the paint each time.
I used DecoArt Cadmium Orange acrylic, DecoArt Red English Oxide Media and Cobalt Teal Fluid acrylics and Distress Carved Pumpkin and Spiced Marmalade. I varied the order of their application on each of the coasters, which gave each a different look, some more pleasing than others. You can see that the more layers of paint you add the more the paint will bead up, even in areas you haven't applied more jelly, because of the build up of the oils from the previous petroleum jelly applications. I love the random outcomes you get with this technique.
Finishing up...
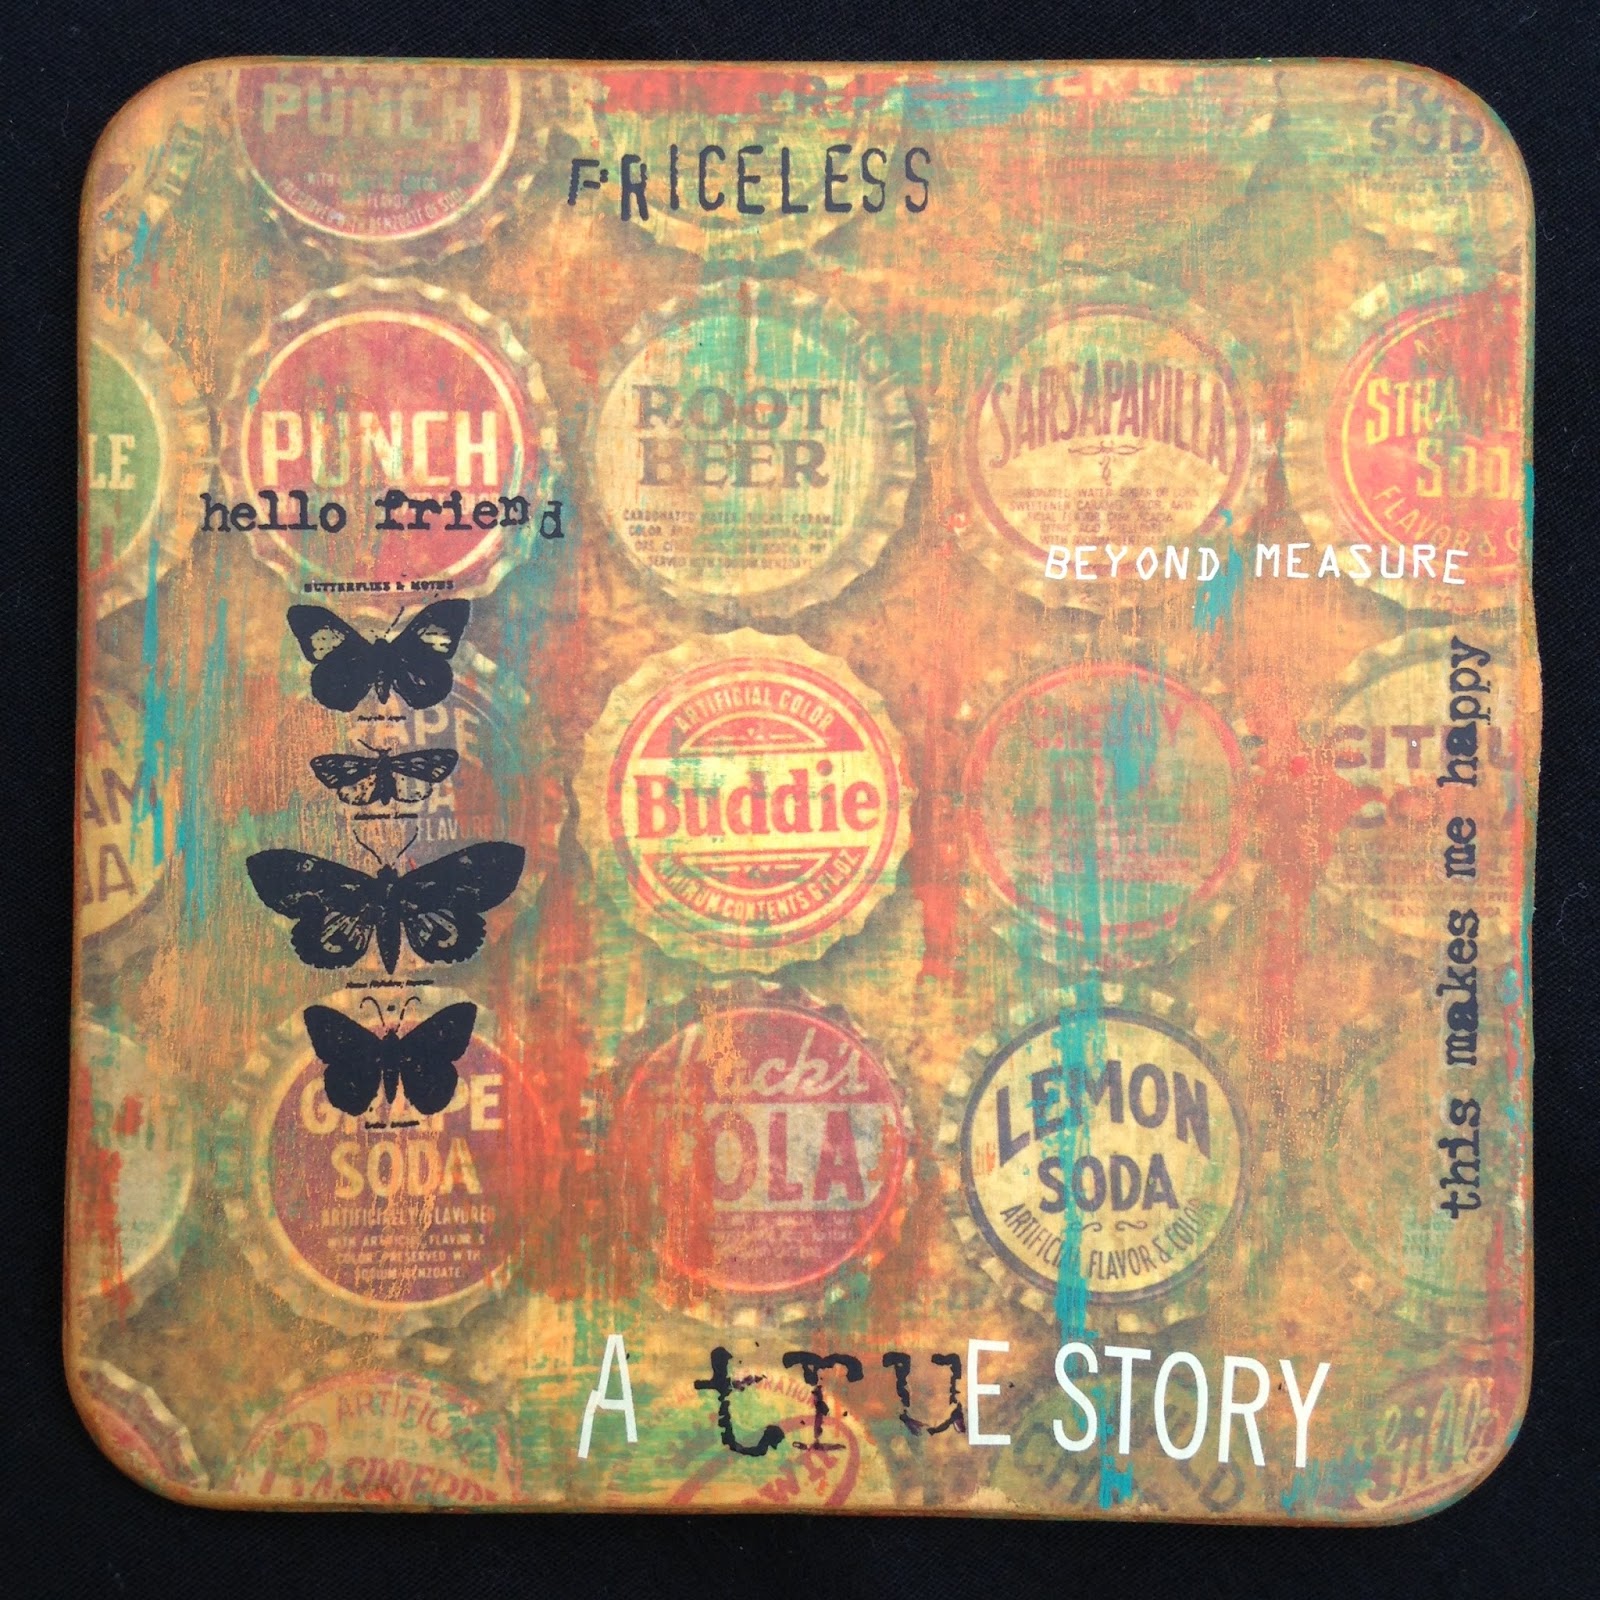
To me, no grungy project is complete until I bring out the sanding block. I sanded each one to give it a more time worn appearance. I wiped them with a damp cloth to remove any dust and applied Tim's Remnant Rubs and other rub ons from my stash. These coasters were a little gift for a very special friend, so I tried to choose words that fit her and were appropriate for our friendship. I purposefully added the rub ons around the edge so they would be visible even when a glass or cup was placed on them.Lastly, I finished with three coats of DecoArt Ultra Matte Varnish so the artwork would be resistant to any liquids. Here are photos of the four separate coasters:


That's it for me today! I hope you will stop back on Friday when our newest monthly challenge goes live! But you have until July 6 to get your projects linked up to our current "Canvas" challenge for a chance to win a $25 gift voucher to Shimmerz Paints or a chance to be one of our Pinworthy Guest Creative Guides in the future. Thank you for coming along with me on my journey!
Sara Emily
What a fantastic set of upcycled coasters Sara Emily . Really love how you have transformed them using the bottle cap papers and the PJ and paint resist technique. Great step by step. The Remnant rubs are a great finishing touch and clever thinking to keep them to the edges so they can still be seen when in use.
ReplyDeleteTerrific use of the travel bag goodies .
hugs x
Your coasters are SO cool Sara Emily! I love your choice of the bottlecap paper and your resist technique with the paint and vaseline came out wonderfully - thank you for all the how to photos and descriptions - a beautiful project using the items in your travel bag! I'm sure your friend will treasure these and remember you each time she uses them! Julia xx
ReplyDeleteThese look fabulous! Love the paper and the beautiful techniques.
ReplyDeleteHugs
Linda xxx
These are phenomenal Sara Emily! The color you achieved with the resist is breathtaking and your use of orange is my kinda good! Love love this fabulous and meaningful set of coasters and your gorgeous description of how you made them. You are amazing my friend! Hugs, Autumn
ReplyDeleteYou have done an amazing job on these mats Sara!! I love how you transformed them with those wonderful papers and the resist techniques - the Cobalt Teal looks just fabulous!! Love, love, love them!! xxx
ReplyDeleteFabulous, Sara Emily! I love the grungy layers of paint adding depth and distressing to the fab bottle top design, and the rub-ons are the perfect finishing touch. A brilliant final flourish at Destination Inspiration this month.
ReplyDeleteAlison x
Stunning creations!
ReplyDeleteawesome work Sara - Love this paper and what a brilliant way to use it! Hugs rachel x
ReplyDeletetotally awesome makes Sara xx Love the way you altered the coasters and with amazing results x great step by step and very inspiring too
ReplyDeleteGreat work
Annie xx
Brilliant Sara, what a wonderful set of coasters and that papaer is just perfect for them!!! Love your step out tutorial also, full of great ideas and inspiration. A brilliant finale to this month's travel adventure!!
ReplyDeleteWhat a brilliant technique, Sara Emily! I would never have thought of that! Love the final aged, grungy appearance. Fabulous project! Tanks so much for sharing in this wonderful tutorial! xo
ReplyDeleteThank you for all your support and kind comments! To all our American friends, I hope you are enjoying a safe and happy 4th of July!
ReplyDeleteLove these altered beer mats... Fabulous paint resist work for a wonderful grungy finish xx
ReplyDeleteThis is a great project- love it!
ReplyDelete