
Hello everyone and thanks for stopping by, it's Deb here today to share a tutorial with you on how I created by vintage nature inspired folio album for our current Book It! challenge.


This folio album was inspired by a YouTube tutorial by papercrafter45. She has a wonderful 6 part video tutorial on how she made her 8-Pocket Mini Folio so be sure to check it out. I've changed the dimensions and the design of some of the tuck spots and pockets on mine (think I ended up with 22 pockets and tucks!) but many of the design aspects follow her videos pretty closely. The measurements that I am going to give you in my tutorial are for the outside dimensions of the pages and pockets only and do not include the 1/2" edge flaps (see papercrafter45's videos to see what I'm talking about!) so take that into consideration if you decide to make one of your own. This tutorial is pretty long so grab a cup or glass of our favourite beverage and let's get started!
NB: most of the papers and images used on this project are courtesy of Ephemeras Vintage Garden, Vectoria Designs and Far Far Hill.
As is my usual style, I started this project very backwards by making an insert to put inside the folio album before I ever made the album! I saw another video tutorial by papercrafer45 for an envelope pocket made from a No. 10 envelope and decided to make a little 3 pocket envelope folio. I adhered two of the envelope pockets back to back (see papercrafter45's video for the envelope pocket how to, she explains it much better than I ever could!) and made a cardstock 'spine' to attach them to the 3rd envelope pocket

Six tags were made to insert into the two main pockets on each of the three envelopes (Tim Holtz's Bird Feather stamp set and Wildflower die cuts).
The crossed fold on each pocket seemed like a good place to tuck some tickets so I stamped up Tim Holtz's Ticket Booth stamps and printed out some more tickets from Vectoria Designs to add to each of the three pockets.

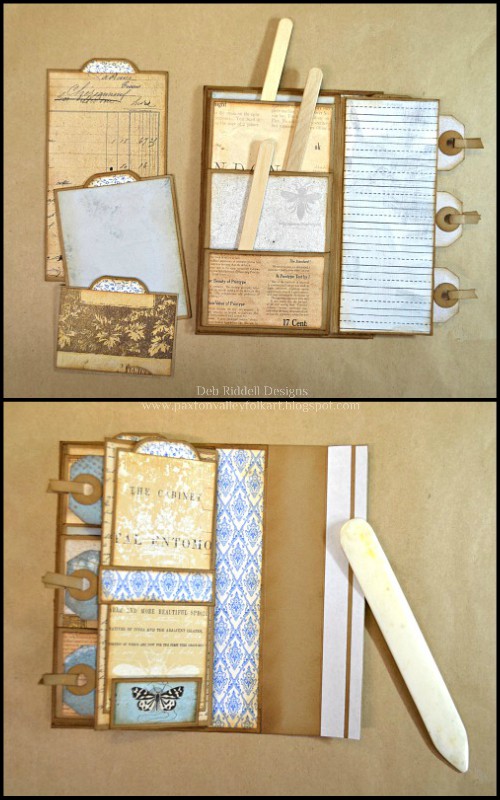
Now that I had my first insert I knew what size of folio album I had to make! I made a back cover measuring 4 1/2" x 6 1/4" (remember, that doesn't include the 1/2" measurements for the reinforced edges) and added a tuck pocket with an 1/8" gusset to the inside that opened to the left and top.
The No. 10 envelope folio was attached to the tuck pocket, leaving another pocket behind the envelope folio by only gluing it on three sides and leaving the top open.

A flap was adhered to the left edge of the tuck pocket with a 1/2" gusset to accommodate the depth of the No. 10 envelope folio underneath it.
A belly band and a tag stop (the little bee image from Ephemeras Vintage Garden) were added to the inside of the flap along with a tab for easy opening.

A journaling card was made to insert under the belly band.
On the front of the flap, two pockets were added.

And two folded tags were created to slip inside them to create a faux waterfall effect.
A little mini art journal was made to slide inside the back cover tuck pocket. I filled it with a few pages of mixed media papers and simply tied them in with a piece of elastic cording so they could easily be removed and new ones added as the journal pages were completed.

Back cover done, now on to the front cover! Same dimensions of course as the back cover (4 1/2" x 6 1/4") and this time I made a pocket measuring 6" x 3 1/4" with an 1/8" gusset for another little mini art journal.
Another flap was added to the front cover pocket, this flap was created as a pocket flap with three spots for little No. 1 manila tags and a belly band.

The No. 1 manila tags were stamped with a discontinued Crafty Secrets stamp set, a tag was made to slide underneath the belly band and another tag stop added to the bottom (the butterfly image from Ephemera Vintage Garden).
Another mini art journal was created in the same manner as the first one to slide inside the front cover pocket.

Three pockets were added underneath the pocket flap.
And three tags were made to slide into the pockets.
Time to put it all together! I stacked the front and back covers together and measured the depth of the folio album. This became the width that I needed for the album spine plus I added about a 1/4" more in case I decided to stuff more into it (although at this point it's pretty well stuffed!). I added an inch on each side to this measurement, scored the cardstock at 1" on each long side and attached the spine to the outside of the front cover with double sided tape.
The spine was then attached to the outside of the back cover and voila, a folio album!

The covers and spine were covered with decorative papers, a few embellishments were added here and there (Tim Holtz's Mini Detailed Butterfly, Small Tattered Florals and Cameo Frame) and a belly band created to keep it closed (it just slides off and on). And that was it, my folio album was complete.
I made a little flip through video to show you the completed project, hope you will enjoy seeing it.
This folio album was inspired by a YouTube tutorial by papercrafter45. She has a wonderful 6 part video tutorial on how she made her 8-Pocket Mini Folio so be sure to check it out. I've changed the dimensions and the design of some of the tuck spots and pockets on mine (think I ended up with 22 pockets and tucks!) but many of the design aspects follow her videos pretty closely. The measurements that I am going to give you in my tutorial are for the outside dimensions of the pages and pockets only and do not include the 1/2" edge flaps (see papercrafter45's videos to see what I'm talking about!) so take that into consideration if you decide to make one of your own. This tutorial is pretty long so grab a cup or glass of our favourite beverage and let's get started!
NB: most of the papers and images used on this project are courtesy of Ephemeras Vintage Garden, Vectoria Designs and Far Far Hill.
As is my usual style, I started this project very backwards by making an insert to put inside the folio album before I ever made the album! I saw another video tutorial by papercrafer45 for an envelope pocket made from a No. 10 envelope and decided to make a little 3 pocket envelope folio. I adhered two of the envelope pockets back to back (see papercrafter45's video for the envelope pocket how to, she explains it much better than I ever could!) and made a cardstock 'spine' to attach them to the 3rd envelope pocket
Six tags were made to insert into the two main pockets on each of the three envelopes (Tim Holtz's Bird Feather stamp set and Wildflower die cuts).
The crossed fold on each pocket seemed like a good place to tuck some tickets so I stamped up Tim Holtz's Ticket Booth stamps and printed out some more tickets from Vectoria Designs to add to each of the three pockets.
Now that I had my first insert I knew what size of folio album I had to make! I made a back cover measuring 4 1/2" x 6 1/4" (remember, that doesn't include the 1/2" measurements for the reinforced edges) and added a tuck pocket with an 1/8" gusset to the inside that opened to the left and top.
The No. 10 envelope folio was attached to the tuck pocket, leaving another pocket behind the envelope folio by only gluing it on three sides and leaving the top open.
A flap was adhered to the left edge of the tuck pocket with a 1/2" gusset to accommodate the depth of the No. 10 envelope folio underneath it.
A belly band and a tag stop (the little bee image from Ephemeras Vintage Garden) were added to the inside of the flap along with a tab for easy opening.
A journaling card was made to insert under the belly band.
On the front of the flap, two pockets were added.
And two folded tags were created to slip inside them to create a faux waterfall effect.
A little mini art journal was made to slide inside the back cover tuck pocket. I filled it with a few pages of mixed media papers and simply tied them in with a piece of elastic cording so they could easily be removed and new ones added as the journal pages were completed.
Back cover done, now on to the front cover! Same dimensions of course as the back cover (4 1/2" x 6 1/4") and this time I made a pocket measuring 6" x 3 1/4" with an 1/8" gusset for another little mini art journal.
Another flap was added to the front cover pocket, this flap was created as a pocket flap with three spots for little No. 1 manila tags and a belly band.

The No. 1 manila tags were stamped with a discontinued Crafty Secrets stamp set, a tag was made to slide underneath the belly band and another tag stop added to the bottom (the butterfly image from Ephemera Vintage Garden).
Another mini art journal was created in the same manner as the first one to slide inside the front cover pocket.

Three pockets were added underneath the pocket flap.
And three tags were made to slide into the pockets.
Time to put it all together! I stacked the front and back covers together and measured the depth of the folio album. This became the width that I needed for the album spine plus I added about a 1/4" more in case I decided to stuff more into it (although at this point it's pretty well stuffed!). I added an inch on each side to this measurement, scored the cardstock at 1" on each long side and attached the spine to the outside of the front cover with double sided tape.
The spine was then attached to the outside of the back cover and voila, a folio album!
The covers and spine were covered with decorative papers, a few embellishments were added here and there (Tim Holtz's Mini Detailed Butterfly, Small Tattered Florals and Cameo Frame) and a belly band created to keep it closed (it just slides off and on). And that was it, my folio album was complete.
I made a little flip through video to show you the completed project, hope you will enjoy seeing it.
Thanks as always for stopping by today and thank you for bearing with me to the end, that was one long post! Hope that I've inspired you to enter our Book It! challenge, there is something so satisfying about making these little albums and I love the challenge of figuring out how to construct them. Have a wonderful weekend everyone and happy creating,
Deb xo
Terrific tute post, Deb. Great to see and learn how your fabulous folio came together . Such a labour of love but definitely worth it. Tfs .
ReplyDeleteAmanda x
Oh my! What an absolutely fantastic folio Deb - this is truly wonderful. I love all the little inserts and tags and adore the mini journals / sketchbooks front and back. Your tutorial is brilliant with all the post its and wonderful photos plus if these weren't enough the video is perfect too. Thank you so much for sharing - makes me want to go find some papers and start making - alas it is nearly bedtime so better wait! Thanks so much for this - one to bookmark for sure, Nikki xxxx
ReplyDeleteYour folio is wonderful Deb, beautifully created and with lovely little tucks and places to keep special mementos. I enjoyed your excellent tutorial and the video too, thanks so much for sharing! Anne xxx
ReplyDeleteOh my Deb, this is just amazing (both the folio and the post) you have created such a wonderful project and beautifully created and made your folio full of incredible pockets, tucks, tags and booklets to store your memorabilia. The video is the icing on the cake in terms of getting a near to real life experience of exactly how much you have squeezed in and the construction of the folio and hidden areas. Wow, wow, wow what a magnificent make from start to finish. Thank you so much for sharing all the details. Happy weekend xxx
ReplyDeleteI adore your stunning folio Deb with an amazing detailed tutorial, which is full of inspiration from beginning to end x TFS I love it xx
ReplyDeleteHugs Annie xx
It really is a fabulous creation, Deb. As I said over at youtube, I loved seeing all those pages in action - and I really appreciate seeing it all in close-up detail here in the photos too. A brilliant post, thank you.
ReplyDeleteAlison x
this is such a beautiful and inspiring creation Deb x I love the details both inside and out and your tutuorial is fabulous. Thank You so much for sharing
ReplyDeleteHuge hugs Annie xx
Deb, Deb, Deb! This is one incredible project, and so well thought out! I giggled when I read how you made the inside before the cover--sounds like what I would do. In the process of making a mini with lots of pockets and such, I can appreciate the thought and time that went into this. I love all the details, the flips and flaps and especially those little booklets that at first I thought were real books! Blackie's Standard Dictionary is so cool--is that a stamp or from one of the paper collections? Another of my favorite details is the faux waterfall-- so cool and wished I would have lifted this element on my own album! Your colors are beautiful, and each delightful tag you pull out is more lovely than the next! Watching your flip through video was like watching a magician--so many surprises! LOVE this, Deb! You have really knocked this one out of the ballpark! Hugs!
ReplyDelete