
Hello everyone! It's Jo from Let's Art Journal here with this month's Creative Card Making tutorial.
Today I'm sharing some Mixed Media cards that are suitable for different occasions such as birthdays, to say thank you or just simply to say hello!
Today I'm sharing some Mixed Media cards that are suitable for different occasions such as birthdays, to say thank you or just simply to say hello!

I used some fun techniques to make these cards, here's how they came together ...

I started by creating a Masterboard from a piece of A4 Mixed Media paper using one of my favourite smooshing techniques by stamping Peacock Feathers, Twisted Citron and Peeled Paint Distress Ink onto a blending mat, spritzing with water and then pressing the mat onto the paper. I did this a number of times, drying the paper with a heat gun between each application of ink, until I created the intensity of colour I was after.
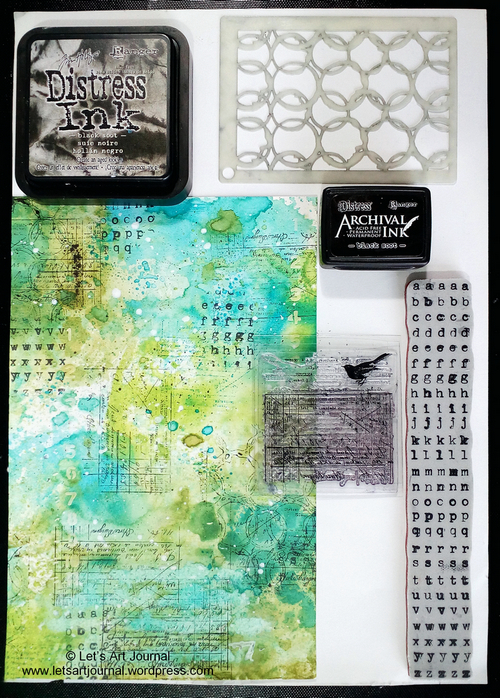
I used an Interlocking Circles stencil as a stamp by covering it with Black Soot Distress Ink and pressing it firmly onto the paper using a brayer. I also stamped a receipt stamp and a letter stamp using Black Soot Distress Archival Ink.

I added some texture by splattering the Masterboard with black and white acrylic paint and by applying some numbers using Texture Paste through a Tim Holtz mini stencil.
I added some texture by splattering the Masterboard with black and white acrylic paint and by applying some numbers using Texture Paste through a Tim Holtz mini stencil.

I cut the Masterboard into four panels to create the backgrounds for my cards. Then I used two sets of Tim Holtz Thinlets to die cut some flowers and butterflies from white linen cardstock.

I stuck one of the flowers and a butterfly onto each of the background panels; the body of the butterflies were coloured using a black marker. I added a Small Talk sticker for the wording and then I edged each panel with the black marker.

To finish, I mounted each panel onto a card (approximately 6x4" in size) which I had made from white cardstock.
If you are interested, there's a full list of the materials that I used over at my blog here.
If you are interested, there's a full list of the materials that I used over at my blog here.

I hope you enjoyed my card making journey today, thanks so much for joining me!
Don't forget that you still have time to join our current challenge It's Gelli Time; it would be lovely to see you there!
Happy and creative wishes! Stay safe and well! Jo x
These are so beautiful I love them Jo
ReplyDeleteThanks very much Kathy! Happy weekend and keep well my friend 😀. Hugs, Jo x
DeleteReally creative and this inspired me ...
ReplyDeleteThanks for sharing.
Have a nice days.
Greetings from Indonesia
Thanks so much for joining us at AVJ and for your lovely comments! I'm so pleased that you were inspired by my tutorial 😊. Wishing you a happy weekend, it was so nice to meet you 😊. Take care! Hugs, Jo x
DeleteFabulous cards Jo, using some super background techniques! Great step by step too! The finished cards with the white die-cuts against the colourful backgrounds, make for really striking results!
ReplyDeleteThank you Astrid! I so enjoyed making these cards, they were fun to make 😀. Happy weekend and keep safe! Hugs, Jo x
DeleteThese are wonderful, Jo - the masterboard background is glorious - such fabulous spring time colours, and the white die-cuts look so fresh and pretty against them. A really clever design for making batches of beautiful cards - thanks for sharing the inspiration.
ReplyDeleteAlison x
Thank you very much Alison! The blue and greens of the Distress Inks that I used for the background are my go to colours as they are my favourites, so glad you like them too 😀. Happy wishes and stay well! Hugs, Jo x
DeleteAbsolutely gorgeous! Love the varied techniques that you used! Just a quick question, if you wouldn't mind responding ... what is the letter stamp? Is it a Tim Holtz, and is it still available (might be able to find it on eBay if you knew the name of it).
ReplyDeleteThanks so much! Yes, the letter stamp is Tim Holtz Collection Stampers Anonymous (Documented CMS226) and having had a quick look it is available in a few shops online 😁. Hope this helps and wishing you a happy weekend! Hugs, Jo x
Deletewhat a beautiful master board you created - a wonderful way to make 4 beautiful cards at once! Love your background and the white die cuts! xx
ReplyDeleteYour cards are absolutely gorgeous, Jo . Such a wonderful set ! Love the background colours and detail and your white die cuts against them give your cards a fabulous freshness. Great instructions too .
ReplyDeleteTfs x
Such a fabulous colourful masterboard Jo ! and the resulting cards are stunning. A fabulous tutorial. Jennie x
ReplyDeleteA fabulous post Jo x Love the background details and vibrant colours xx Stunning cards x
ReplyDeleteTFS and huge hugs
Annie xx