

Hello and thank you for joining me today for the Beautiful Blooms Tutorial. For our current challenge I used Eileen Hull's Stand Up Easel for the base of my project and embellished it with layered stitched papers and handmade blooms.

I shall start the tutorial with sharing how I made the blooms:

I cut three flower petals and added Distress Inks (Seedless Preserves and Victorian Velvet) lightly around the edges and using a cotton bud a circle of colour in the middle of the bloom. I have used Shabby Posies floral Spellbinders die designed by Tammy Tutterow (one of my favourites!).

Each bloom was spritzed with water and then scrunched up and left to dry. I find it easier to spritz on a muslin nappy as then the cardstock is not sitting in a puddle of water.

When the flowers are fully dried (best left to dry themselves overnight), gently ease out the petals (top), then using a bone folder smooth out each petal of the bloom keeping in some of the creases (middle) and finally using a pokey tool (or thin knitting needle) curl the edges lightly.

For the inner bud I die cut four multi leaved petals from Tim Holtz Sissix Thinlits Small Tattered Florals. Using a ball tool I have broken down the fibres of each leaf and then gradually glued each alternate leaf. It is a bit messy but if you use clear dries PVA it won't show!

This is the second layer, the first layer is the most difficult but to make it easier you could add a small bead in the first bud to give you something to layer around.

These buds can then be glued into the middle of the crimped flower. I have also added a cream cardstock stamen die cut from a Heartfelt Creations Stamp/Die Set. Once you start making flowers you collect favourite pieces from different sets!

Once you get in the way of curling the flowers you can create a nice depth which allows the flowers to be layered over each other.
To create the backing for the flowers I decorated the two parts of the Easel Stand separately.
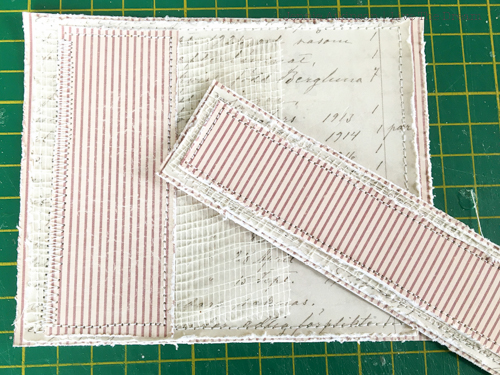
My base card was cut to 5" x 4" for the back and 5" x 1 3/8" for the stand. I then layered complimentary papers and some scrim stitching the pieces together.

I created a bit of texture by using Tim Holtz Texture Paste through a stencil. It didn't take too well, but is enough to give a suggestion!

I then adhered the panels to the Stand before adding final layers of embellishments and muslin.

Then ribbon and leaves.
I could then play around with the placement of the flowers and final embellishments.


I hope this tutorial has inspired you to showcase your own blooms whether they be handmade, die cut, stamped, painted or pressed. You can link up your project here and the challenge will be open until the 28th May.
I hope you have a blooming lovely weekend!
Jennie x
Beautiful card, gorgeous flowers thank you so much for sharing this tutorial.
ReplyDeleteAbsolutely amazing flowers, Jennie - and such a clear and detailed tutorial full of helpful tips and knowhow. Thank you so much for sharing how you created them, as well as the lovely layers of the card itself. (Love the textured text!).
ReplyDeleteAlison x
Absolutely gorgeous flowers and a very clear tutorial. Thank you, Jennie.
ReplyDeleteAmazing flowers and card Jennie !! They are wonderful. Thank you very much for your great tutorial you share with us.
ReplyDeleteI wish you a very nice weekend, stay safe and well
Big hugs, Caty
Your flowers are indeed really 'beautiful blooms' , Jennie. They make for such a stunning focal feature enhanced even more by all your other lovely creative touches and well chosen embellishments. A gorgeous project. Thanks for sharing your excellent tutorial .
ReplyDeleteA x
You are the queen of beautiful blooms Jennie x It was wonderful to see how your make came together and I love the background details but those flowers are the icing on the cake x Thank You for a great tutorial
ReplyDeleteBest wishes
Annie x
Annie has taken the words out of my mouth! You are indeed the queen of beautiful blooms! Thankyou for sharing some of your techniques with us in this fabulous tutorial! The finished easel stand is gorgeous too !toni xx
ReplyDeleteOoh-la-la! This is so pretty and serene. Thanks for sharing the technique for making these beautiful blooms. Hope you are staying safe and well. Hugs!
ReplyDeleteThese are so delicate and gorgeous - I''m going to have a go - although I don't have those Tim Holtz colours - oh I feel a purchase coming on lol!
ReplyDelete