
Hi Everyone
Amanda (ink-a-pink) here today sharing a tutorial for my 'Finder's Keepers' tag that I created for our current Challenge, Tag You're It! My original post, shared when the challenge launched on the 7th August can be seen here.
There's nothing complicated about the creativity so hopefully the techniques, steps I share will be 'user friendly'.
It is a long post so you may want to grab a cuppa or at least get yourself all nice and comfy before scrolling on.

My substrates ,of course were 'Tags', one That's Crafty MDF Tag #10 and one That's Crafty Greyboard Tag #8. I gave them both a quick coat of white paint/ gesso so they were all prepped and ready for all that came next!

Starting with the large tag...
Cover it with Tim Holtz Typeset Collage Paper (or any other paper of your choosing)
Cut/ Sand off any excess 'overhang'.
Seal with Matte medium or Collage Medium
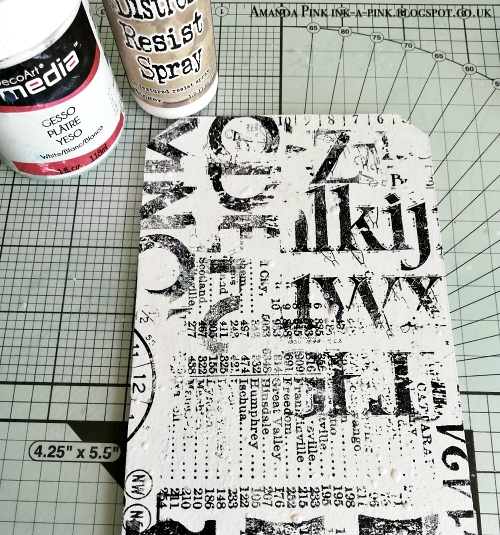
Spray some Tim Holtz Distress Resist Spray on to the collaged paper tag.
Break the pointed end off a cocktail stick so you have a flat end. Use this to apply dots of Gesso around the tag.
Not so easy to see in the photo above so let me get you closer ....

... hopefully you can see them better now.

Take a selection of Seth Apter/ Aladine Izink Dye Sprays. I used Turquoise, Seaspray, Honey and Tea.
Spray the collaged paper tag with colour.
Once the collage paper is covered with an initial layer of ink dry with a heat gun or leave to air dry before spraying more.
Then continue spraying and drying, building up colour for as long as you want.
Have fun, enjoy and just follow your creative instinct's as to when to stop.
Tip: You may want to put your tag in a box while you are spraying. This will help prevent any 'rogue' sprayed ink going everywhere!!!

Dry thoroughly with a heat gun or leave to air dry.
Take a very lightly dampened cloth and rub very gently over the inky colour.
As you rub you will see that the distress resist spray and gesso you applied before the inks has resisted the ink and those areas (after gently rubbing) are either far lighter in colour or white.

Spray one of the colours of ink you are using onto a glass matt. I chose Honey.
Pick up some of the ink with a paint brush
Hold the loaded brush over the tag, tap the brush to create some inky splatters.
Create as many splatters as you want by repeating the process.
I love splatters so always have to 'proceed with caution' as I have been know to get a little carried away!

Tear the top off a sponge scourer.
Apply PaperArtsy Snowflake Fresco paint ( or any other paint) to the scourer and stamp around the tag to create some tiny white speckle detail.

Apply some DecoArt Quinacrodine Gold around the edges of the tag.

Add some textured stenciling, as much or as little as you want .
I only did a little using Tim Holtz 'Grime Layering Stencil with Ranger Texture Paste tinted with Turquoise Izink Dye Spray.
With the large tag background now finished I moved on to the smaller tag....
This was to sit centrally on the large tag and I wanted the design on the collage paper to flow through the two tags seamlessly.

Lining up the collage paper design was key!

Here's the 'method' I used:
Roll out the collage paper and find the same part of the collage design used for the tag.
Cut that part away from the roll.
Position the #8 tag centrally on the #10 tag
Place the piece of collage paper over the #8 tag and line up the design with the design on the #10 tag beneath.

Take a spare #8 tag, place it directly on top of the #8 tag underneath the collage paper.
Draw round the tag with a sharp pencil.
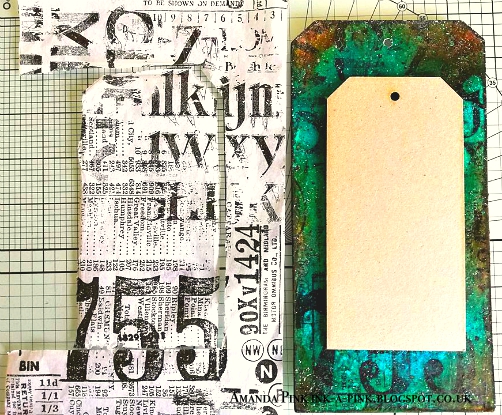
Lift everything off everything else and cut out the tag shape drawn on the collage paper.
It's worth just double checking at this stage that the collage paper design is continuous through the two tags before continuing.
Then repeat all the creative steps taken for the #10 tag.
Moving onto the focal feature...

Using Tim Holtz Steampunk Parts die and greyboard die cut 2 portholes.

Adhere the 2 portholes together.
Cover the 'porthole' with Pinflair Rust it!
Leave to dry.
When dry lightly catch the rough rusty surface with DecoArt Quinacrodine Gold and Patina Antiquing Cream.

Die cut a circle slightly larger than the porthole with heavy card stock. I used Seth Apters Steering Wheel die cutting away the inner part of the steering wheel.
(sorry the actual die did 'a runner' when it say the camera!)
Cover it with DecoArt Crackle Paint and set it aside for the paint to dry and the cracks appear.
When they have, add touches of colour using a few of the paints and inks used for the tags.
Lightly stamp the crackle die cut using a fine detail stamp. I used one of Seths from his PaperArtsy ESA13 stamp set.
Finally the embellishments...
Unfortunately, I can't tell you how I created these as they were made by either man or machine and they were rusted by natures elements. I call them my 'street swag' - rusty bits and pieces that I find when I'm out and about. I've gathered quite a collection over the years.

These are the ones from my collection that I thought would be great for my tag, along with the rusty porthole I created. I love how all the 'rusts' are so unique to themselves.
Oops, I forgot to include the rusty wire and the copper brads!
Sure you'll spot them in the few close up pics I'll now share of the rusty elements in situ....
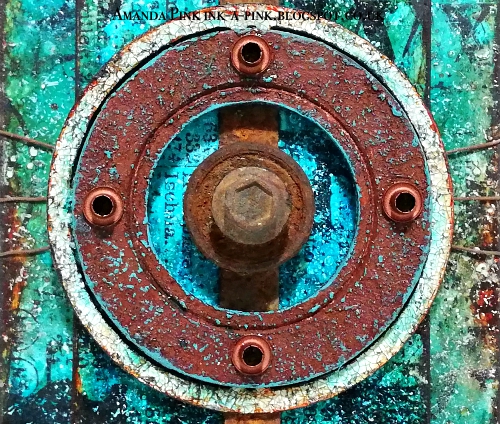
There's the copper brads embellishing the rusty porthole that frames the rusty hardware...

.... and the rusty wire wrapped around the large tag.

The rusty holed bar (don't know what its called in 'the trade') fastened down with a rusty winged nut made a great tag hanger.
I love finding and using rusty treasure like this in my creativity and often as I pick up 'the pieces' I catch myself thinking, sometimes saying out loud ....

Finders, Keepers!

I hope you have enjoyed your time here with me today and that maybe I have offered some creative inspiration.
Thank you so much for stopping by.
If you would like to join us in our Tag You're It! Challenge head over to the launch post where you will find all the details about the challenge and how to enter. There's also a fabulous gallery of inspiring tags created by some of our talented Creative Guides.
We would love for you to share your your Tag Creativity with us as we always look forward to seeing all the entries.
Wishing you all a lovely weekend.
Take Care, Stay Safe
and
Keep on Creating!
Amanda
x
Beautiful tag, great tutorial, thank you!
ReplyDeleteFabulous Amanda!
ReplyDeleteFantastically detailed tutorial, Amanda - love the rusty findings, and those amazing layers of background colour and texture. Great description of the resist process and also lining up the papers. And the finished result is, of course, spectacular.
ReplyDeleteAlison x
Absolutely love the depth of background colour you have achieved Amanda x Together with the dies and and rusty elements it’s pretty special x Thank You for sharing the process xx
ReplyDeleteAnnie x
Thank you LauraVi, Nikki, Alison and Annie. Your kind words mean alot and are greatly appreciated .
ReplyDeleteWow, thx for this tutorial
ReplyDeleteBest regards
Bernhard
Hope you enjoyed it Bernhard and that you gained some inspiration along the way.
DeleteThanks for your appreciation and for taking the time to atop by
Amanda x
Fabulous Tag!!!!!
ReplyDeleteThanks Wanda for your kind words and for stopping by .
DeleteAmanda x
Fell in love with this tag when first I saw it...and, after going through the tutorial, I can appreciate it for even more reasons. Tags have long been my favorite substrate, but it has been years since I have actually created on one. You may have just inspired me today!Thank you for all your dedication and time and, well, hard work to share this with us! Well worth it! Hugs!
ReplyDelete