This is a unique challenge blog where we are inspired by and focus on the Vintage; shabby; mixed-media; art journaling; industrial, timeworn and steampunk genres and encompass the talent, flair, expertise and ideas of many artists that we are inspired by. We welcome all types of projects - cards, journaling, assemblage, layouts, albums, atcs, altered art in fact whatever you want to share (as long as it is in good taste).

Monday, 3 October 2016

Last stop for the Destination Inspiration posts

Hi it's Brenda here with the last of the Destination Inspiration posts for this particular schedule. It's always good to summarise what we have done as a round up so here are the contents of our travel bag  ......... 
Product - Texture or Modelling Paste
Substrate - Fabric/Burlap
Colour - Autumnal / Fall colours - orange, brown, rust
Technique - Collage

........ and the Creative Guides who have already been travelling with these items and how they used them.


First up was Nikki with her fabulous burlap panel.
Next came Jennie with her pretty autumnal tag.
Third out of the bag was S@ndy and her great door decoration ...
and fourth was Jenny with her superb hessian covered canvas.

So now it's up to me to finish this five week month with a final travel bag destination inspiration project and dare I say it? It is a Christmas card.


I began by collecting together the items I wanted to use.
Colours of paints and sand texture paste.


Embellishments ...


... the hessian and mediums to use with it.


Cut the hessian to fit a card blank, seal the 'open' edges with fabric stiffener, this allows you to work with it without it fraying too much, then give it a light coat of the everlasting chalky paint.


Create the rust effects on the lanterns.
(Sorry these photos were taken with a daylight bulb and it's not the same as in natural light).

1. Apply the sand texture paste and heat dry.


2. Give random areas some watery wash of paynes grey.


3. Make some of the edges darker with carbon black.


4. Paint some burnt sienna in other random areas.


5. Repeat #4 with raw umber and paint a little titan buff onto the bowl of the left lantern. Up to this point you think you are never going to get a rusty effect.


6. Now comes the rust in a bottle - paint over a layer of quinacridone gold.


7. Bring it all together with a wash of paynes grey.


8. Finish with a coat of ultra matte medium to give it a non shiny surface. Now all of this is done I will make the lantern bowl shiny with a layer of liquid glass. It's always better to do too many and put the spares away for another day. They are bound to come in useful.


I have already added in ultra matte medium and liquid glass to the products, you'll also see a few added items on the finished card. Now time to assemble everything. 

Tie your floral/berry embellishments together .....


The lantern, I heated the liquid glass with a heat gun and let it bubble so that I had more the look of aged glass than brand new. ....


.... a cork sentiment which has been given a dirty wash of paynes grey and quinacridone gold mixed together.


You can see I added some dried flowers sprayed with tea dye distress stain and I mopped up the surplus with some cheesecloth and glued it behind the lantern with some patterned jute ribbon to add interest.


.... and there we are. I think I've gathered all the travel bag contents together, sand texture paste, fabric and hessian, autumn colours, orange, brown and rust and with all my elements collaged together onto the card. The Cambridge dictionary defines collage as - (the art of making) a picture in which various materials or objects, for example paper, cloth, or photographs, are stuck onto a larger surface. So although this is not my normal style of collaging it still meets the criteria.


Thanks to all the ladies who contributed one of the four contents to the travel bag which made up a brilliant challenge for us. We do enjoy making these DI projects so I hope you like looking and hopefully learning from them.

We will see you on Friday when the lovely Anne will be the hostess - now I wonder what sort of theme she has chosen???? Those of you who know her well will probably be able to guess lol. And don't forget you have till this Thursday evening to get your projects in for the 'create within a frame' challenge.

Have a fun and creative week.

hugs Brenda xxx


Friday, 30 September 2016

Tag Friday

Welcome everyone - it's TAG FRIDAY where the Creative Guides choose to create a tag of their own choice to share today. No theme or expectations other than we keep to the genres listed above and just have fun.

Just before we take a look at what everyone has made we are so pleased and excited to welcome home an AVJ family member I'm sure you know, it's our one and own Annie from Crafty & Curious Treasures back to share her amazing creative talents with us once again. It's so lovely to see you back amongst the fold Annie and thanks for stepping in with a tag for today.
Whilst we say hello to Annie we also say a sad farewell to Julie from Juliz Design Post, we will miss Julie tremendously with her wonderful shabby creations, luckily she will continue to blog but is stepping back from some DT work to have more time with her family and follow some new interests. Good luck Julie in all that you do and we hope you will be popping by to see us when you can.

Ok onto these wonderful tag creations from the truly talented Creative Guides today.

*********************************
Nikki

Tim Holtz Wildflower Tag
An earthy toned tag for me today started with some leftover paint on my craft sheet... lots of inkiness later and this is where I ended up! For all the details please pop over to Addicted to Art.


I love the colors of Fall & really enjoyed making this tag.  I got a chance to use my Distress Crayons and a few new techniques from the Creative Chemistry 103.   Hope you will stop by my blog for a visit My "Crafty" Life on the Internet.


I've inked up one of my mini Dina Wakley women for the first time, but otherwise this tag is pretty much lots of tried and tested favourites for me - blues & browns, lots of wild meadow grasses, and book page layers.  Do hop over to Words and Pictures to check out the details.


Astrid

I am trying to get into the right mood for Halloween, and so I dug out this quirky stamp by Teesha Moore... not that she is a witch exactly, I just love her hat. If you want to see more about how this tag came together, just visit my blog by clicking HERE


Brenda


Don't ask me where this came from!!! I was looking through my small tags box as I had it in my head I would add tags on tags for today's post, having found a couple I moved onto my rusty elements box, you know the place where you pop in anything left over or discarded from a previous project hoping it may come in useful another time. Well it worked for me as I found the Route 66 badge, the work 'explore' and the arrow all nicely rusted and worn looking. So I was off. If you would like to see the details and more photos of how I created the background and put it together, click my name above and you will be transported over to Bumblebees and Butterflies.


I have got rather hooked on using Distress Micro Glaze since I got back from my holiday experimenting with different types of background, including this resist technique I found whilst searching on Pinterest for some post holiday inspiration. Do join me over at Live The Dream if you would like to find out more about the technique.


Since Halloween is one of my favourite times of the year and I have got some new
Tim Holtz goodies to play with, I made a Halloween tag.  You can see more over at my blog.


  Annie

Hi everyone............I can't begin to tell you how thrilled I am to be back here amongst my AVJ family and friends xxxx My tag was inspired by a recent Andy Skinner show on HOCHANDA. If you would like to view more details then please click on my name above, to be transported to my blog.

Looking forward to catching up with all of you over the next few weeks, when I am inspired by the amazing entries to the AVJ Challenges. Hugs Annie xx

......................................


Thanks everyone for your fabulous creations, such a fabulous range of styles and creative ideas.

As it's a five week month here at AVJ you will have another Destination Inspiration post on Monday before another new challenge begins next Friday - can't wait for you to see the inspiration projects for this one. Also you still have till Thursday night (BST) to get yourself into the current challenge
'Create within a Frame'. We have some amazing entries this month again and love looking at what you show us. So do pop over and join us.

Have a wonderful weekend whatever you have planned.

hugs Brenda and The Creative Guides. xxxx

Monday, 26 September 2016

Destination Inspiration - Terminal Four

Hi everyone and welcome! Well we've already had some fantastic projects from Nikki, Jennie and Sandy. Now it's Jenny here reporting for duty. So here we are, arriving at our fourth terminal for this month's Destination Inspiration and it's my turn to create with the contents of the travel bag this month.

Just as a reminder, this is what's in the suitcase:

Product - Texture or Modelling Paste
Substrate - Fabric/Burlap
Colour - Autumnal / Fall colours - orange, brown, rust
Technique - Collage

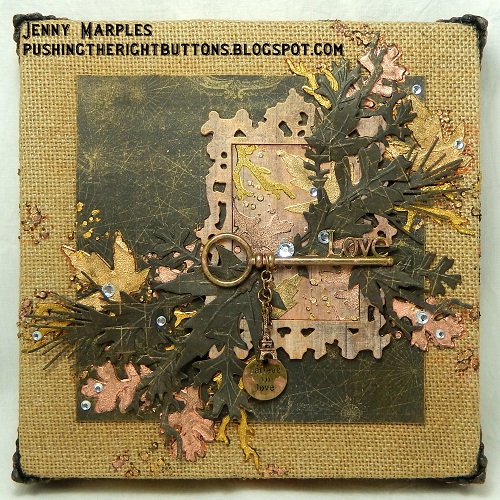
And here's the canvas I came up with...


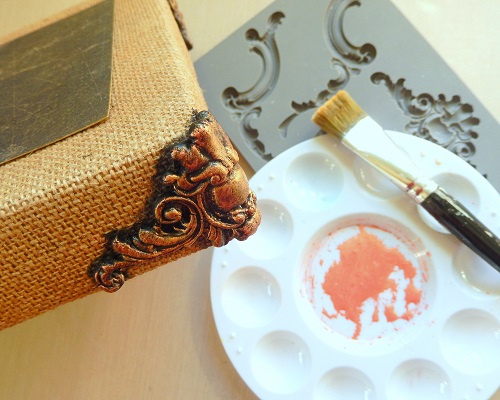
This is an 8x8 canvas and I had to start by covering it in a piece of burlap. Anyone who has tried covering a deep sided canvas will know that the corners are the tricky bit,especially when the fabric used is thick and I decided to make mine more presentable by using Prima paper clay and an IOD mould to create bespoke trims. Painted with black gesso and dry brushed with IndigoBlu gold and coral Luscious pigment powders they worked a treat.


I adhered an old piece of Prima 6x6 paper with glue to the centre of the canvas and used Tim Holtz new Autumn Layering Stencil (in it's mini version) to add black embossing paste foliage across the top and down the sides. The Luscious pigment powders were used to colour them, this time with the addition of the bronze option, to add a gentle Fall palette and a touch of shimmer.


Now for a spot of collage - I added a die cut Ornate Frame and centre covered with more of the coordinating Prima paper and a brush of Luscious. You'll notice I repeated the stencilling/colouring with more Autumn foliage in the centre of the frame. Yet more Autumn Foliage was die cut and embossed with Tim Holtz Thinlits set and layered on top of the stencilled leaves. This really helped to bring the design to life and add a sense of depth.


The canvas was completed with the addition of some metal embellishments and crystal drops in keeping with the soft Fall look and colour palette. Here are some close up photos so you can see more of the detail;


So now you've had four creations using this month's travel bag. Make sure you come back next week to see the final Destination Inspiration from another of the Creative Guides and in the meantime there's still time for you to enter our current challenge 'Create Within a Frame'.

Have a fantastic week ahead and take care of yourselves.
Jenny xxx

Friday, 23 September 2016

We have a new guest Creative Guide -

Welcome everyone, it's our special invited guest week and we have the amazing Mark Gould with us today. Mark tours the country and venues teaching his amazing projects and loves the grungy style. So let's take a look at what he has made especially for our Create Within A Frame challenge.

**************

Morning all, Mark here and I am so happy and honoured to have been asked to be the guest designer for the Create Within a Frame challenge set by Julia this month. There is still about two weeks for you to take part.

I still class myself as a newbie to the craft industry and it's been an amazing and whirlwind experience and I'm loving every minute! I live in London and am a landscape gardener by day, but after a quick change into my cape I love nothing more than getting creative in my man cave - (with the help of my 2 cats of course).
My style has been influenced by many things including music, art and sculpture. I love mixed media and seeing how I can be as innovate as possible with colour and texture.
( I got my gf to write this as I'm no good at writing about me ;) )


*****


For this challenge I decided to go down the Shabby Chic route and up cycle one of the iconic Ikea Mirrors using Decoart's Chalky Finish paints and waxes along with their Media fluids and Media modeling paste.


I used a heat gun to gently melt the glue holding the mirror in and popped it out, Next the frame was given a coat of Decoart Media Gesso.


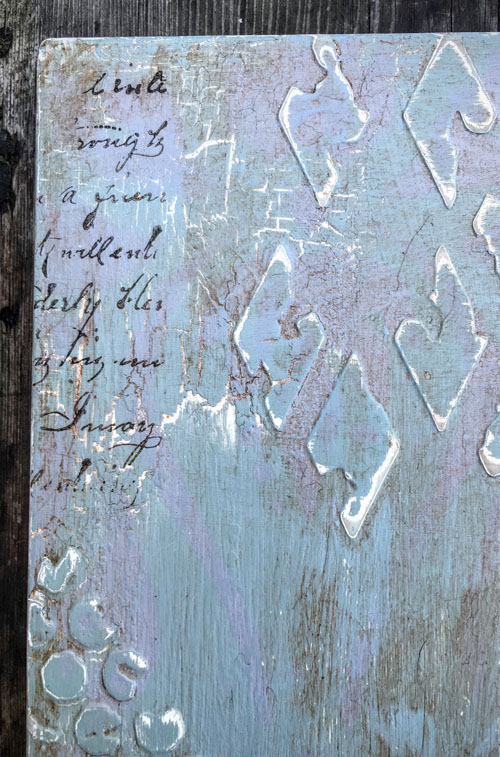
Using various stencils from Tando-Creative and some modeling paste I added some detail in random places around the frame.


Once the paste is dry the whole frame was painted with Decoart chalky finish Everlasting, I gave it two coats for a nice solid colour.
I also added some Chalky finish crackle medium  in a few spots, You can just make it out as the shiny spots on the frame.


Once the crackle medium is dry I applied a coat of chalky finish Vintage, the colour doesn't quite show up in this light but its a subtle duck egg green colour. You can see where the crackle medium is working as the white paint is showing through.
At this stage I added some very subtle stenciling using a baroque pattern and the light grey chalky finish Yesteryear.
Using a fine grade sanding block/paper gently start sanding across the textured areas and edges of the frame to create a distressed look.


To finish the frame off and to give it more of an aged look I applied a coat of the chalky finish clear cream wax, left to dry and then applied a coat of the dark wax. Once the dark wax is applied take some kitchen roll and start to wipe back to achieve a look you are happy with. At this stage it's best to work light and build up layers of the dark wax instead of going heavy straight away. 
I also added some stamping using a vintage script stamp from Stampendous and some dark brown Stazon ink.


For the inside of the frame I used a 4 inch canvas board and stamped it with a vintage cockerel stamp and some black stazon. 
I added colour by adding colour washes of Decoart Media Fluids,A watered down base of Transparent Yellow Oxide was left to dry to give an aged base and washes of  Pyrrole Red and Green Gold were added allowing each stage to dry first so as not to muddy the colours.
The canvas board was then sealed with some Matte Medium and then given a coat of Decoart One Step Crackle.
The aged effect was finished off with some Raw umber Antiquing cream to age the cracks.


Same frame, this time I added an old Bisque tile I painted as a coaster a few years ago.

Thank you so much to Brenda and the amazing team here at A Vintage Journey for having me play along. The projects I have seen so far have been beautiful and I look forward to seeing more of you playing along in this months challenge.
And thank you for stopping by and having a look at what I have created xx.

***********

Wow, don't you just love Marks's grungy shabby style and the effects he has created and I love the contrasting coasters in the middle. Mark resides at Spesh Ink blog and there can be found many wonderful samples of his fabulous projects and his class list. I have to say I am really proud to be teaching alongside him and Andy Skinner in Coventry this November, so if you are booked on you'll get to take a class with him and be wowed with what he makes. In the meantime it would be lovely if you could pop over to visit his blog.
Thanks for being such a great guest Mark, see you soon.

*****

As Mark said you still have a couple of weeks to enter the challenge and it would be wonderful to see you there if you are not already. We have had lots of amazing projects entered and don't forget a frame can be as simple as a doodled line, a mount or a proper bought frame, there are lots of ways to interpret it.

It is also a five week month for us so you get an extra Destination Inspiration post and next Friday is Tag Friday when we get to have fun creating a tag in any theme or way we want, so I hope you will come back again every Monday and Friday to see what awaits you.

Have a wonderful weekend.

hugs Brenda, Mark and the Team xxxx


Monday, 19 September 2016

Destination Inspiration - Arriving at Terminal 3

Hi fellow travelers and welcome to Terminal 3.  We've already had some fabulous inspiration this month from Jennie and Nikki.  Before we get started let's see what we have to work with in the travel bag.
Product : Texture or Modelling Paste
Substrate : Fabric/Burlap
Colour : Autumnal/Fall Colours (orange, brown, rust)
Technique : Collage
I'm sure you will agree that Jennie and Nikki have really risen to the challenge with these beautiful collages.


Now that we have arrived at Terminal 3 - let's see what we have:
 Today I'm sharing a fun way to celebrate the coming season with a door decoration that is easy to make and brings those fall colors into your home. 

Here's how it came together - 

I just got some new Tim Holtz Mini Stencils so wanted to give them a try. Using modelling paste, I first stenciled the designs on some burlap squares and let it dry. 

Next came the fall colors from sprays, I used some Lindy's Stamp Gang and some Memory Mists.  These sprays are die based so as the burlap soaked up the color it also lightly colored the modelling paste.  I really like the monochromatic effect this gives.
Next came the selection of the rust colored ribbon.
I used hot glue to attach the panels to the ribbon leaving a loop at the top for hanging on the door knob.
Next step was to select the embellishments I wanted to use.  I decided on a pumpkin for one panel using an Elizabeth Craft Designs Die.  After cutting it from manila paper, I embossed the top section with gold embossing powder then glued the two pieces together.  When the glue was dry I colored the pumpkin with Copic Markers.
Next came the leaves using the same die.  I colored two leaves green to go with the pumpkin (not shown) and the rest of the leaves are colored with Distress Inks using Fossilized Amber, Carved Pumpkin and Vintage Photo.

I embossed some of the curly stems from the die set using gold embossing powder. Then I tied a bow with some orange and white twine.


For my final decoration I selected some tree branches using the Halloween Scene from Karen Burniston.  I used some rust colored paper and added some Frayed Burlap Distress Ink to darken it.


I simply arranged decorations and glued in place. 

I hope you have enjoyed this stop on our Journey.
Happy Fall,