

Hello Everyone!
Jennie here today to share with you some ideas for some mini art ticket strips which are both fun to make and fun to use on your atcs, cards, tags and mixed media journal pages.
 Back in 2013 Tim shared a project for Mini Masterpieces using Journalling Tickets and the "concept" has been in my mind ever since. You can see the full tutorial here as to how Tim made and then used his tickets.
As usual my take is very different! As a user of stamped tickets in pretty well all my projects I wanted something a little smaller.

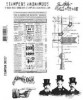
I started by cutting some strips of tickets using the mini-ticket die and plain cream cardstock. I was a child who loved to make postage stamps using my Nana's old sewing machine so already I was getting excited ! I had a good look through my stamps and gathered together a pile of small(ish) stamps and a palette of Distress Inks: Antique Linen, Fired Brick, Gathered Twigs, Peeled Paint, Walnut Stain, Faded Jeans and Salty Ocean.

And this is the process: at the top you will see that I have used post-it notes to mask out the adjoining tickets. I started with a background stamp in Antique Linen and then started layering other images over the top. Once I had a design it was quick and easy to work along the ticket strip. Finally I edged each strip with some Walnut Stain Distress Ink.

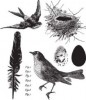
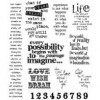
Here are some of my other ticket strips using Tim's stamps - I am are you will recognise them!

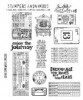
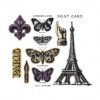
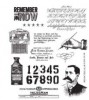
I also used some larger stamps which initially I thought would be too big for these mini tickets, but as Tim's stamps have the design printed on the back of the stamp it was easy to determine whether they would fit the ticket and where to place them.
Again I am sure you will recognise these fine gentlemen and of course the top of the Effeil Tower.

By this time I had spent time trawling through ALL my stamps and found that quite large flower stamps could be easily stamped in the little space. I stamped these designs in Ranger Arcival Black Ink and then painted the design with Distress Inks.

I love painting with Distress Inks - I just squish a two or three colours on the craft mat and spritz with a little water and layer the colours over each other. The colours blend beautifully with very little effort.

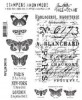
The one thing I have done is to stamp each ticket with a background stamp even though the overstamped design was quite detailed. It isn't very visible but it is amazing how effective having something in the background is. I found this text stamp from the Mercantile set just perfect - not too large - and of course Antique Linen Distress Ink is just perfect.

Well I do hope that has given you some ideas for using your ticket strip die and I am looking forward to using these little tickets on future projects. But be warned - it does get a little bit addictive !!
Have fun!
Jennie

Wonderful idea, love all of your tickets! Thanks so much for sharing your technique.
ReplyDeleteSuch a lovely ides and the tickets look fab! I love the gentleman and the floral one!
ReplyDeleteHow fun! I love how you have used all kinds of stamps on such a great background! Love all your colors - these will be fabulous ephemera on future projects. xx Lynn
ReplyDeleteThank you Jennie for sharing such wonderful ideas with us. Makes me look at my dies and stamps in an new and fun way.
ReplyDeleteLoved seeing all your clever ideas.
Hugs, Sandy xx
These are such fun Jennie, what great little tickets they are. Your inspiration is fabulous, I need to dig out some little stamps as I own this ticket die. Thanks so much for this x
ReplyDeleteOh Jennie, this is brilliant!!! I totally adore your tickets, the stamped layers look fantastic and the variety of stamps you used and put together looks just wonderful! In fact I loved this so much, that ticket die (which I had been considering for a while) fell straight into my basket..... Now I can't wait to see how you are going to se them on your projects...
ReplyDeleteWow Jennie, what a great idea! I have that ticket die and rarely use it, but I will now! Thank you for the wonderful inspiration, the end results are superb. Anne xx
ReplyDeleteVery inspiring tutorial Jennie :-) your tickets are fantastic and can be decorated in so many ways. Thank you for sharing this great idea.
ReplyDeleteHuge hugs Annie x
What a delightful tutorial Jennie! I have this ticket die and I've just never pulled it out to use - now I'll be looking through my stamps and trying this wonderful technique - thanks for sharing this lovely design idea!
ReplyDeleteI can see how this would be quite addictive & although I don't have a ticket strip die to use I do have something that would work....I'm think I might manage a play this afternoon!
ReplyDeleteNow that's what I call inspiration! So creative, a fabulous idea Jennie. Nikki xx
ReplyDeleteTotally brilliant idea, love your inspirational tickets.
ReplyDeleteJulie x
I agree! Fantastic ideas!
ReplyDeleteThese are definitely fabulous!
ReplyDeleteThat is a lot of AWESOMENESS going on there, That is so neat, can't wait to try it, now do I have the die, immmmm, better go check.
ReplyDeletewhat a great idea!!! love the stamps you chose - they really make a simple ticket shape amazing!
ReplyDeleteI'm in love with this very unique idea! Thank you!
ReplyDeleteWow! Love it. Now I need to go buy this die cut.
ReplyDeletethese are really great!! I'm inspired! =)
ReplyDeleteSuch fabulous ideas! Love them all. I now need a big shot more than ever so I can get that die and have a go! lol. x
ReplyDeleteWhat a brilliant idea! Love them.... and will be looking out for them now on future projects! Ruth x
ReplyDeleteA fantastic idea Jennie! This looks like such a fun idea to create and I can't wait to see how you use yours. Thanks so much for sharing. Jenny x
ReplyDeleteCompletely clever and wonderful little works of art, Jennie!! AND OMG--I have that Tim strip die!! WOO-HOO!! Fabulous idea!! XOXO-Shari
ReplyDeleteWow Jennie, you are a mind reader! I was sorting through my dies and looking at the film strip, which I use quite a lot but have never used the tickets, when up pops your tutorial. Inspiration!!! Thank you for sharing your ideas, love it Jan x
ReplyDeleteWonderful Jennie, I love your mini ticket strips ! Toni x
ReplyDeleteI really love these, Jennie - brilliant stamping, and so much fun. You set me off looking for the ticket die straight away (and then I told myself to get a grip and cut them myself!!). Fabulous tutorial and a great stock of ephemera that I look forward to spotting on futures creations.
ReplyDeleteAlison xx
What a great idea! I am stealing, um, I mean borrowing this idea for future projects! Thank you for sharing such an inspiring post!
ReplyDeleteOh, I remember when there was a ticket craze online! I had such fun stamping them then and now want to go and do it again. Thanks for this terrific tute, Jennie.
ReplyDelete