
Hello everyone and thank you for stopping by, it's Deb here today with the third stop on our Destination Inspiration journey for November. If you recall our travel bags are packed with the following contents:
and you can check out what Tracy and Alison already created for us this month by clicking here and here.
For my Destination Inspiration project I decided to make a cover for my current art journal. I had to deconstruct my journal as it was getting very chunky and I needed a cover so I could bind the completed pages back together again.

I added a secret interactive element to my journal cover as well, the butterfly lifts up to reveal the completed sentiment that I wrote.

I started out with a piece of corrugated cardboard packaging cut slightly larger than my art journal pages. I tore a bit of the backing paper off of one side to reveal the corrugations below for some texture (and my apologies for the glare in these photos!).

To incorporate the patterned paper and altered paper technique, I took some Tim Holtz papers and Melange tissue wrap and coated them with resin, sprinkling on some Distress Glitter as it dried. The brown paper at the top of the photo was the unbleached paper towel that I used to clean up and I loved it's translucency so decided to use it as well. I had some extra resin left over so filled a couple of jewelry bezels with seed beads and resin to be used on some future project.
The corrugated cardboard cover was painted with gesso and then dragged through a puddle of Rusty Hinge and Antique Linen Distress stains on my craft sheet to satisfy the orange/rust colour component of the travel bag.

A variety of patterned papers were then torn into pieces and adhered here and there onto the journal cover.
I loved that wonderful resin butterfly image and decided to frame it with some copper wire. I then started to contemplate how I could make it into an interactive component that could be moved or opened to reveal a secret. Could I make a wire hinge that would allow the framed butterfly to be lifted up? Well, yes I could! I cut two short lengths of copper wire and curled them around a bamboo skewer.

I then twisted more wire together to make a frame for the resin butterfly image and attached one of the curled hinges to the frame. The other curled hinge was meshed together with the hinge on the frame and short piece of copper wire was threaded down the center of the two hinges to join them together.
The resin butterfly was then adhered onto the copper frame with E6000 glue and set aside to dry thoroughly. Once dry, the assembly was adhered to the journal cover and the hinge covered up with some strips of patterned paper.

More texture was added to the journal cover by applying some Wendy Vecchi Crackled texture paste here and there through Tim Holtz's mini layering stencils Burlap and Nordic.

The texture paste was coloured with Distress crayon in Rusty Hinge and Vintage Photo once dry and then the cover was stamped randomly with Vintage Photo Archival ink and stamps from Tim Holtz's MM101 Clear Stamp set.
The translucent resin paper towel reminded me of amber glass and to enhance that illusion, I coloured it with some Butterscotch alcohol ink, adding and subtracting the ink with Alcohol Blending solution.

And then in my usual style, I got on a roll and forgot to take any more in process pictures, apologies yet again! Three small frames were die cut with Tim Holtz's Stitched Rectangle die from kraft cardstock, the centers were cut out and the faux amber glass paper was sandwiched in between to make a window. The word 'seek' was stamped onto tissue paper and adhered to the journal cover and the faux amber glass window was positioned over top.
I wrote the word 'an' on tissue paper with a Zig brush marker and adhered it with Distress Matte collage medium. My brush lettering skills are suspect at best and I was worried I'd muck it up if I tried to write it directly onto the cover.
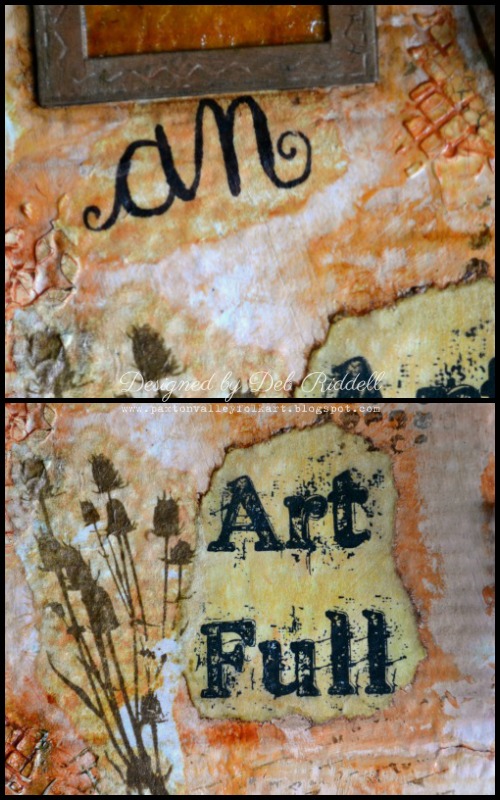
'Art Full' was printed out onto copy paper (the font is called Old Printing Press), the edges were torn around the sentiment and it was adhered underneath the resin butterfly interactive element. Some wildflowers were stamped onto tissue paper and adhered with matte medium here and there on the cover.
And to complete the sentiment, 'Life' was stamped onto tissue paper with Tim Holtz's Worn Text stamp set and adhered to the bottom of the journal cover. The edges of the cover were coloured with Walnut Stain Distress paint, some glue stick was lightly applied over top of the dried paint and gold Deco Foil was pressed into the wet glue for a random gilded edging to the journal cover.

And finally, a small manila tag was clear embossed with this great stamp from Tim Holtz's Phrases 2 Clear Stamp set, the tag coloured with Vintage Photo and Ground Espresso Distress inks and then fastened in place with a Custom Fastener.
Thanks so much for stopping by today and I hope that you have enjoyed seeing how I used the contents of our November Destination Inspiration travel bag. We have one more stop in our journey this month so be sure to stop by next Monday when Astrid will be here to bring our travels to a close. And there is still time for you to join in our Cracked Up November challenge so break out those crackle mediums, stencils and stamps and get cracking! Happy creating,
Deb xo
Product: Patterned Paper
Technique: Altered Paper Techniques
Colour: Orange/Rust
Substrate: Notebook or Journal Cover
and you can check out what Tracy and Alison already created for us this month by clicking here and here.
For my Destination Inspiration project I decided to make a cover for my current art journal. I had to deconstruct my journal as it was getting very chunky and I needed a cover so I could bind the completed pages back together again.
I added a secret interactive element to my journal cover as well, the butterfly lifts up to reveal the completed sentiment that I wrote.
I started out with a piece of corrugated cardboard packaging cut slightly larger than my art journal pages. I tore a bit of the backing paper off of one side to reveal the corrugations below for some texture (and my apologies for the glare in these photos!).
To incorporate the patterned paper and altered paper technique, I took some Tim Holtz papers and Melange tissue wrap and coated them with resin, sprinkling on some Distress Glitter as it dried. The brown paper at the top of the photo was the unbleached paper towel that I used to clean up and I loved it's translucency so decided to use it as well. I had some extra resin left over so filled a couple of jewelry bezels with seed beads and resin to be used on some future project.
The corrugated cardboard cover was painted with gesso and then dragged through a puddle of Rusty Hinge and Antique Linen Distress stains on my craft sheet to satisfy the orange/rust colour component of the travel bag.
A variety of patterned papers were then torn into pieces and adhered here and there onto the journal cover.
I loved that wonderful resin butterfly image and decided to frame it with some copper wire. I then started to contemplate how I could make it into an interactive component that could be moved or opened to reveal a secret. Could I make a wire hinge that would allow the framed butterfly to be lifted up? Well, yes I could! I cut two short lengths of copper wire and curled them around a bamboo skewer.
I then twisted more wire together to make a frame for the resin butterfly image and attached one of the curled hinges to the frame. The other curled hinge was meshed together with the hinge on the frame and short piece of copper wire was threaded down the center of the two hinges to join them together.
The resin butterfly was then adhered onto the copper frame with E6000 glue and set aside to dry thoroughly. Once dry, the assembly was adhered to the journal cover and the hinge covered up with some strips of patterned paper.
More texture was added to the journal cover by applying some Wendy Vecchi Crackled texture paste here and there through Tim Holtz's mini layering stencils Burlap and Nordic.
The texture paste was coloured with Distress crayon in Rusty Hinge and Vintage Photo once dry and then the cover was stamped randomly with Vintage Photo Archival ink and stamps from Tim Holtz's MM101 Clear Stamp set.
The translucent resin paper towel reminded me of amber glass and to enhance that illusion, I coloured it with some Butterscotch alcohol ink, adding and subtracting the ink with Alcohol Blending solution.
And then in my usual style, I got on a roll and forgot to take any more in process pictures, apologies yet again! Three small frames were die cut with Tim Holtz's Stitched Rectangle die from kraft cardstock, the centers were cut out and the faux amber glass paper was sandwiched in between to make a window. The word 'seek' was stamped onto tissue paper and adhered to the journal cover and the faux amber glass window was positioned over top.
I wrote the word 'an' on tissue paper with a Zig brush marker and adhered it with Distress Matte collage medium. My brush lettering skills are suspect at best and I was worried I'd muck it up if I tried to write it directly onto the cover.
'Art Full' was printed out onto copy paper (the font is called Old Printing Press), the edges were torn around the sentiment and it was adhered underneath the resin butterfly interactive element. Some wildflowers were stamped onto tissue paper and adhered with matte medium here and there on the cover.
And to complete the sentiment, 'Life' was stamped onto tissue paper with Tim Holtz's Worn Text stamp set and adhered to the bottom of the journal cover. The edges of the cover were coloured with Walnut Stain Distress paint, some glue stick was lightly applied over top of the dried paint and gold Deco Foil was pressed into the wet glue for a random gilded edging to the journal cover.
And finally, a small manila tag was clear embossed with this great stamp from Tim Holtz's Phrases 2 Clear Stamp set, the tag coloured with Vintage Photo and Ground Espresso Distress inks and then fastened in place with a Custom Fastener.
Thanks so much for stopping by today and I hope that you have enjoyed seeing how I used the contents of our November Destination Inspiration travel bag. We have one more stop in our journey this month so be sure to stop by next Monday when Astrid will be here to bring our travels to a close. And there is still time for you to join in our Cracked Up November challenge so break out those crackle mediums, stencils and stamps and get cracking! Happy creating,
Deb xo
Such a fabulous cover Deb, - brilliantly put together! The little hinge and frame is just genius. Love all the different elements you used for your cover, great use of those travel bag ingredients!!
ReplyDeleteThis is BEAUTIFUL Deb! I adore the whole collage look and the clever use of textures including that resin framed butterfly. A genius way of using the travel bag contents and having something so wonderful to look at every day xx
ReplyDeleteLoving your journal cover Deb x the details on the travel pag contents have resulted in a fabulous creation to be treasured. Great step by step
ReplyDeleteTfs and hugs Annie xx
A wonderful journal cover Deb!!! Fabulous use of the travel bag contents and in particular your little metal frame around the butterfly is just adorable. Jennie x
ReplyDeleteWhat a great journal cover you created Deb - Wonderful techniques used - thanks for explaining them in detail! Love the secret door design! Julia xx
ReplyDeleteLots of inspiration and love the cover of the journal you created.
ReplyDeleteHugs
Linda xxx
The resin covered butterfly is an absolute delight Deb in the beautiful copper wire frame, love that you created a secret door - so clever! Great use of the contents of the travel bag... Anne xxx
ReplyDeleteOooh what amazing colours you have achieved and I love the little frame! Really clever xx
ReplyDeleteBeautiful.
ReplyDeleteWonderful journal cover! Deb Great interactive touch and the faux amber glass is lovely. Such creative use of all the goodies x
ReplyDeleteLovely textural cover Deb, love how,you framed the butterfly to create a spotlight. Creative use and combination of the goodies this month. Tracy x
ReplyDeleteCompletely fantastic, Deb - I love those resin-altered pieces of tissue, and the faux amber is brilliant - gorgeous!
ReplyDeleteAlison x